| Active with remarks |
|---|
| This application needs additional settings. Please follow the documentation below to create your own connectionUnique, active service acces point to a network. There are different types of connections (API key, Oauth…). More. |
The Sendcloud modulesThe module is an application or tool within the Boost.space system. The entire system is built on this concept of modularity. (module - Contacts) More allow you to watch, create, list, retrieve, and delete the parcel, returns, invoices, brands, and integrations in your Sendcloud account.
Prerequisites
-
A Sendcloud account
In order to use Sendcloud with Boost.spaceCentralization and synchronization platform, where you can organize and manage your data. More IntegratorPart of the Boost.space system, where you can create your connections and automate your processes. More, it is necessary to have a Sendcloud account. If you do not have one, you can create a Sendcloud account at sendcloud.com.
To connect your Sendcloud account to Boost.space Integrator you need to obtain the API Key from your Sendcloud account and insert it in the Create a connection dialog in the Boost.space Integrator moduleThe module is an application or tool within the Boost.space system. The entire system is built on this concept of modularity. (module - Contacts) More.
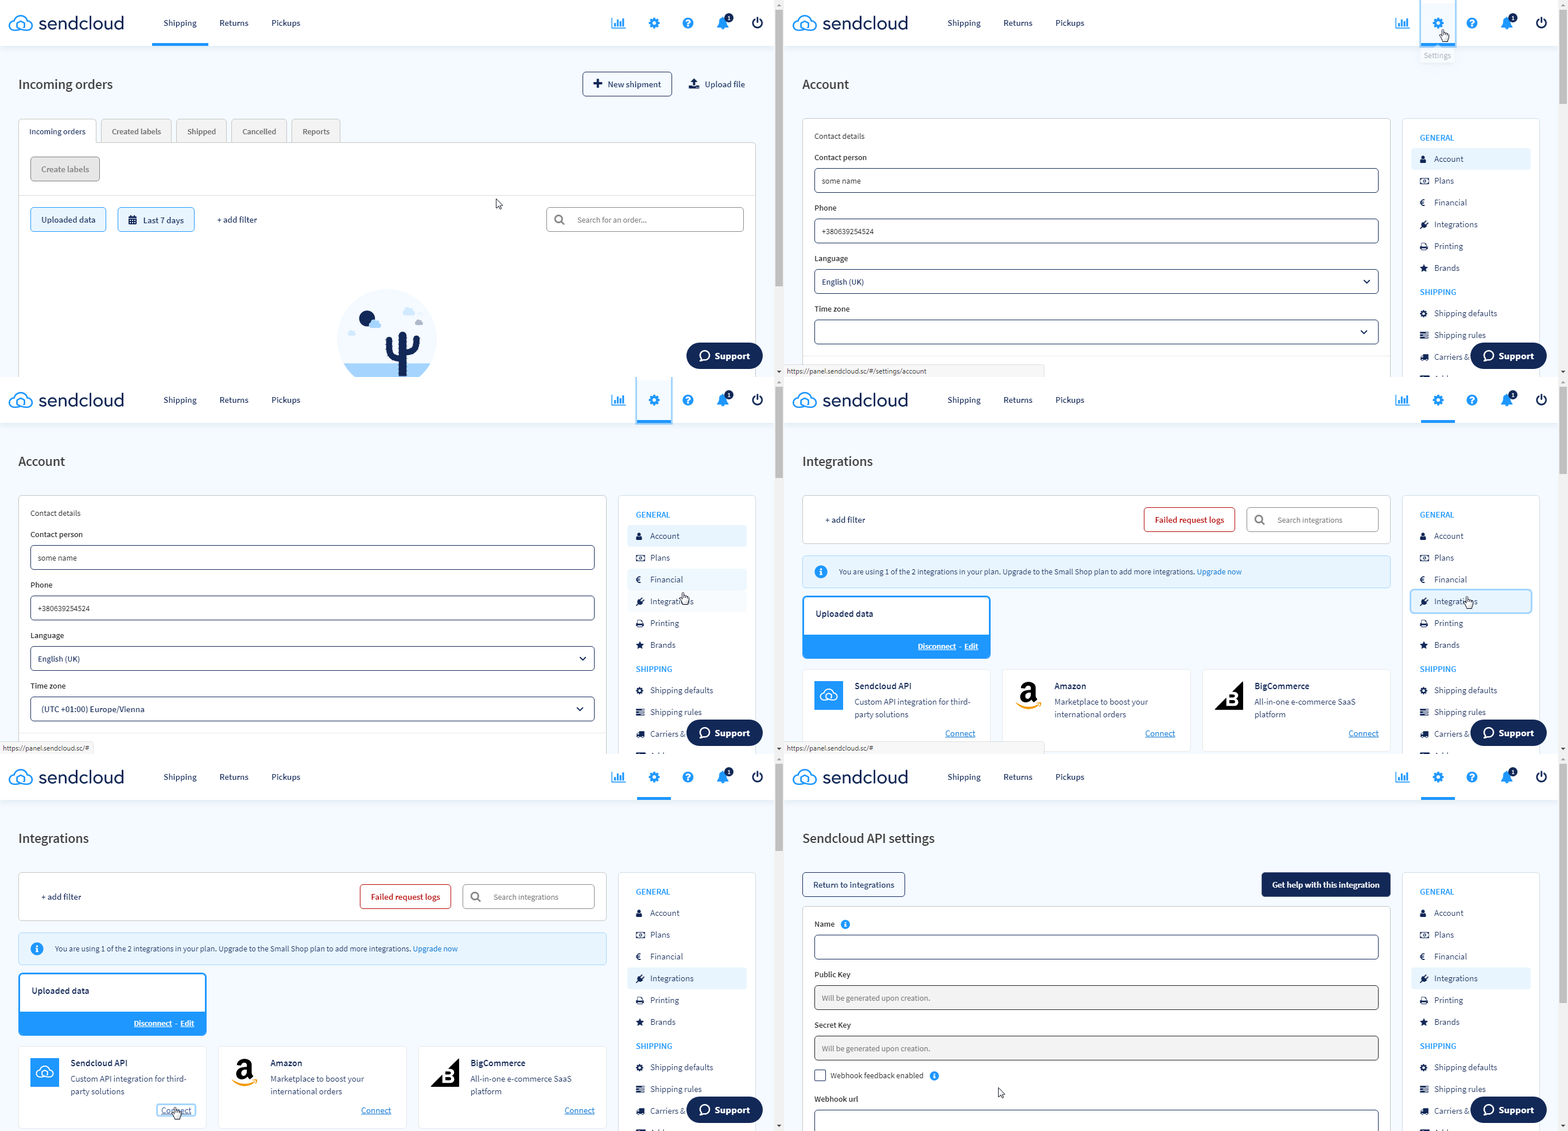
1. Log in to your Sendcloud account.
2. Click Settings ( ) > Integrations > Sendcloud API.
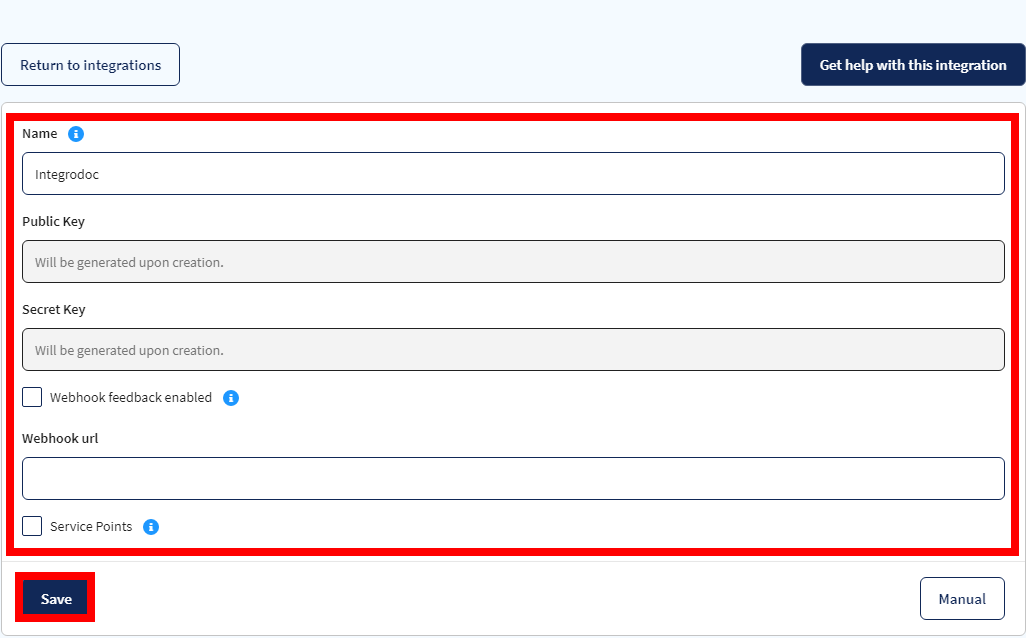
3. Enter a name for the API and click Save.
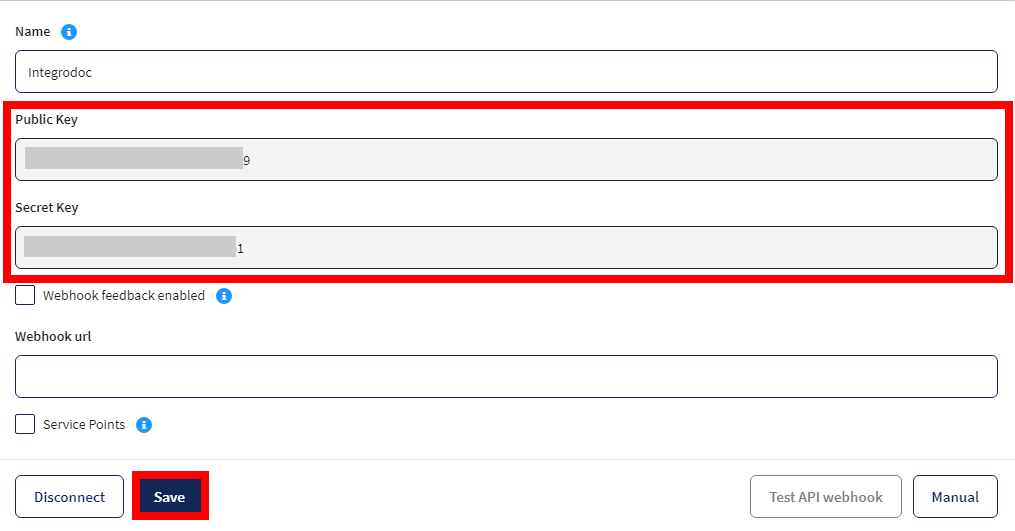
4. Copy the Public Key and Secret Key details to a safe place and Click Save.
5. Go to Boost.space Integrator and open the Sendcloud module’s Create a connection dialog.
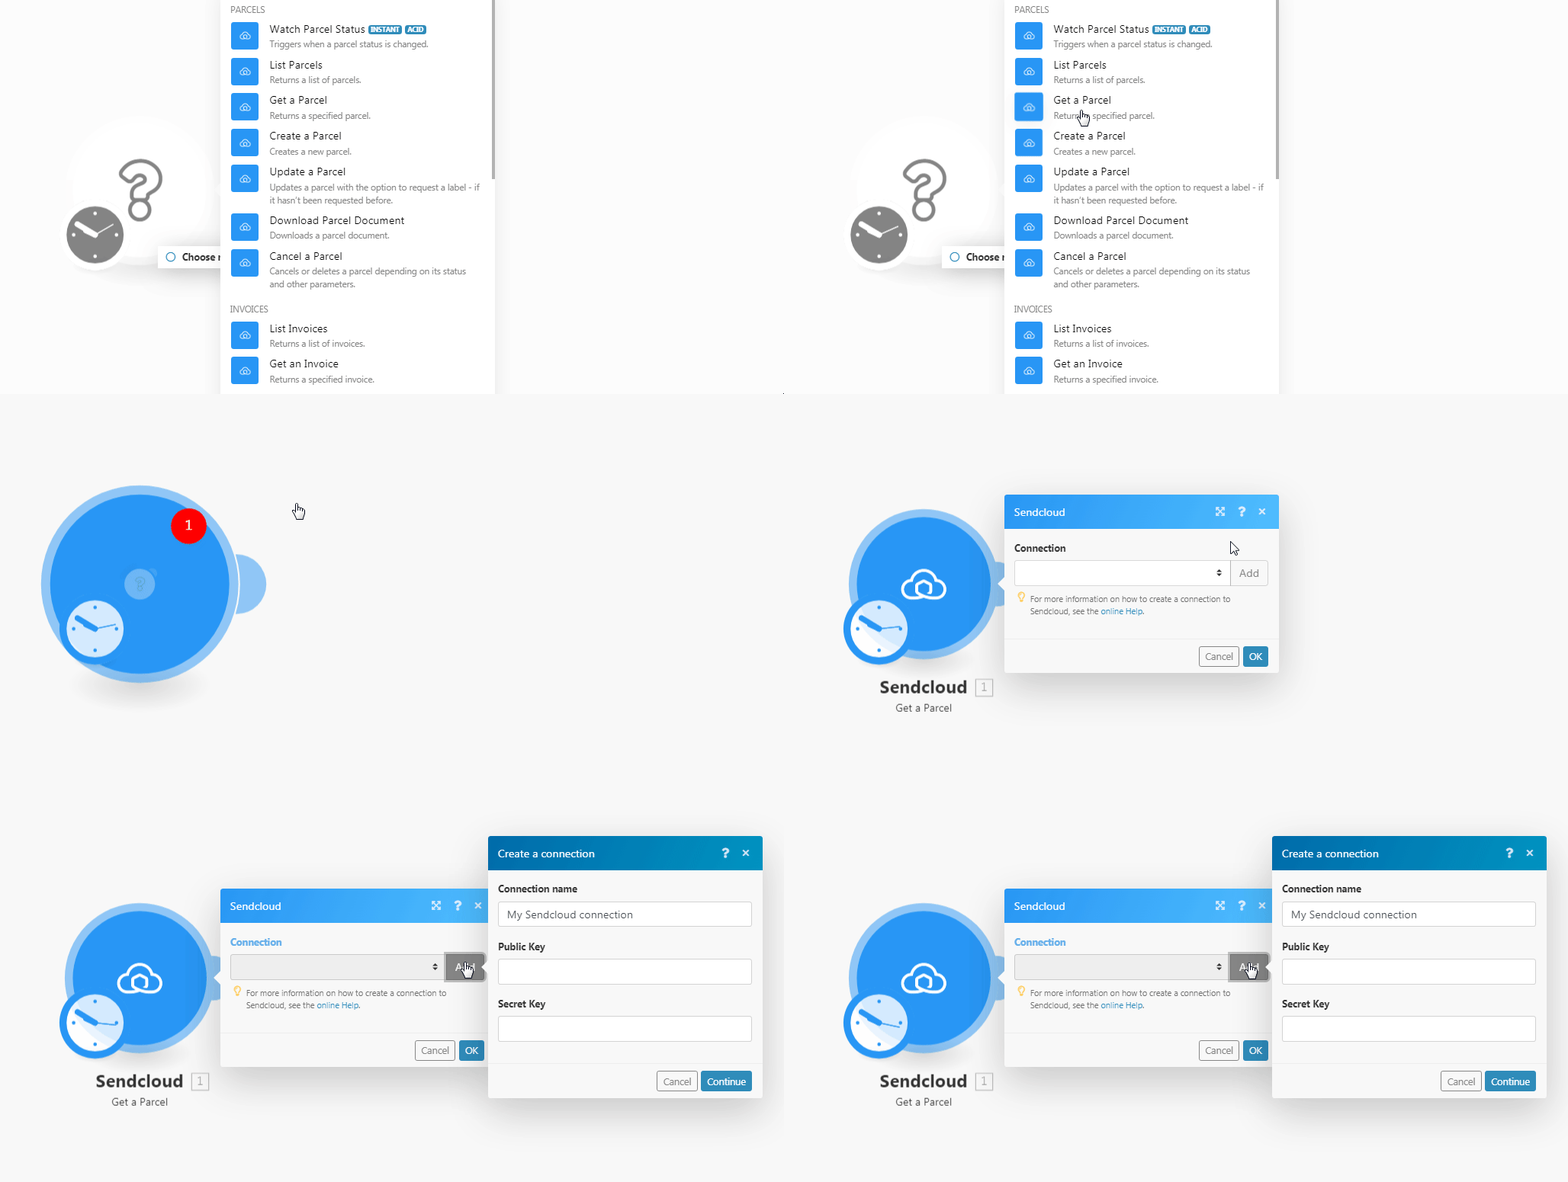
6. In the Connection name field, enter a name for the connection.
7. In the Public Key and Secret Key fields, enter the details copied in step 4 respectively, and click Continue.
The connection has been established.
TriggersEvery scenario has a trigger, an event that starts your scenario. A scenario must have a trigger. There can only be one trigger for each scenario. When you create a new scenario, the first module you choose is your trigger for that scenario. Create a trigger by clicking on the empty module of a newly created scenario or moving the... when a parcel statusCreate statuses for each module separately to create an ideal environment for efficient and consistent work. More is changed.
|
WebhookA webhook is a way for an app to send real-time information to a specific URL in response to certain events or triggers. Name |
Enter a name for the webhook. |
|
Connection |
See Connecting to Sendcloud Webhook using Boost.space Integratorto add the webhook to your Sendcloud account.
Returns a list of parcels.
|
Connection |
|
|
Parcel Status |
Select the parcel status whose details you want to list. For example, |
|
Tracking Number |
Select the parcel tracking number to list the parcels with the specified number. |
|
Order Number |
Select the parcel’s order number whose details you want to list. |
|
Announced After |
Enter the date to list all the parcels announced after the specified date. See the list of supported formats. |
|
Updated After |
Enter the date to list all the parcels updated after the specified date. See the list of supported formats. |
|
Parcel IDs |
Select the Parcel IDs whose details you want to list. |
|
Limit |
Set the maximum number of parcels Boost.space Integrator should return during one scenarioA specific connection between applications in which data can be transferred. Two types of scenarios: active/inactive. More execution cycleA cycle is the operation and commit/rollback phases of scenario execution. A scenario may have one or more cycles (one is the default).. |
Returns a specified parcel.
|
Connection |
|
|
Parcel ID |
Select the Parcel ID whose details you want to retrieve. |
Creates a new parcel.
|
Connection |
|||||||||||||||||||||
|
Name |
Enter the recipient’s name. |
||||||||||||||||||||
|
Address |
Enter the recipient’s address. |
||||||||||||||||||||
|
House Number |
Enter the recipient’s house number. |
||||||||||||||||||||
|
City |
Enter the recipient’s city name. |
||||||||||||||||||||
|
Postal Code |
Enter the recipient’s area postal code. |
||||||||||||||||||||
|
Country |
Enter the recipient’s country name. |
||||||||||||||||||||
|
Company Name |
Enter the recipient’s company name to which the parcel will be shipped to. |
||||||||||||||||||||
|
Additional Address |
Enter the recipient’s alternative address. |
||||||||||||||||||||
|
Country State |
Enter the recipient’s two-character state code. For example, |
||||||||||||||||||||
|
Telephone |
Enter the recipient’s phone number. |
||||||||||||||||||||
|
|
Enter the recipient’s email address. |
||||||||||||||||||||
|
Sender Address |
Enter the sender’s address who is sending the parcel. |
||||||||||||||||||||
|
Custom Invoice Number |
Enter the parcel’s invoice number if it is shipped outside the EU region. |
||||||||||||||||||||
|
Custom Shipment Type |
Select the parcel type:
|
||||||||||||||||||||
|
External Reference |
Enter the unique external reference number with which you can identify a parcel. |
||||||||||||||||||||
|
Request LabelA label is a “tag” that can be added to items within a module. It's a flexible tool used to categorize and organize data, making it easier to customize workflows and processes. More |
Select whether a label is requested for the parcel. |
||||||||||||||||||||
|
Request Label Async |
Select whether a label is requested asynchronously for the parcel. |
||||||||||||||||||||
|
To Service Point |
Enter the parcel’s Service Point ID. |
||||||||||||||||||||
|
Insured Value |
Enter the Sendcloud Insurance amount to add to the parcel. The entered value must be a multiple of 100 and maxes out at 2500 or 5000 depending on the carrier. This field does not take the carrier/shipping method insurance into consideration |
||||||||||||||||||||
|
Total Insured Value |
Enter the parcel’s total insurance amount. The entered value must be a multiple of 100 and maxes out at 2500 or 5000 depending on the carrier. This field automatically calculates the Sendcloud Insurance you need to add and your shipping method’s insurance so it matches the exact value you have given. As an example, DPD insures all their shipments by 520€ by default. If you pass the total insured value, 5000, then your shipment will have total insurance coverage of 5000€, but you are only paying for 4480€. |
||||||||||||||||||||
|
Order Number |
Enter the parcel order number. |
||||||||||||||||||||
|
Integration ID |
Select the integration option for the parcel. You must create integrations in your Sendcloud account. |
||||||||||||||||||||
|
Shipment UUID |
Enter the unique identifier assigned to the shipment with the Sendcloud system. |
||||||||||||||||||||
|
Parcel ItemsItems are rows in records (order/request/invoice/purchase...) |
Add the parcel items:
|
||||||||||||||||||||
|
Weight |
Enter the weight of the parcel in kilograms. If no weight is specified, the default weight in settings is used. |
||||||||||||||||||||
|
Is Return |
Select whether the item is returnable. |
||||||||||||||||||||
|
Total Order Value |
Enter the amount paid by the buyer through various payment methods. For example, |
Updates a parcel with the option to request a label – it hasn’t been requested before.
|
Connection |
|||||||||||||||||||||
|
Parcel ID |
Select the Parcel ID whose details you want to update. |
||||||||||||||||||||
|
Name |
Enter the recipient’s name. |
||||||||||||||||||||
|
Address |
Enter the recipient’s address. |
||||||||||||||||||||
|
House Number |
Enter the recipient’s house number. |
||||||||||||||||||||
|
City |
Enter the recipient’s city name. |
||||||||||||||||||||
|
Postal Code |
Enter the recipient’s area postal code. |
||||||||||||||||||||
|
Country |
Enter the recipient’s country name. |
||||||||||||||||||||
|
Company Name |
Enter the recipient’s company name to which the parcel will be shipped to. |
||||||||||||||||||||
|
Additional Address |
Enter the recipient’s alternative address. |
||||||||||||||||||||
|
Country State |
Enter the recipient’s two-character state code. For example, |
||||||||||||||||||||
|
Telephone |
Enter the recipient’s phone number. |
||||||||||||||||||||
|
|
Enter the recipient’s email address. |
||||||||||||||||||||
|
Sender Address |
Enter the sender’s address who is sending the parcel. |
||||||||||||||||||||
|
Custom Invoice Number |
Enter the parcel’s invoice number if it is shipped outside the EU region. |
||||||||||||||||||||
|
Custom Shipment Type |
Select the parcel type:
|
||||||||||||||||||||
|
External Reference |
Enter the unique external reference number with which you can identify a parcel. |
||||||||||||||||||||
|
Request Label |
Select whether a label is requested for the parcel. |
||||||||||||||||||||
|
Request Label Async |
Select whether a label is requested asynchronously for the parcel. |
||||||||||||||||||||
|
To Service Point |
Enter the parcel’s Service Point ID. |
||||||||||||||||||||
|
Insured Value |
Enter the Sendcloud Insurance amount to add to the parcel. The entered value must be a multiple of 100 and maxes out at 2500 or 5000 depending on the carrier. This field does not take the carrier/shipping method insurance into consideration |
||||||||||||||||||||
|
Total Insured Value |
Enter the parcel’s total insurance amount. The entered value must be a multiple of 100 and max out at 2500 or 5000 depending on the carrier. This field automatically calculates the Sendcloud Insurance you need to add and your shipping method’s insurance so it matches the exact value you have given. As an example, DPD ensures all their shipments by 520€ by default. If you pass the total insured value, 5000, then your shipment will have total insurance coverage of 5000€, but you are only paying for 4480€. |
||||||||||||||||||||
|
Order Number |
Enter the parcel order number. |
||||||||||||||||||||
|
Integration ID |
Select the integration option for the parcel. You must create integrations in your Sendcloud account. |
||||||||||||||||||||
|
Parcel Items |
Add the parcel items:
|
||||||||||||||||||||
|
Weight |
Enter the weight of the parcel in kilograms. If no weight is specified, the default weight in settings is used. |
||||||||||||||||||||
|
Is Return |
Select whether the item is returnable. |
||||||||||||||||||||
|
Total Order Value |
Enter the amount paid by the buyer through various payment methods. For example, |
Downloads a parcel document.
|
Connection |
|
|
MappingMapping links the modules in your scenario. When you map an item, you connected the data retrieved by one module to another module to perform the desired action. For example, you can map the email address and subject lines from the Email > Watch emails module to Google Sheets > Add a row and create a spreadsheet of email addresses... |
Select the option to choose the parcel document you want to download:
|
|
Parcel ID |
Select the Parcel ID whose documents you want to download. |
|
Document Type |
Select the document type you want to download. |
|
Format |
Select the format in which you want to download the document:
|
Cancels or deletes a parcel depending on its status and other parameters.
|
Connection |
|
|
Parcel ID |
Select the Parcel ID you want to delete. The cancellation is not guaranteed and may be asynchronous depending on the state of the parcel. |
Returns a list of invoices.
|
Connection |
|
|
Limit |
Set the maximum number of invoices Boost.space Integrator should return during one scenario execution cycle. |
Returns a specified invoice.
|
Connection |
|
|
Invoice ID |
Select the Invoice ID whose details you want to retrieve. |
Returns a list of shipping methods.
|
Connection |
|
|
Sender Address |
Select the Sender ID to where you planCombination of a license (enabled features) and tier (numeric limits) and a subscription period (monthly / yearly). to ship your parcels from. If you want to retrieve all available shipping methods, enter |
|
Service Point ID |
Enter the Service Point ID to list the shipping methods available with the specified service point. |
|
Is Return |
Select whether the shipping method you want to list includes a return policy. |
|
Limit |
Set the maximum number of shipping methods Boost.space Integrator should return during one scenario execution cycle. |
Returns a specified shipping method.
|
Connection |
|
|
Shipping Method |
Select the shipping method whose details you want to retrieve. |
Returns a list of brands.
|
Connection |
|
|
Limit |
Set the maximum number of brands Boost.space Integrator should return during one scenario execution cycle. |
Returns a specified brand.
|
Connection |
|
|
Brand ID |
Select the Brand ID whose details you want to retrieve. |
Returns a list of sender addresses.
|
Connection |
|
|
Limit |
Set the maximum number of sender addresses Boost.space Integrator should return during one scenario execution cycle. |
Gets a specified sender address.
|
Connection |
|
|
Sender Address ID |
Select the Sender Address ID whose details you want to retrieve. |
Triggers when integration is connected.
|
Webhook Name |
Enter a name for the webhook. |
|
Connection |
See Connecting to Sendcloud Webhook using Boost.space Integratorto add the webhook to your Sendcloud account.
Triggers when integration is deleted.
|
Webhook Name |
Enter a name for the webhook. |
|
Connection |
See Connecting to Sendcloud Webhook using Boost.space Integratorto add the webhook to your Sendcloud account.
Triggers when integration is updated.
|
Webhook Name |
Enter a name for the webhook. |
|
Connection |
See Connecting to Sendcloud Webhook using Boost.space Integratorto add the webhook to your Sendcloud account.
Returns a list of shipments from an integration.
|
Connection |
|
|
Integration ID |
Select the Integration ID whose shipments you want to list. |
|
Start Date |
Enter the date to list the integrations started on the specified date. |
|
End Date |
Enter the date to list the integrations that ended on the specified date. |
|
Limit |
Set the maximum number of integration shipments Boost.space Integrator should return during one scenario execution cycle. |
Returns a list of integrations.
|
Connection |
|
|
Limit |
Set the maximum number of integrations Boost.space Integrator should return during one scenario execution cycle. |
Updates a specified integration’s settings.
|
Connection |
|
|
Integration ID |
Select the Integration ID whose settings you want to update. |
|
Webhook URL |
Enter the webhook endpoint URL address. |
|
Shop Name |
Enter the shop name. |
|
Shop URL |
Enter the shop’s URL address. |
|
Service Point Enabled |
Select the service point that is enabled in the integration. |
|
Webhook Active |
Select whether the webhook is active in the integration. |
|
Service Point Carriers |
Add the service point carriers to the integration. |
Delete an order from an Integration.
|
Connection |
|
|
Integration ID |
Select the Integration ID whose order you want to delete. |
|
Shipment UUID |
Select the Unique Shipment ID you want to delete. |
Triggers when a refund is requested.
|
Webhook Name |
Enter a name for the webhook. |
|
Connection |
Establish a connection to your Sendcloud account. |
See Connecting to Sendcloud Webhook using Boost.space Integrator to add the webhook to your Sendcloud account.
Performs an arbitrary authorized API call.
|
Connection |
|
|
URL |
Enter a path relative to For the list of available endpoints, refer to the Sendcloud API Documentation. |
|
Method |
Select the HTTP method you want to use: GET to retrieve information for an entry. POST to create a new entry. PUT to update/replace an existing entry. PATCH to make a partial entry update. DELETE to delete an entry. |
|
Headers |
Enter the desired request headers. You don’t have to add authorization headers; we already did that for you. |
|
Query String |
Enter the request query string. |
|
Body |
Enter the body content for your API call. |
The following API call returns all the shipping methods from your Sendcloud account:
URL:api/v2/shipping_methods
Method:GET
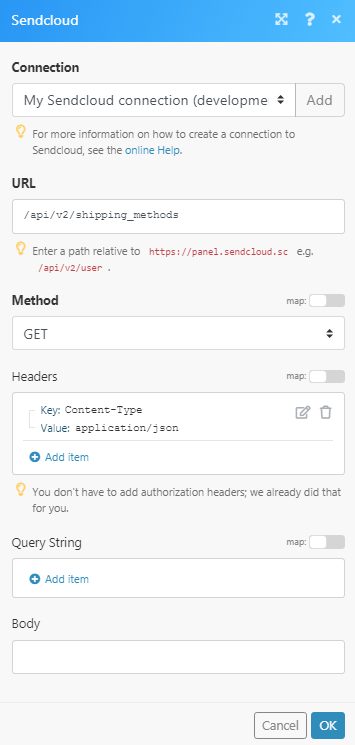
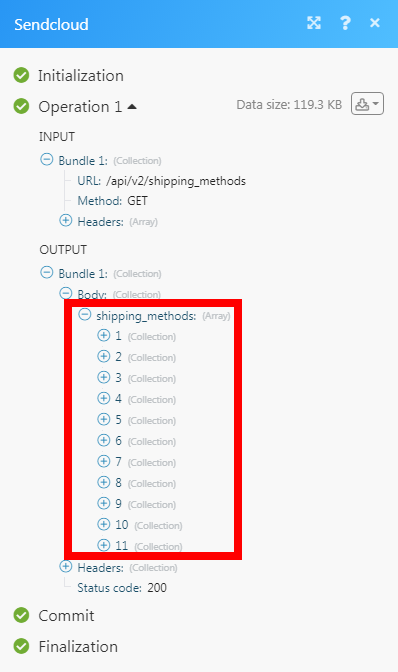
Matches of the search can be found in the module’s Output under BundleA bundle is a chunk of data and the basic unit for use with modules. A bundle consists of items, similar to how a bag may contain separate, individual items. More > Body > shipping_methods.In our example, 11 shipping methods were returned:
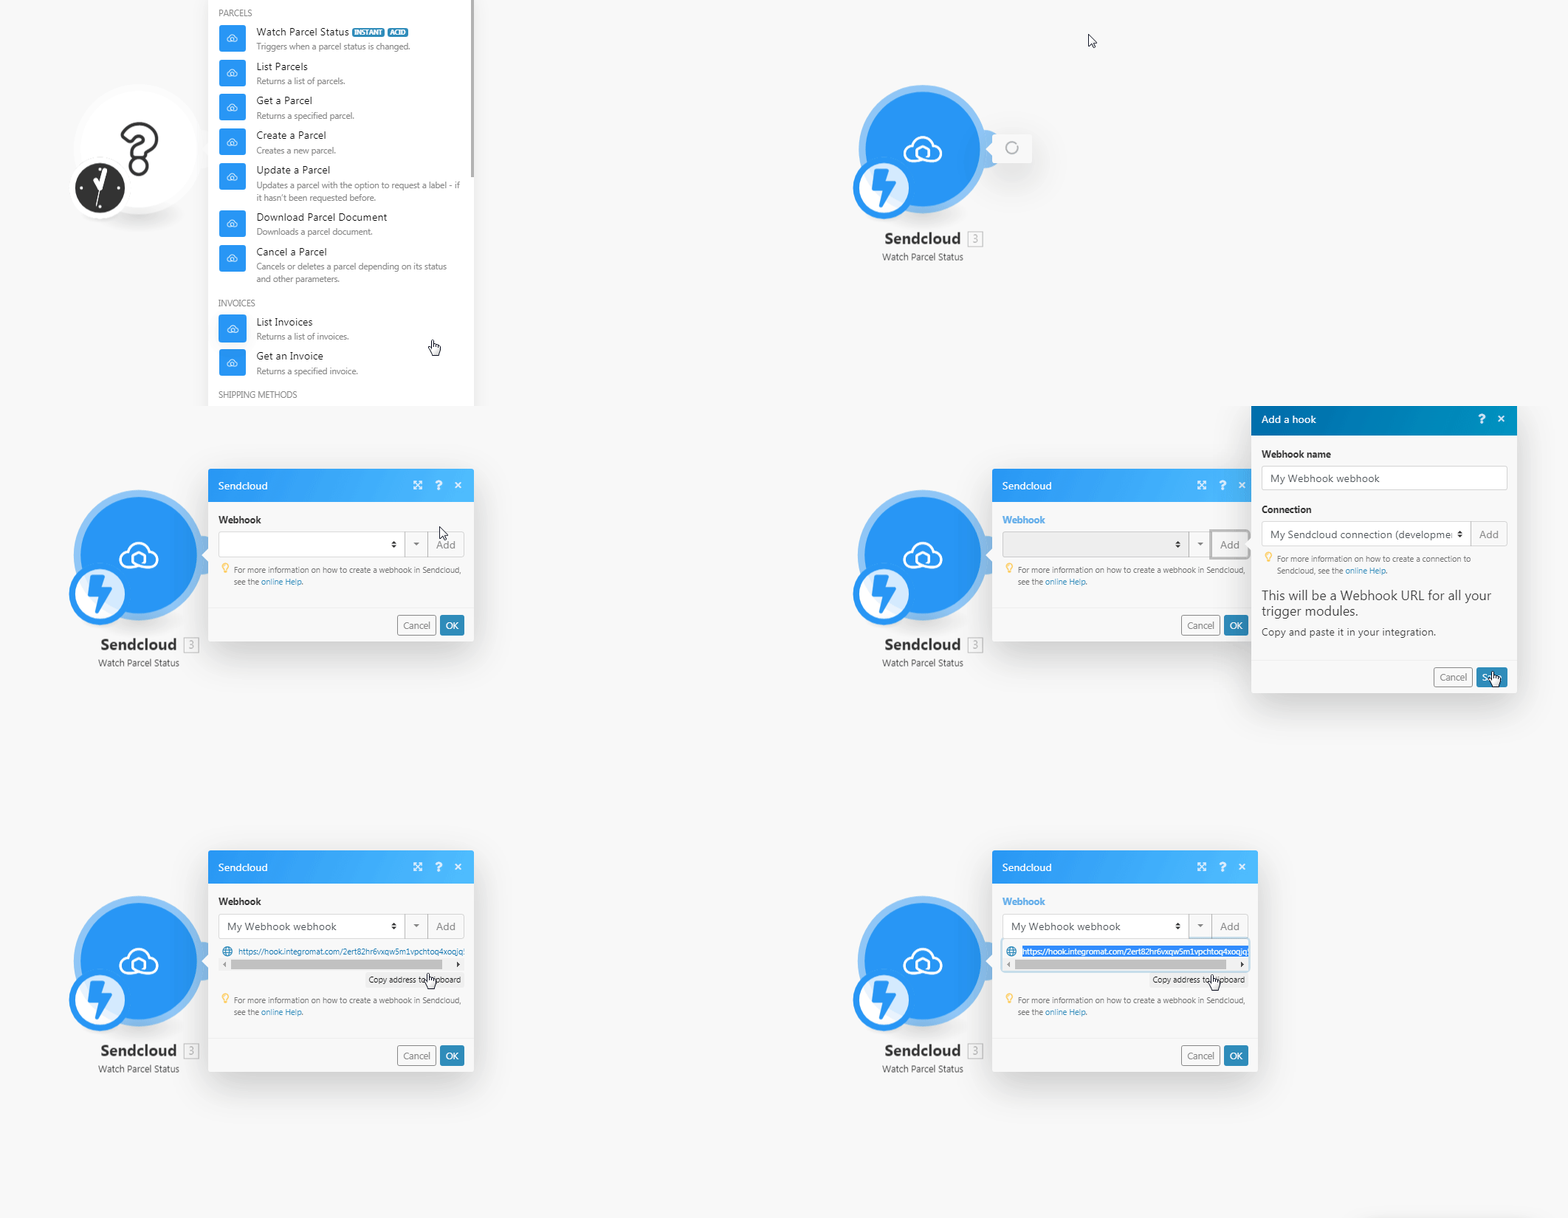
1. Open any Watch module, establish the connection as mentioned in the respective module, click Save, and copy the URL address to your clipboard. Click OK and save the triggerEvery scenario has a trigger, an event that starts your scenario. A scenario must have a trigger. There can only be one trigger for each scenario. When you create a new scenario, the first module you choose is your trigger for that scenario. Create a trigger by clicking on the empty module of a newly created scenario or moving the....
2. Log in to your Sendcloud account.
3. Click Settings ( ) > Integrations.4. Click Edit in the Integration to which you want to add the webhook. In the Webhook URL address field, enter the URL address copied in step 1.
5. (Optional) Select the Service Points for the trigger.
6. Click Save.
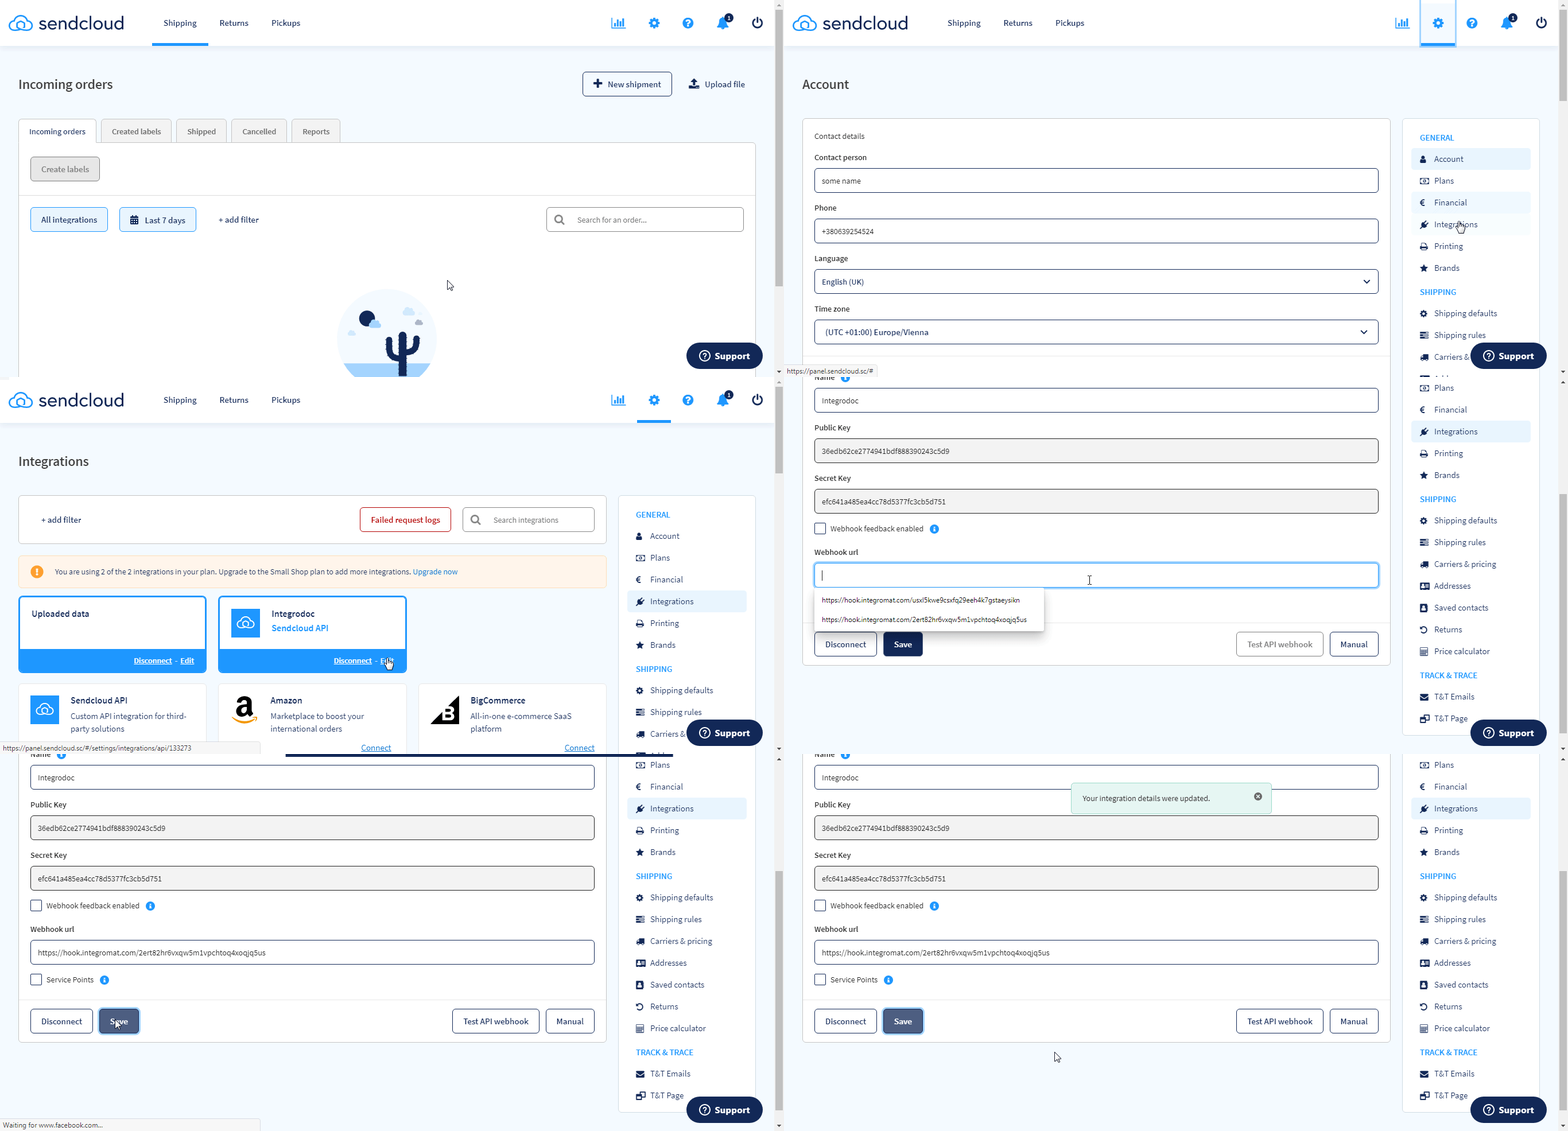
The webhook is added successfully.
