| Active |
|---|
| This application does not need additional settings. So you can make connectionUnique, active service acces point to a network. There are different types of connections (API key, Oauth…). More only by using your login credentials or by following the instructions below . |
With Sellsy modulesThe module is an application or tool within the Boost.space system. The entire system is built on this concept of modularity. (module - Contacts) More in Boost.spaceCentralization and synchronization platform, where you can organize and manage your data. More IntegratorPart of the Boost.space system, where you can create your connections and automate your processes. More, you can monitor, create, update, send, retrieve, list, and delete the clients, comments, contacts, events, opportunities, prospects, suppliers, and tasks in your Sellsy account.
To get started with Sellsy, create an account at go.sellsy.com/en/
Refer to the Sellsy API documentation for the list of available endpoints.
There are two ways to connect the Sellsy app: Public and Private.
-
Public: API access is linked to a collaborator, and the OAuth2 client credentials require validation from the Sellsy team to use.
-
Private: API access is limited to collaborators of your Sellsy account.
To establish the connection:
-
Log in to your Sellsy account.
-
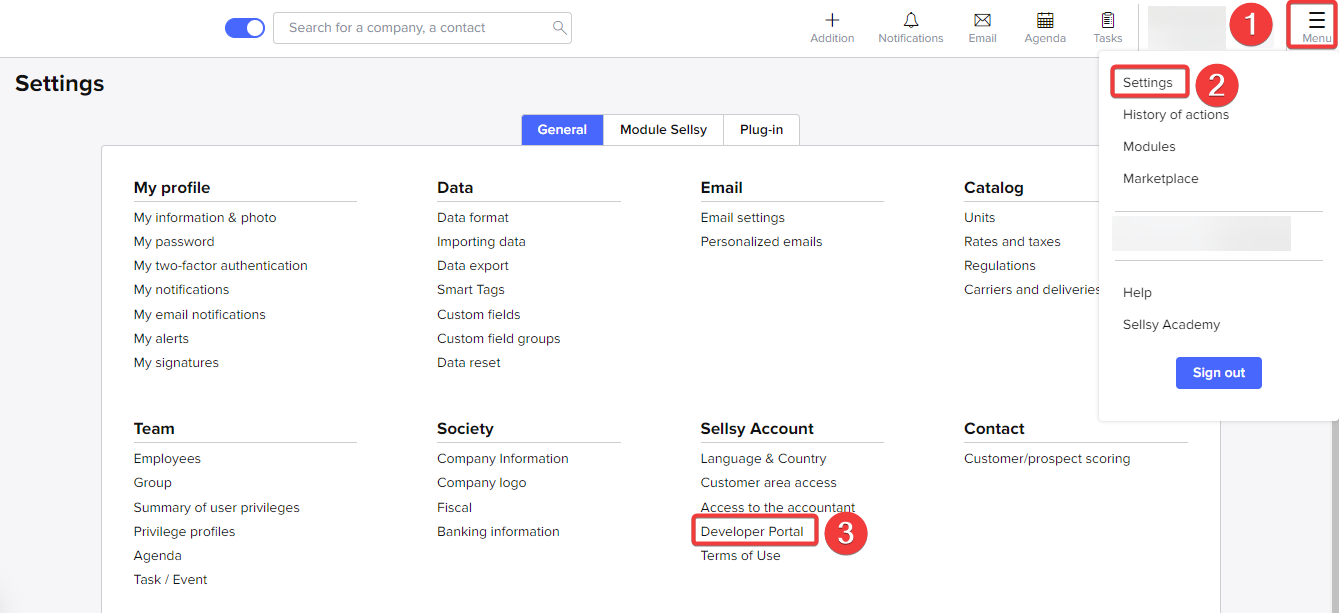
Click Menu > Settings > Developer Portal.
-
Click API V2 (beta) > Create API access and select the access type.
-
Enter the following details and click Save.
Access Name
Name for the API access.
Redirect URLs
https://integrator.boost.space/oauth/cb/sellsy2https://www.integrator.boost.space/oauth/cb/sellsy2Scopes
Select the required scopes for the API access.
-
Copy the client credentials to a safe place.
-
Log in to your Boost.space Integrator account, add a Sellsy moduleThe module is an application or tool within the Boost.space system. The entire system is built on this concept of modularity. (module - Contacts) More to your scenarioA specific connection between applications in which data can be transferred. Two types of scenarios: active/inactive. More , and click Create a connection.
-
Optional: In the Connection name field, enter a name for the connection.
-
In the Client ID and Client Secret fields, enter the client credentials from step 5, and click Save.
Note: To add additional scopes, switch on the Show advanced settings toggle and either select, map, or enter the scopes.
You have successfully established the connection. You can now edit your scenario and add more Sellsy modules. If your connection requires reauthorization at any point, follow the connection renewal steps here.
Contacts
-
Watch Contacts Created
-
Watch Contacts Updated
-
Create a Contact
-
Update a Contact
-
Get a Contact
-
Search Contacts
-
Delete a Contact
Companies
-
Watch Company Created
-
Watch Company Updated
-
Create a Company
-
Update a Company
-
Get a Company
-
Search Companies
-
Delete a Company
Opportunities
Tasks
-
Watch Task Created
-
Watch Task Updated
-
Watch Task Deleted
-
Create a Task
-
Update a Task
-
Get a Task
-
Search Tasks
-
Delete a Task
Events
-
Create a Calendar Event
-
Update a Calendar Event
-
Get a Calendar Event
-
Search Calendar Events
-
Delete a Calendar Event
Comments
-
Create a Comment
-
Update a Comment
-
Get a Comment
-
Search Comments
-
Delete a Comment
Other
-
Make an API Call


