| Active with remarks |
|---|
| This application needs additional settings. Please follow the documentation below to create your own connectionUnique, active service acces point to a network. There are different types of connections (API key, Oauth…). More. |
With Teachable modulesThe module is an application or tool within the Boost.space system. The entire system is built on this concept of modularity. (module - Contacts) More in Make, you can manage students and monitor events that occur in your Teachable account.
To get started with Teachable, create an account at teachable.com.
Connect Teachable to Boost.spaceCentralization and synchronization platform, where you can organize and manage your data. More IntegratorPart of the Boost.space system, where you can create your connections and automate your processes. More
-
Log in to your Teachable account.
-
Copy the domain URL to your clipboard. For example,
https://{your_domain_name}.teachable.com. -
Go to your Boost.space Integrator scenarioA specific connection between applications in which data can be transferred. Two types of scenarios: active/inactive. More and select the Teachable moduleThe module is an application or tool within the Boost.space system. The entire system is built on this concept of modularity. (module - Contacts) More you want to use.
-
Under Connection, click Add.
-
Give your new connection a name.
-
Paste your domain URL in the field provided.
-
Enter your Teachable username and password.
-
Click Save.
You have successfully established the connection.
TriggersEvery scenario has a trigger, an event that starts your scenario. A scenario must have a trigger. There can only be one trigger for each scenario. When you create a new scenario, the first module you choose is your trigger for that scenario. Create a trigger by clicking on the empty module of a newly created scenario or moving the... when a following event occurs.
![[Note]](https://docs.boost.space/wp-content/themes/bsdocs/docs-parser/HTML/css/image/note.png) |
Note |
|---|---|
|
You must be on a paid Teachable planCombination of a license (enabled features) and tier (numeric limits) and a subscription period (monthly / yearly). to use webhooksA webhook is a way for an app to send real-time information to a specific URL in response to certain events or triggers.. |
Follow the Setting up a Teachable webhook guide below to set up this module.
Searches for students by email.
|
Connection |
|
|
Student’s Email |
Enter the email address of the students you want to search for. |
|
Limit |
Enter the maximum number of students Boost.space Integrator returns during one scenario execution cycleA cycle is the operation and commit/rollback phases of scenario execution. A scenario may have one or more cycles (one is the default).. |
Gets a specific student.
Creates a new student’s account.
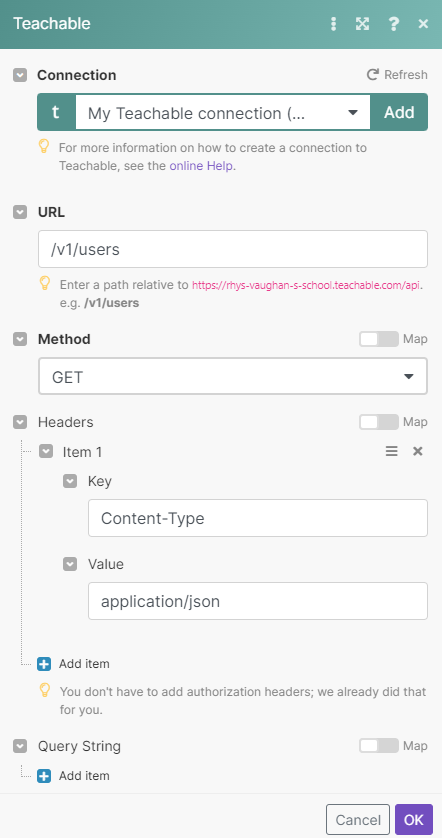
Performs an arbitrary authorized API call.
![[Note]](https://docs.boost.space/wp-content/themes/bsdocs/docs-parser/HTML/css/image/note.png) |
Note |
|---|---|
|
For the list of available endpoints, refer to the Teachable API documentation. |
The following API call returns a list of usersCan use the system on a limited basis based on the rights assigned by the admin. More in your Teachable account.
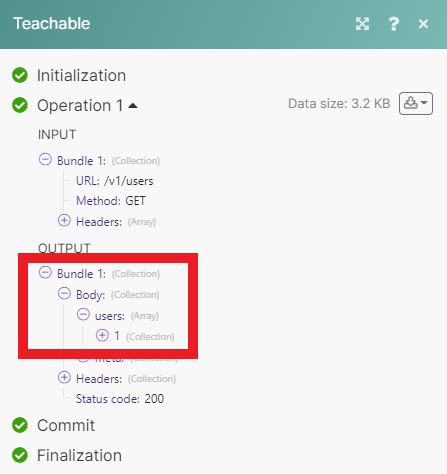
Matches of the search can be found in the module’s Output under Bundle > Body > users. Our example returned 1 userCan use the system on a limited basis based on the rights assigned by the admin. More:
![[Note]](https://docs.boost.space/wp-content/themes/bsdocs/docs-parser/HTML/css/image/note.png) |
Note |
|---|---|
|
You must be on a paid Teachable plan to use webhooks. |
-
In your Boost.space Integrator scenario, open the Teachable Watch Events module.
-
Click Add.
-
Give your new webhookA webhook is a way for an app to send real-time information to a specific URL in response to certain events or triggers. a name, then select the connection you want to use.
-
Select the type of event you want to watch for.
-
Click Save. Boost.space Integrator should then attach this webhook to your Teachable account automatically. If for some reason this does not happen, follow the steps below.
-
Click Show address, then copy the URL to your clipboard.
-
Log in to your Teachable account.
-
Click Setting, then Webhooks.
-
Click Add webhook.
-
Paste the URL in the box provided, then select the type of events the webhook will watch for.
-
Click Save.
You have successfully set up your new webhook.


