| Active |
|---|
| This application does not need additional settings. So you can make connectionUnique, active service acces point to a network. There are different types of connections (API key, Oauth…). More only by using your login credentials or by following the instructions below . |
Teamwork Desk provides helpdesk ticketing software that allows you to manage customer services, communicate, and improve transparency. You can create, update, and delete tickets, customer data, help doc sites, categories, and articles.
Prerequisites
-
A Teamwork Desk account
In order to use Teamwork Desk with Boost.spaceCentralization and synchronization platform, where you can organize and manage your data. More IntegratorPart of the Boost.space system, where you can create your connections and automate your processes. More, you must have an Teamwork Desk account. If you do not have one, create an account at teamwork.com/desk-signup.
When you create an account for the first time with Teamwork Desk, a site URL is generated. For example, <companyname>/teamwork.com.
1. Log in to your Teamwork Desk account.
2. From the Dashboard, click the Profile icon in the top-right corner.
3. Go to View Profile > API Keys.
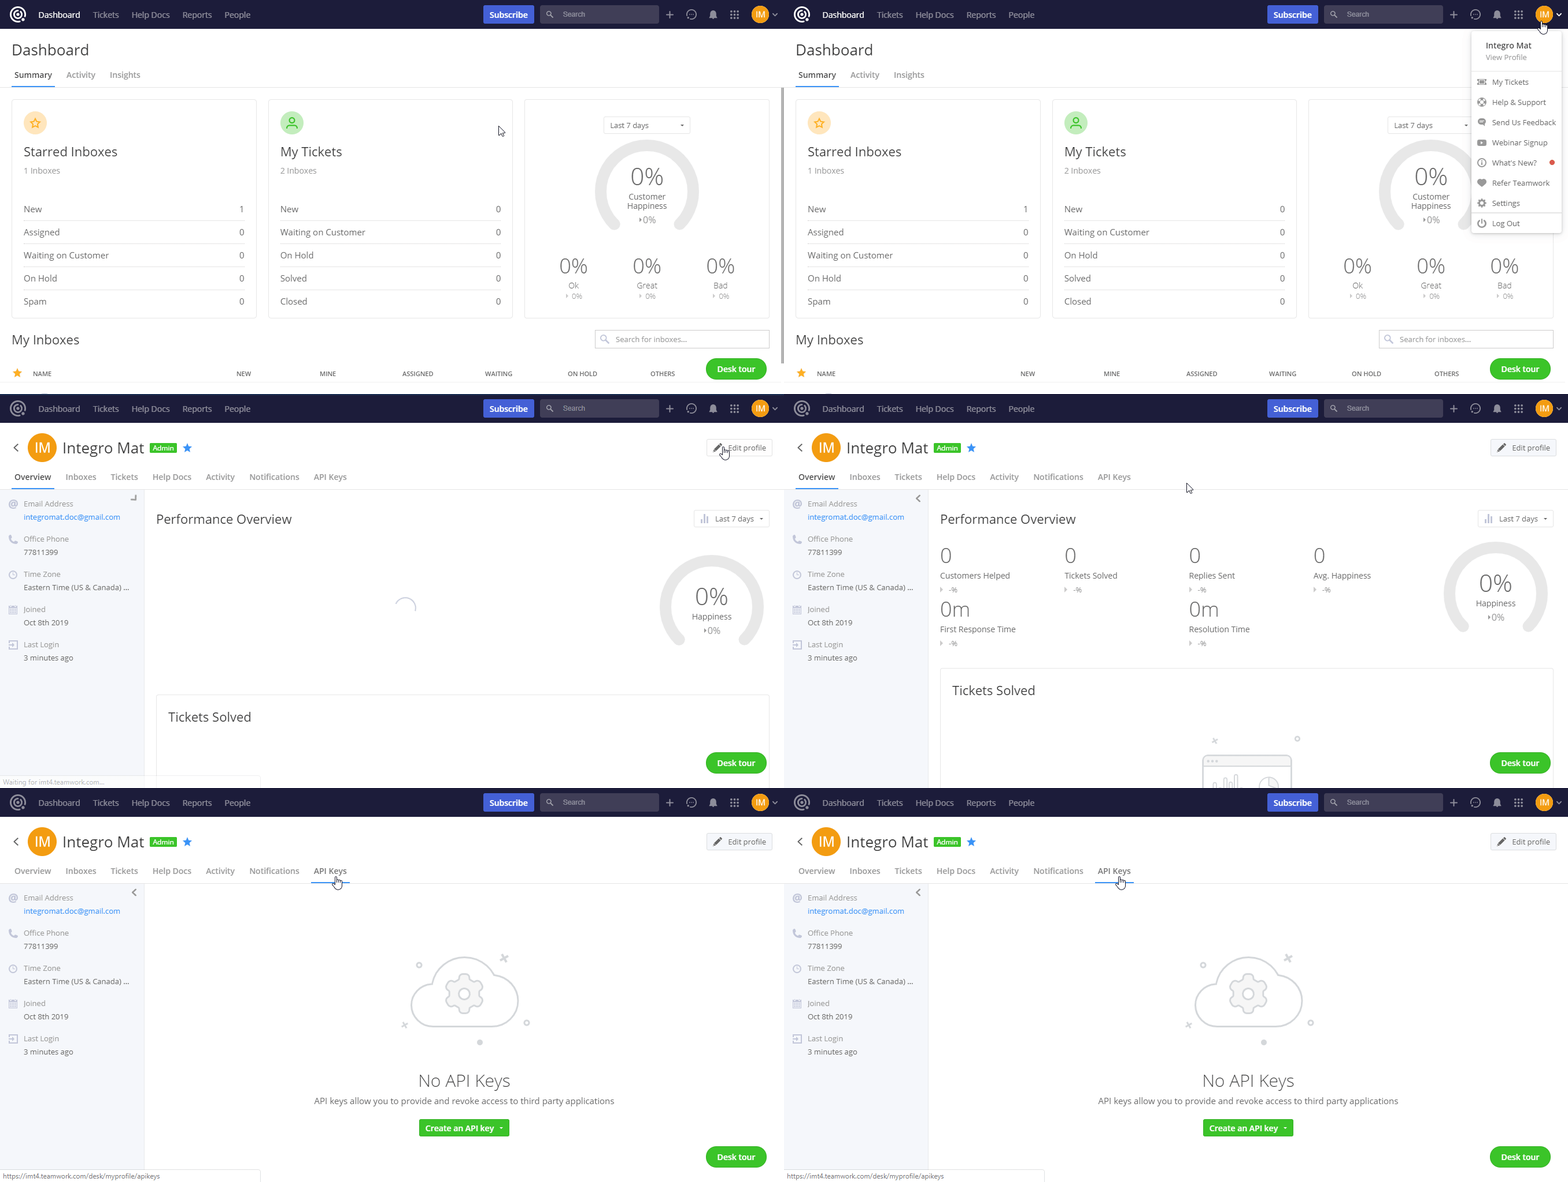
4. Click Create an API Key and select the V1 API Key option.
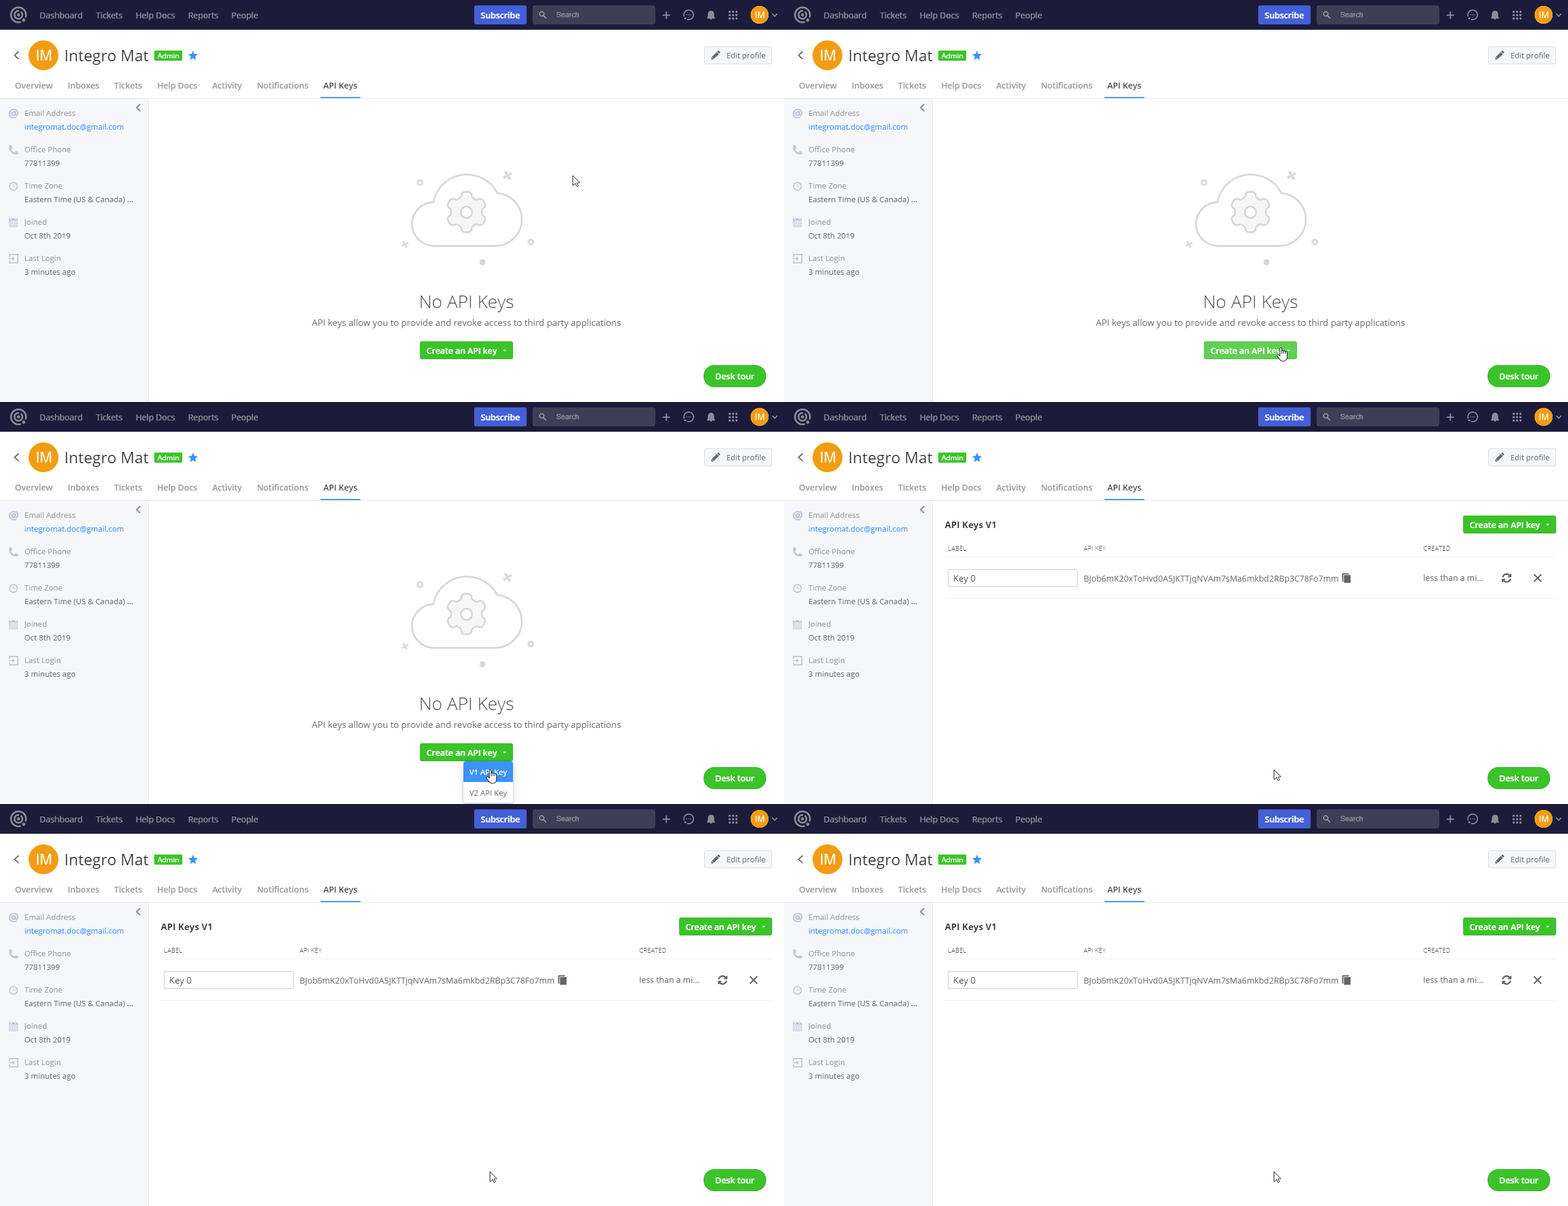
5. Copy the API Key to the clipboard.
6. Go to Boost.space Integrator and open the Teamwork Desk module’s Create a connection dialog.
7. Enter your Teamwork Domain and the API Key you have copied in step 5 to the respective field and click the Continue button to establish the connection.
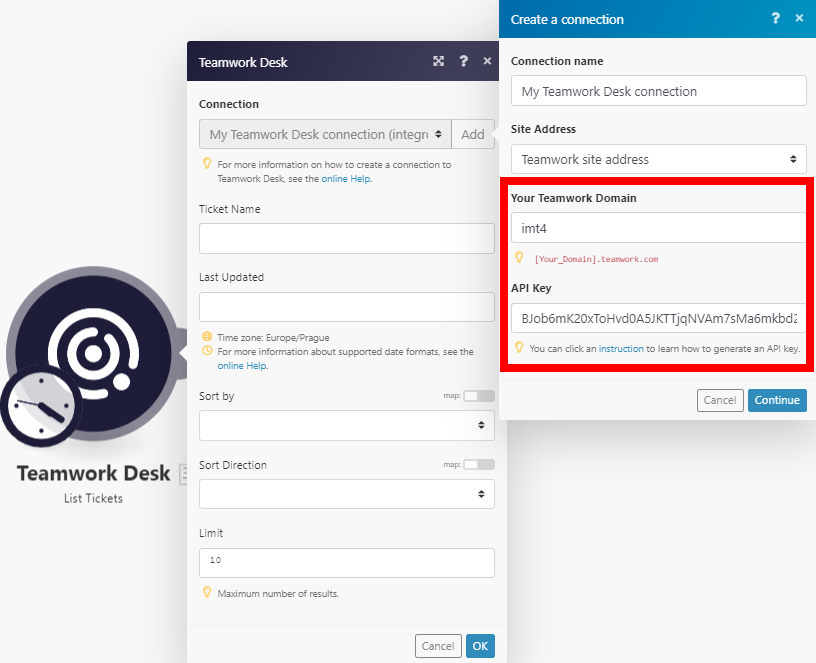
8. The connection is now established.
TriggersEvery scenario has a trigger, an event that starts your scenario. A scenario must have a trigger. There can only be one trigger for each scenario. When you create a new scenario, the first module you choose is your trigger for that scenario. Create a trigger by clicking on the empty module of a newly created scenario or moving the... when an event related to tickets, customers, agent, threads or inboxes, occurs according to your settings in your Teamwork Desk account.
To set up a new event triggerEvery scenario has a trigger, an event that starts your scenario. A scenario must have a trigger. There can only be one trigger for each scenario. When you create a new scenario, the first module you choose is your trigger for that scenario. Create a trigger by clicking on the empty module of a newly created scenario or moving the...:
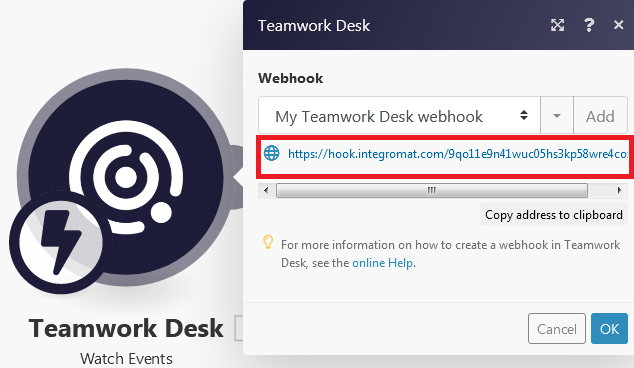
1. Go to Boost.space Integrator and create a Watch Event Connection moduleThe module is an application or tool within the Boost.space system. The entire system is built on this concept of modularity. (module - Contacts) More.
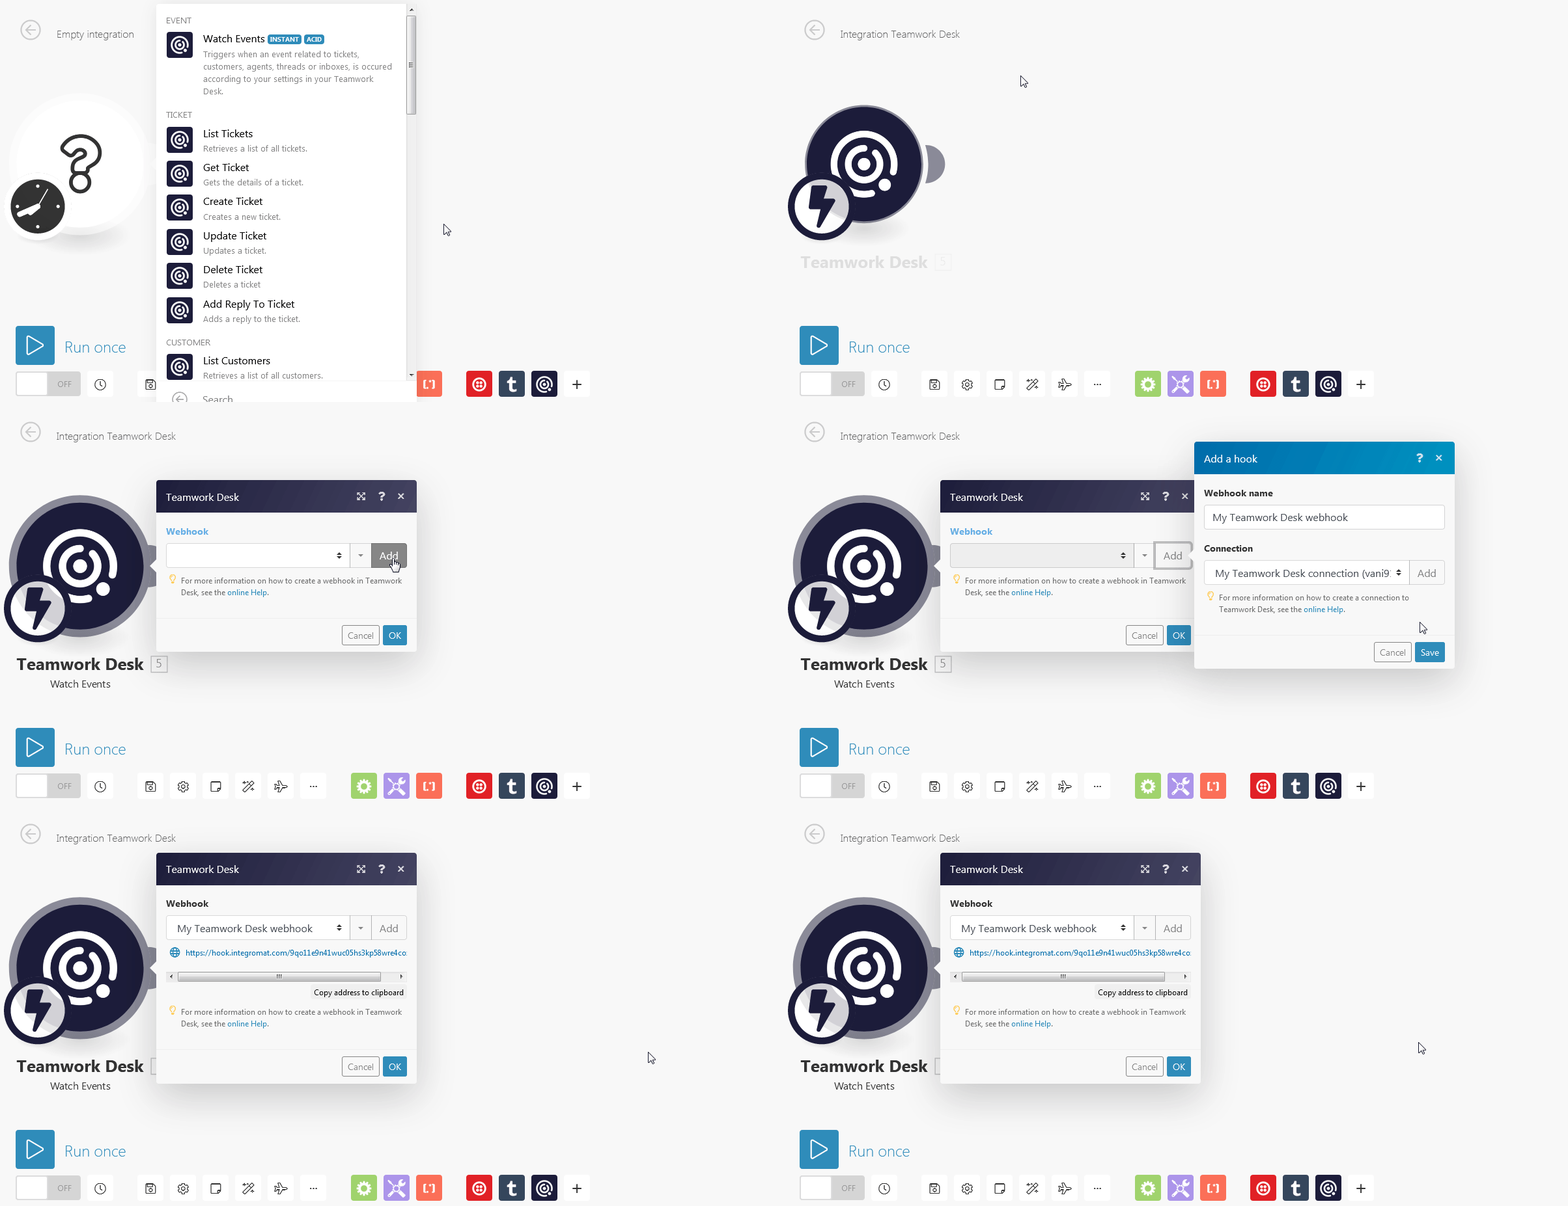
2. Copy the URL to the clipboard.
3. Log into your Teamwork Desk account.
4. Click your Profile icon > Settings> WebhooksA webhook is a way for an app to send real-time information to a specific URL in response to certain events or triggers..
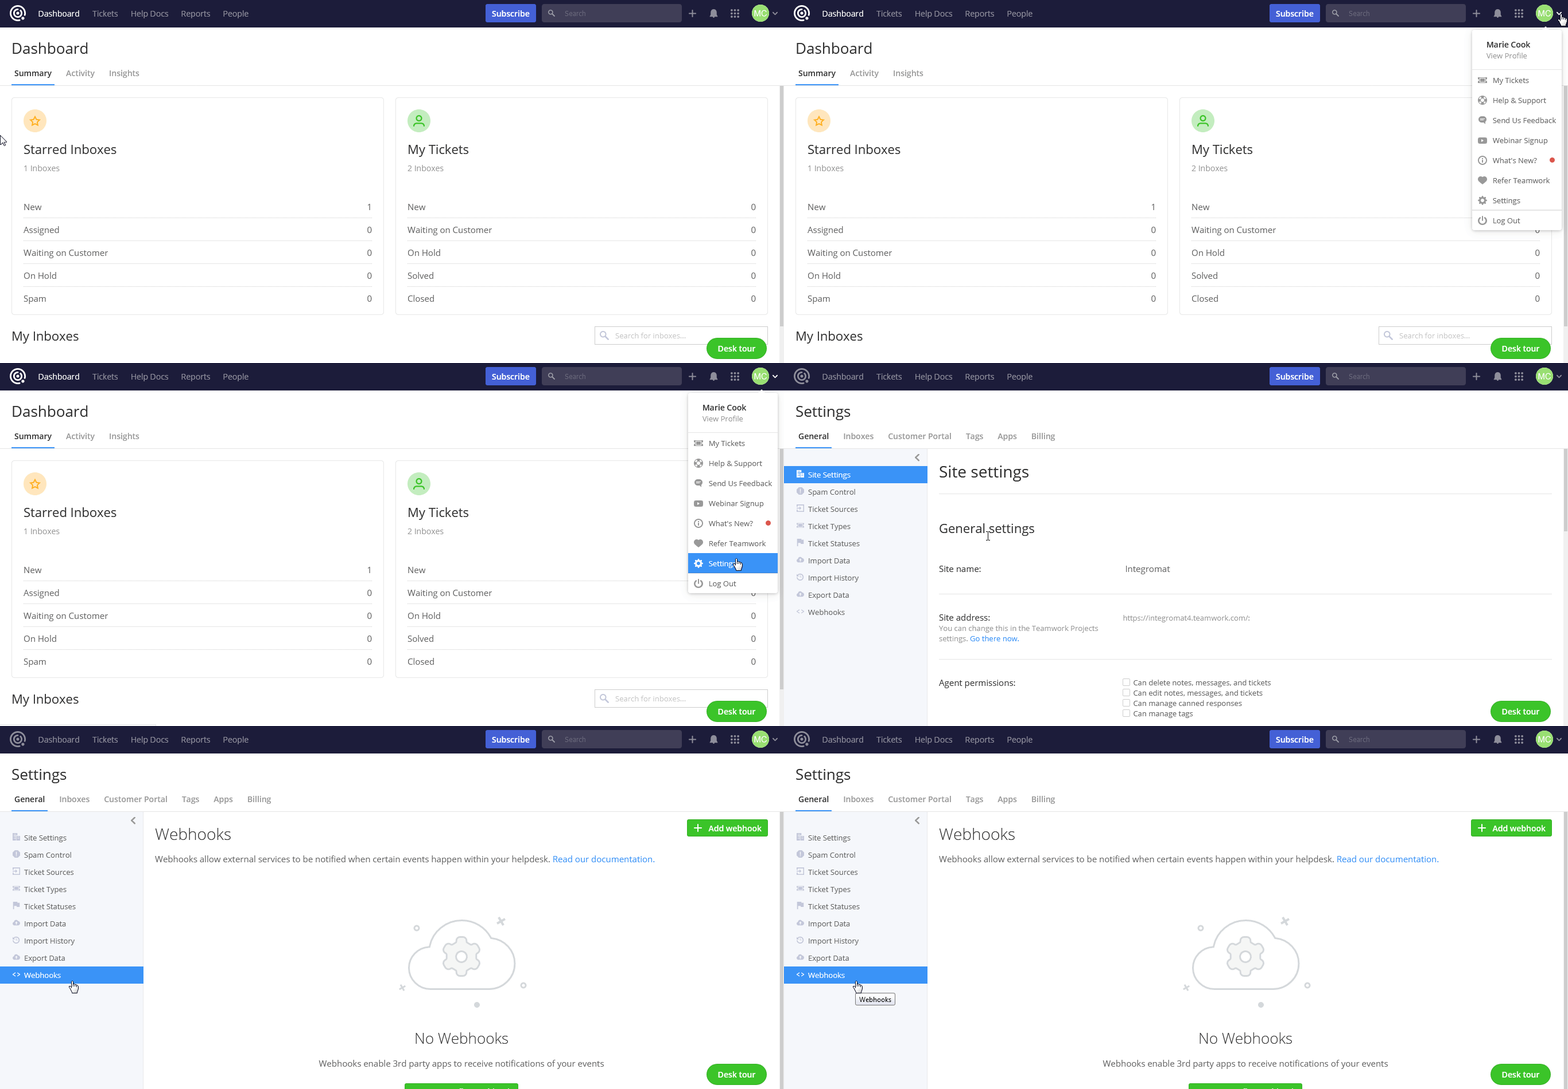
5. Click Create your first webhookA webhook is a way for an app to send real-time information to a specific URL in response to certain events or triggers. or Add Webhook.
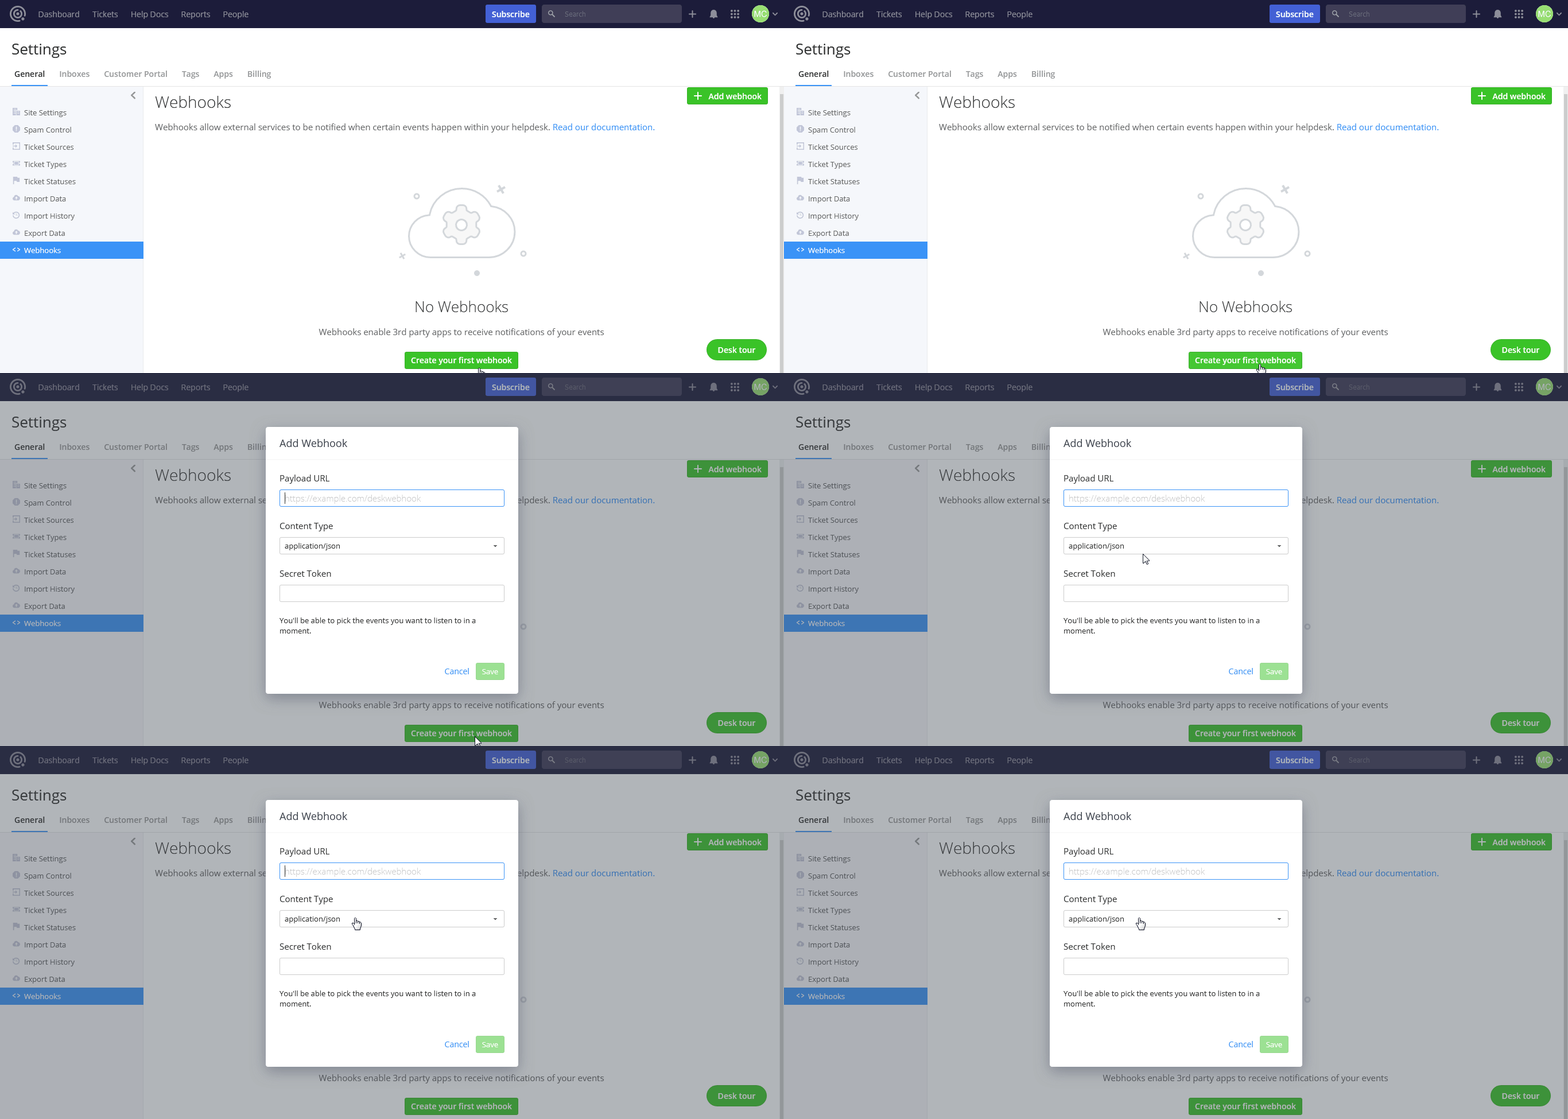
6. In the Playload URL field, enter the URL copied in Step 2.
7. In the Content Type field, select the option from the drop-down list appropriately.
8. In the TokenThe API token is a multi-digit code that allows a user to authenticate with cloud applications. More field, enter a unique custom password and click Save.
The webhook is then successfully created.
![[Note]](https://docs.boost.space/wp-content/themes/bsdocs/docs-parser/HTML/css/image/note.png) |
Note |
|---|---|
|
After creating the webhook, ensure to enable the fields, Active, All Inboxes, and All Events. |
Retrieves a list of all tickets.
|
Connection |
|
|
Ticket Name |
Enter the names of all the tickets to return. |
|
Last Updated |
Select the time the ticket was updated. |
|
Sort by |
Select the option to sort the list of tickets. |
|
Sort Direction |
Select the ascending or descending order in which you want the tickets to be displayed. |
|
Limit |
Maximum number of tickets Boost.space Integrator returns for one single scenarioA specific connection between applications in which data can be transferred. Two types of scenarios: active/inactive. More execution. |
Gets the details of a ticket.
|
Connection |
|
|
Ticket ID |
Enter the ticket ID you want to retrieve the details of. |
Creates a new ticket.
|
Connection |
|
|
Select or Create Customer |
Select the existing customer or create a new customer for the new ticket. |
|
Subject |
Enter the subject of the ticket. |
|
Message |
Enter the content of the ticket. |
|
Inbox ID |
Select the Inbox ID for the ticket. |
|
Source |
Select the source of the ticket. For example, email or phone |
|
StatusCreate statuses for each module separately to create an ideal environment for efficient and consistent work. More |
Select the new status to update the ticket. For example, active, or on-hold. |
|
Type |
Select the type of ticket. For example, whether the ticket is about a problem or a question. |
|
Priority |
Select the new priority for the ticket. |
|
Assignee |
Select an assignee for the ticket. |
|
Tags |
Select whether you want to update the tags or remove the tags. |
|
Notify Customer |
When selected, notifies the customer about the ticket. |
|
Show Advanced Settings |
When selected, displays the following fields: BCC: Sends a notification about the ticket changes. CC: Sends a notification about the ticket changes. |
Updates a ticket.
|
Connection |
|
|
Ticket ID |
Enter a new ID or update the ticket ID. |
|
Customer ID |
Enter a new ID or update the customer ID. |
|
Subject |
Enter a new subject or update the subject of the ticket. |
|
Message |
Enter new content or update the content of the ticket. |
|
Inbox ID |
Select a new Inbox ID. |
|
Source |
Select the new source of the ticket. For example, email or phone |
|
Status |
Select the new status. For example, active, or on-hold. |
|
Type |
Select the type of ticket. For example, whether the ticket is about a problem or a question. |
|
Priority |
Select the new priority of the ticket. |
|
Assignee |
Select the new assignee. |
|
Edit or Remove Tags |
Select whether you want to update the tags or remove the tags. |
|
Show Advanced Settings |
When selected, displays the following fields: BCC: Sends a notification about the ticket changes. CC: Sends a notification about the ticket changes. |
Deletes a ticket.
|
Connection |
|
|
Ticket ID |
Select the ticket ID to be deleted. |
Adds a reply to the ticket.
|
Connection |
|
|
Ticket ID |
Select the Ticket ID to which you want to add a reply. |
|
Body |
Select or enter the content of the reply to add. |
|
Status |
Select the status of the ticket. |
|
Assignee |
Select the name to who the ticket is assigned. |
|
Draft |
Select if the ticket’s reply is a draft. If selected as draft, the reply is not sent and remains in drafts. |
Retrieves a list of all customers.
|
Connection |
|
|
Search Customers by |
Select the option to search the customers by their first name, last name, email address or all. |
|
Limit |
Maximum number of customers Boost.space Integrator should return during one scenario execution cycleA cycle is the operation and commit/rollback phases of scenario execution. A scenario may have one or more cycles (one is the default).. |
Gets the details of a customer.
|
Connection |
|
|
Customer ID |
Enter the Customer ID to retrieve the details. |
Creates a new customer.
|
Connection |
|
|
First Name |
Enter the first name of the customer. |
|
Last Name |
Enter the last name of the customer. |
|
Email Address |
Enter the email address of the customer. |
|
Phone Number |
Enter the landline number of the customer. |
|
Mobile Number |
Enter the mobile number of the customer. |
|
Organization |
Enter the company name of the customer. |
|
Job Title |
Enter the position title of the customer in the organization. |
|
Facebook URL |
Enter the Facebook URL of the organization. |
|
LinkedIn URL |
Enter the LinkedIn URL link of the organization. |
|
Location |
Enter the location of the customer. |
|
Language |
Enter the preferred language of the customer. |
|
Timezone |
Enter the timezone where the customer is available. |
|
Notes |
Enter the additional information about the customer to be noted. |
Updates a customer.
|
Connection |
|
|
Customer ID |
Enter a new ID or update the existing customer ID. |
|
First Name |
Enter a new first name or update the existing first name. |
|
Last Name |
Enter a new last name or update the existing last name. |
|
Email Address |
Enter a new email address or update the email address of the customer. |
|
Phone Number |
Enter a new number or update the existing landline number of the customer. |
|
Mobile Number |
Enter a new number or update the existing mobile number of the customer. |
|
Organization |
Enter a new organization or update the company name of the customer. |
|
Job Title |
Enter the new position title of the customer in the organization. |
|
Facebook URL |
Enter the Facebook URL of the organization. |
|
Linkedin URL |
Enter the LinkedIn URL link of the organization. |
|
Location |
Enter a new location or update the existing location of the customer. |
|
Language |
Enter a new language or update the existing preferred language of the customer. |
|
Timezone |
Enter a new timezone or update the existing timezone where the customer is available. |
|
Notes |
Enter new notes or update the additional information about the customer to be noted. |
Deletes a customer.
|
Connection |
|
|
Customer ID |
Select the Customer ID to be deleted. |
Retrieves a list of all inboxes.
|
Connection |
|
|
Limit |
Maximum number of Inboxes Boost.space Integrator should return during one scenario execution cycle. |
Gets the details of an inbox.
|
Connection |
|
|
Ticket ID |
Select the Ticket ID that you want to get the details of. |
Creates a new inbox.
Deletes an inbox.
|
Connection |
|
|
Inbox ID |
Select the Inbox ID to be deleted. |
Retrieves a list of all helpdocs sites.
|
Connection |
|
|
Limit |
Maximum number of sites Boost.space Integrator should return during one scenario execution cycle. |
Creates a new helpdocs site.
|
Connection |
|
|
Name |
Enter the site name for the new helpdocs site. |
|
Sub Domain |
Select the sub domain name for the helpdocs site. The name appears in the URL of helpdocs site. For example, |
|
Description |
Select or enter information about the new helpdocs site. |
Gets the details of a helpdocs site.
|
Connection |
|
|
Helpdocs Site ID |
Select the Helpdocs Site ID you want to retrieve the details of. |
Updates a helpdocs site.
|
Connection |
|
|
Helpdocs Site ID |
Select the Helpdocs Site ID you want to update. |
|
Name |
Select a new name for the helpdocs site. |
|
Sub Domain |
Select a new sub domain name. |
|
Authentication Type |
Select an authentication type, which is required to update a helpdocs site. For example, administrator or requires a password for updating a helpdocs site. |
|
Publish Site |
Select whether you want to publish this helpdocs site. |
|
Show Social Icons |
Select whether you want show social icons such as Twitter, Facebook, and LinkedIn in the helpdocs site. |
|
Show Date Last Modified |
When selected, displays the date when this helpdocs site was modified. |
|
Edit Method |
Select the edit method for the helpdocs site. |
|
Custom Domain URL |
Enter a new customer domain URL for this helpdocs site to update. |
|
homePageURL |
Enter a new home page URL. |
|
Home Page Link Text |
Enter a new home page link text to appear. |
|
Home Page Link Enabled |
When enabled, the home page link appears in the site. |
|
Description |
Enter information about the helpdocs site. |
|
Show On Home Page |
When selected, displays the helpdocs site on the teamwork docs home page. |
|
Language Code |
Select the language code for the helpdocs site. For example, the language code for United States is US. |
|
Show Contact Form |
When selected, shows the contact form in the helpdocs site. |
|
Logo Image |
Select the logo image to appear in the helpdocs site. |
|
Touch Icon |
Select the image that appears as a touch icon to click and access the helpdocs site. |
|
Favicon |
Select a favorite icon, such as the website icon, to be updated in the helpdocs site. |
|
Page BG Color |
Select the page background color for the helpdocs site. |
|
Header BG Color |
Select the background color for the header. |
|
Nav Text Color |
Select the color for helpdocs site link. |
|
Nav Active Text Color |
Select the color for the helpdocs site link which appears when you try to hover the mouse and click the link. |
|
Article Text Color |
Select the color for the article text. |
|
Link Color |
Select the color for the site link. |
|
Head TemplateTemplates are predefined scenarios that you can expand and customize to create new scenarios. You can then share these with friends and colleagues. More |
Select the header template for the helpdocs site web page. |
|
Footer Template |
Select a footer template for the helpdocs site web page. |
|
Article Template |
Select the article template to be created in the helpdocs site. |
|
Category Template |
Select a new category template for the categories in the helpdocs site. |
|
Home Template |
Select the template for the helpdocs site home. |
|
Search Template |
Select a template for the search page results in the helpdocs site. |
Deletes a helpdocs site.
|
Connection |
|
|
Helpdocs Site ID |
Select the Helpdocs Site ID you want to delete. |
Retrieves a list of all categories within a helpdocs site.
|
Connection |
|
|
Helpdocs Site ID |
Select the Helpdocs Site ID whose categories you want to retrieve. |
|
Limit |
Maximum number of customers Boost.space Integrator should return during one scenario execution cycle. |
Creates a category within a site.
|
Connection |
|
|
Helpdocs Site ID |
Select the Helpdocs Site ID under where you want to create the category. |
|
Name |
Enter the name of the category. |
|
Slug |
Enter a new word that appears as a final word in the URL. For example, if you have selected a word, agent, then the example URL link is |
|
Display on Doc Homepage |
When selected, displays the category on the site homepage. |
|
Old URL |
If any old URL exists for this category, you can enter it so that the teamwork desk matches it and this category appears when any user searches this category with the old URL. |
Updates a category within a site.
|
Connection |
|
|
Helpdocs Site ID |
Select the Helpdocs Site ID whose category you want to update. |
|
Name |
Enter a new name for the category. |
|
Slug |
Select a new word that appears as a final word in the URL. For example, if you have selected a word, agent, then the example URL link is |
|
Display on Doc Homepage |
When selected, displays the category on the site homepage. |
|
Old URL |
If any old URL exists for this category, you can enter it so that Teamwork Desk matches it and this category appears when any user searches this category with the old URL. |
Deletes a category within a site.
|
Connection |
|
|
Helpdocs Site ID |
Select the Helpdocs Site ID whose category you want to delete. |
|
Category ID |
Select the Category ID you want to delete. |
Retrieves a list of all articles within a category or site.
|
Connection |
|
|
List Articles Within |
Select the option whose articles you want to list. |
|
Helpdocs Site ID |
Select the Helpdocs Site ID whose articles you want to list. |
|
Limit |
Maximum number of articles Boost.space Integrator returns during one scenario execution cycle. |
Gets the details of an article.
|
Connection |
|
|
Helpdocs Site ID |
Select the Helpdocs Site ID whose article details you want to retrieve. |
|
Article ID |
Select the Article ID to retrieve the details. |
Updates an article.
|
Connection |
|
|
Helpdocs Site ID |
Select the Helpdocs Site ID whose article you want to update. |
|
Title |
Select a new title for the article. |
|
Status |
Select a new status of article. For example, draft, published, or unpublished. |
|
Content Body |
Enter new content for the article. |
|
Description |
Enter a new description for the article. |
|
Slug |
Select a new word that appears as a final word in the URL. For example, if you have selected a word, agent, then the example URL link is http://site.teamwork.com/agent |
|
Display Order (Relevance) |
Select an order for the article to be displayed. |
|
Enable Disqus Comment |
When enabled, usersCan use the system on a limited basis based on the rights assigned by the admin. More can comment about this article. |
|
Edit Method |
Select a new edit method for the article. |
Deletes an article.
|
Connection |
|
|
Helpdocs Site ID |
Select the Helpdocs Site ID whose article you want to delete. |
|
Article ID |
Select the Article ID you want to delete. |
