| Active with remarks |
|---|
| This application needs additional settings. Please follow the documentation below to create your own connectionUnique, active service acces point to a network. There are different types of connections (API key, Oauth…). More. |
With Google Calendar modulesThe module is an application or tool within the Boost.space system. The entire system is built on this concept of modularity. (module - Contacts) More in Boost.spaceCentralization and synchronization platform, where you can organize and manage your data. More IntegratorPart of the Boost.space system, where you can create your connections and automate your processes. More, you can manage events and calendars in your Google Calendar account.
To use the Google Calendar modules, you must have a Google account. You can create an account at accounts.google.com.
Refer to the Google Calendar API documentation for a list of available endpoints.
To establish the connection in Boost.space Integrator:
-
Log in to your Boost.space Integrator account, add a Google Calendar moduleThe module is an application or tool within the Boost.space system. The entire system is built on this concept of modularity. (module - Contacts) More to your scenarioA specific connection between applications in which data can be transferred. Two types of scenarios: active/inactive. More, and click Create a Connection.
-
Optional: In the Connection name field, enter a name for the connection.
-
Optional: Switch on the Show advanced settings and enter your Google Cloud Platform Project client credentials. See the Create and configure a Google Cloud Console project for Google Calendar section below.
-
Click Sign in with Google and select your Google account.
-
If prompted, authenticate your account and confirm access.
You have successfully established the connection. You can now edit your scenario and add more Google Calendar modules. If your connection requires reauthorization at any point, follow the connection renewal steps here.
![[Note]](https://docs.boost.space/wp-content/themes/bsdocs/docs-parser/HTML/css/image/note.png) |
Note |
|---|---|
|
You may receive a connection errorService is unavailable due to a failure, a service responds with unexpected data or the validation of input data fails. More if your Google account has multiple APIs enabled in Google Cloud Platform. If so, create a new Google Cloud Platform Project and try to establish the connection again. See the Create and configure a Google Cloud Console project for Google Calendar section below for more information. |
To connect to Boost.space Integrator using your own client credentials, you can create and configure a project in the Google Cloud Console.
To create a Google Cloud Console project:
-
Log in to Google Cloud Console using your Google credentials.
-
In the top menu, click Select a project > New project.
-
Enter a Project name and select the Location for your project.
-
Click Create.
-
In the top menu, check if your new project is selected in the Select a project dropdown. If not, select the project you just created.
To enable the required API:
To configure your OAuth consent screen:
-
In the left sidebar, click OAuth consent screen.
-
Under UserCan use the system on a limited basis based on the rights assigned by the admin. More Type, select External.
For more information regarding user types, refer to Google’s Exceptions to verification requirements documentation.
-
Click Create.
-
Fill in the required fields with your information.
-
For Authorized domains, add
make.comandintegromat.com. -
Click Save and Continue.
-
On the Scopes page, click Add or Remove Scopes, add your desired scopes, and click Update.
-
Click Save and Continue.
-
Optional: If your project will remain in the Testing publishing statusCreate statuses for each module separately to create an ideal environment for efficient and consistent work. More, add test user emails on the Test usersCan use the system on a limited basis based on the rights assigned by the admin. More page, then click Save and continue.
To create your client credentials:
-
In the left sidebar, click Credentials.
-
Click + Create Credentials > OAuth Client ID.
-
In the Application type dropdown, select Web application.
-
Update the Name of your OAuth client. This will help you identify it in the console.
-
In the Authorized redirect URIs section, click +Add URI and enter the following redirect URI:
https://integrator.boost.space/oauth/cb/google. -
Click Create.
-
Copy your Client ID and Client Secret and store them in a safe place.
You will use these values in the Client ID and Client Secret fields in Boost.space Integrator.
After connecting the app, you can perform the following actions:
Event
-
Watch Events
-
Search Events
-
Get an Event
-
Create an Event
Note: For the Send notifications about the event creation field, the None option should only be used for migration use cases.
For the Recurrence field, DTSTART and DTEND lines are not allowed in this field; event start and end times are specified in the start and end fields. This field is omitted for single events or instances of recurring events.
For adding Google Drive file attachments, use the same format as in
alternateLinkproperty of the Files resource in the Drive API. -
Duplicate an Event
-
Update an Event
-
Delete an Event
Calendar
-
List Calendars
-
Get a Calendar
-
Create a Calendar
-
Update a Calendar
-
Delete a Calendar
-
Clear a Calendar
Access Control Rule
-
List Access Control Rules
-
Get an Access Control Rule
-
Create an Access Control Rule
-
Update an Access Control Rule
-
Delete an Access Control Rule
Other
-
Make an API Call
-
Get Free/Busy Information
It is possible to triggerEvery scenario has a trigger, an event that starts your scenario. A scenario must have a trigger. There can only be one trigger for each scenario. When you create a new scenario, the first module you choose is your trigger for that scenario. Create a trigger by clicking on the empty module of a newly created scenario or moving the... a scenario a specified amount of time before an event with the help of standard Google Calendar email reminders and the WebhooksA webhook is a way for an app to send real-time information to a specific URL in response to certain events or triggers. > Custom mailhook module.
-
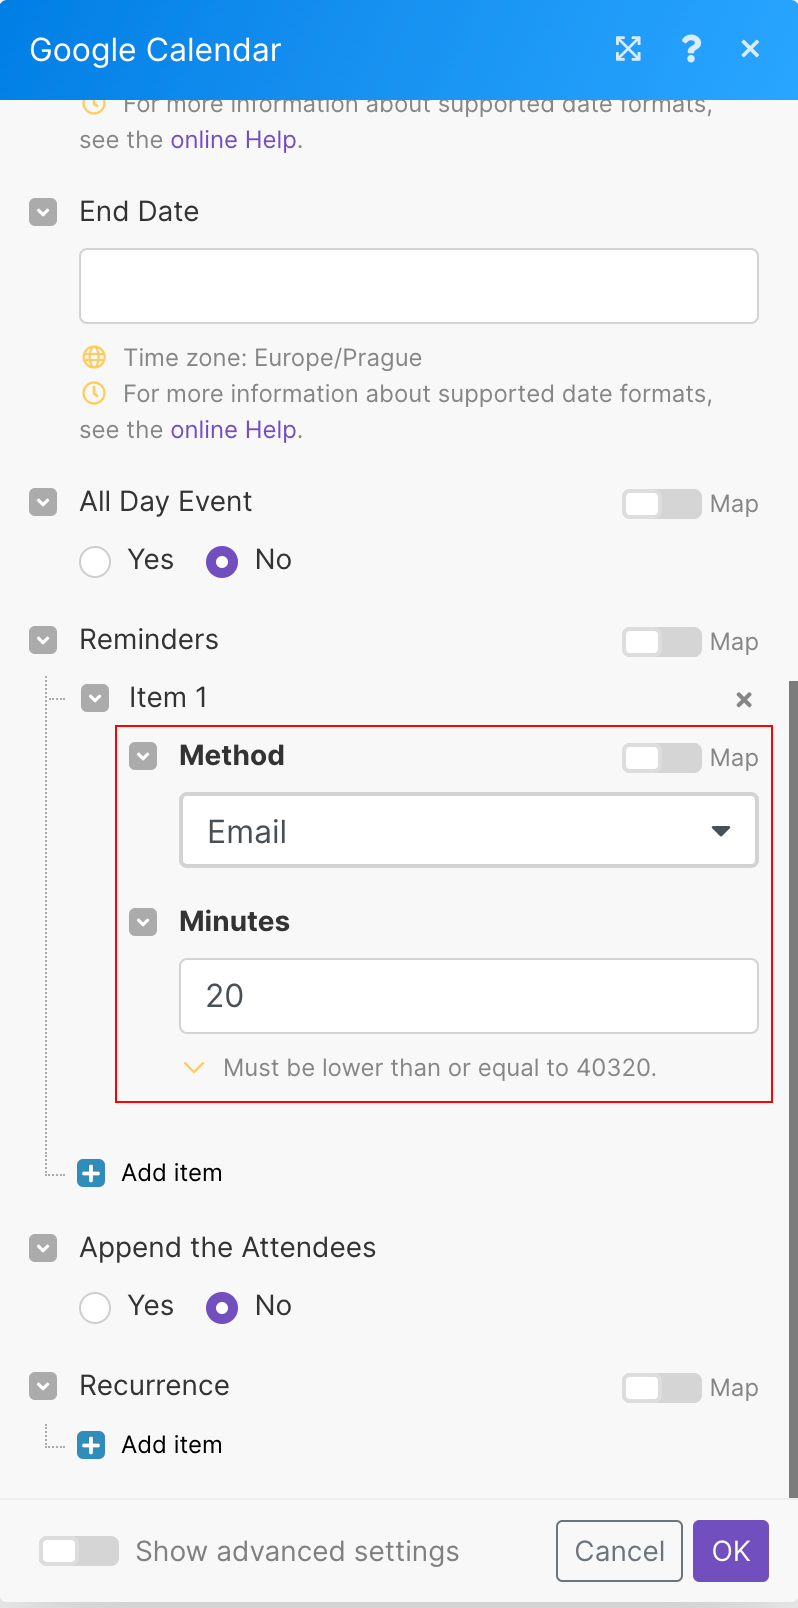
Use the Google Calendar > Update an event module to add an email reminder to your event:
-
Create a new scenario starting with the Webhooks > Custom mailhook module. Copy the mailhook’s email address. Save the scenario and execute it.
-
In Gmail, redirect the Google Calendar email reminders to the mailhook’s email address:
-
Open your Gmail settings.
-
Open the Forwarding and POP/IMAP tab.
-
Click Add a forwarding address.
-
Paste the copied mailhook’s email address, press “Next”, confirm by pressing “Proceed” in the popup window and close the dialog by pressing “OK”.
-
In Boost.space Integrator, switch to the new scenario which should finish its execution by receiving the confirmation email.
-
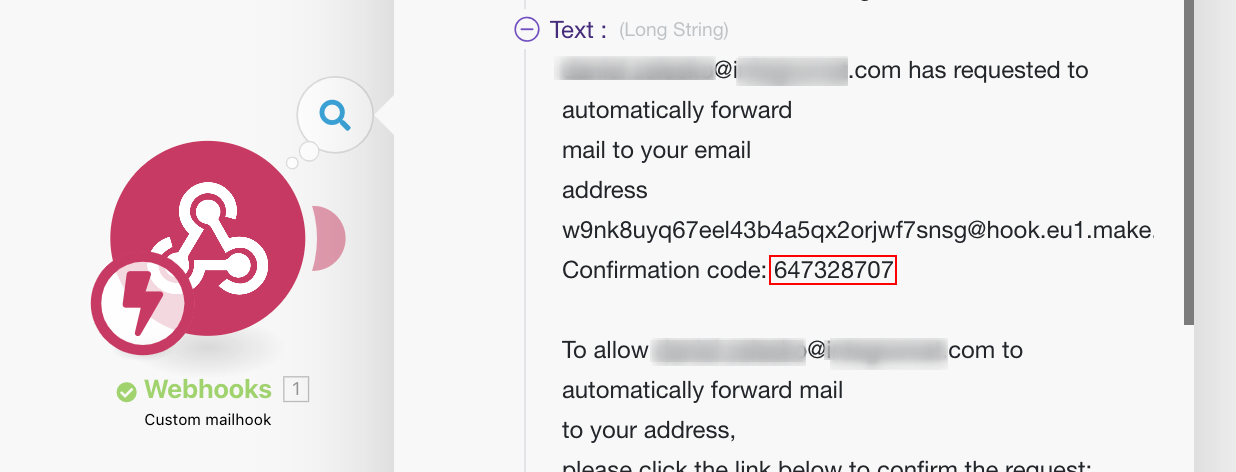
Click the bubble above the module to inspect the module’s output.
-
Expand the
TextitemItems are rows in records (order/request/invoice/purchase...) and search for the Confirmation code: -
Copy the Confirmation code.
-
In Gmail, paste the Confirmation code in the edit box and click Verify:
-
Open the Filters and Blocked Addresses tab.
-
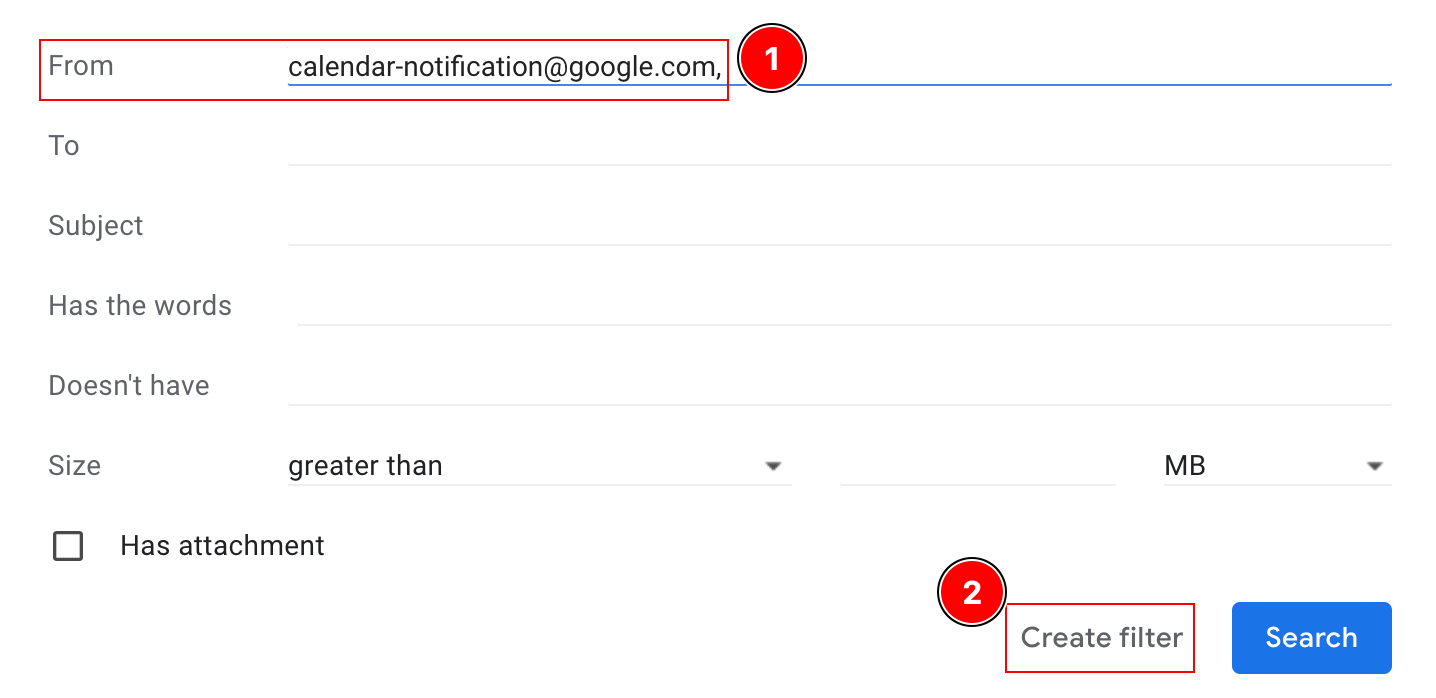
Click Create a new filter:
-
Set up a filter for all emails coming from
[email protected]and click Create filter: -
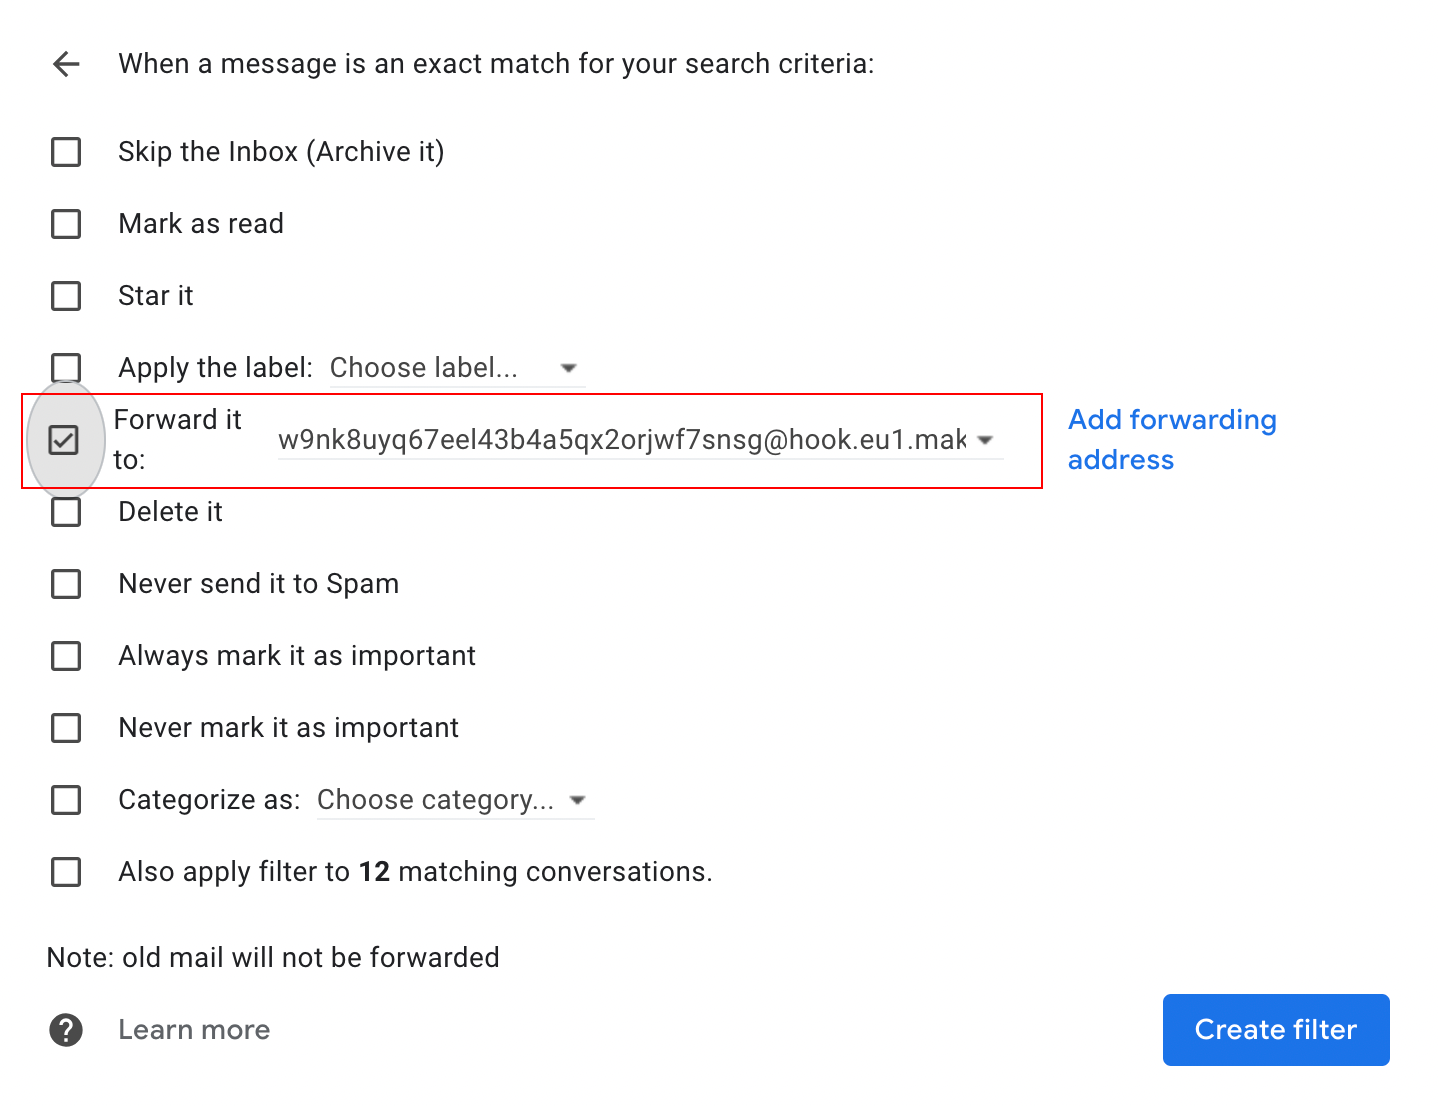
Tick the “Forward it to:” checkbox and choose the mailhook’s email address from the list:
-
Click Create filter.
-
-
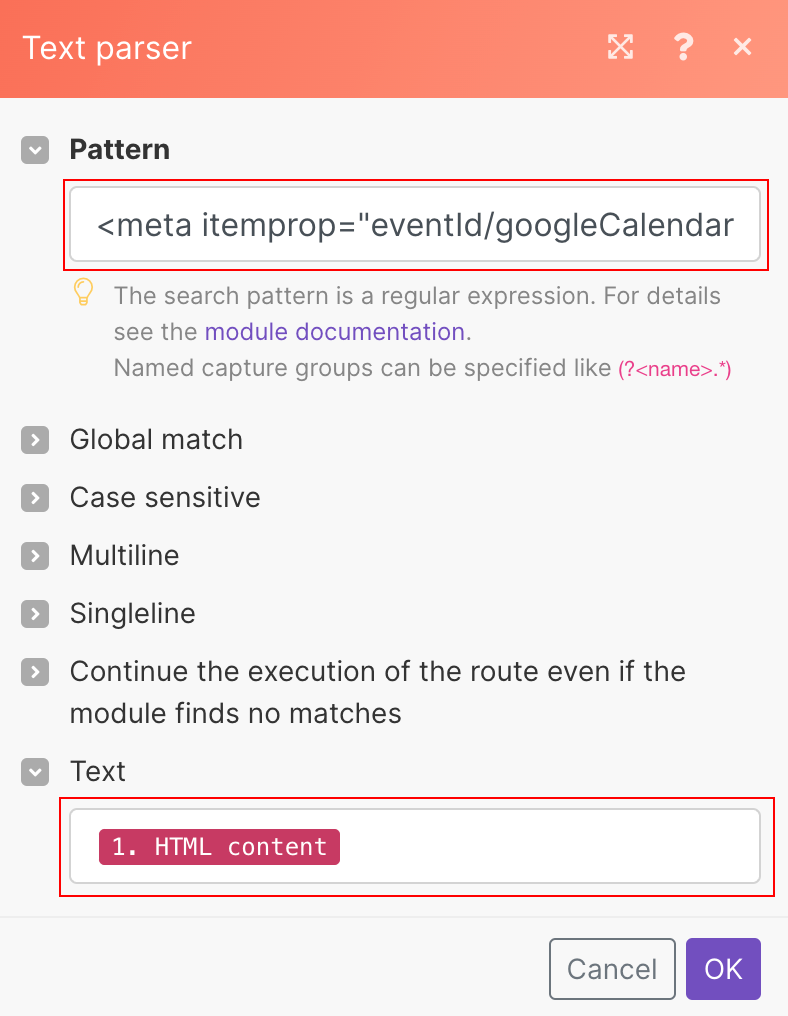
In Boost.space Integrator, you can add the Text parser > Match pattern module after the Webhooks > Custom mailhook module to parse the email’s HTML code and obtain any information you need. For example, you can configure a module like this to obtain the event’s ID:
Pattern:
<meta itemprop="eventId/googleCalendar" content="(?<evenitID>.*?)"/>Text: The
HTML contentitem output from the Webhooks > Custom mailhook module:
Both modules are deprecated. To iterate desired values, please use the Flow Control > IteratorWhen creating a scenario, use an iterator to divide one bundle into smaller separate bundles. Subsequent modules then process the bundles separately. One common use is when automatically uploading email attachments to a cloud drive. You can find iterators under the Flow control of the tools section. More module.

