| Active with remarks |
|---|
| This application needs additional settings. Please follow the documentation below to create your own connectionUnique, active service acces point to a network. There are different types of connections (API key, Oauth…). More. |
Shopify modulesThe module is an application or tool within the Boost.space system. The entire system is built on this concept of modularity. (module - Contacts) More allow you to monitor, create, update, delete, and search orders, products, product variants, product images, customers, articles, pages, refunds, inventory, abandoned checkouts, and transactions on your Shopify account.
Prerequisites
-
A Shopify account
In order to use Shopify with Boost.spaceCentralization and synchronization platform, where you can organize and manage your data. More IntegratorPart of the Boost.space system, where you can create your connections and automate your processes. More, you must have a Shopify account. Create a Shopify account at www.shopify.com/signup.
For the list of available endpoints, refer to the Shopify REST API Documentation.
Shopify offers two types of connections:
-
Standard OAuth connection (displayed as Shopify in the Create connection dialog) – use this by default
-
Custom appCreate your own custom apps to be used in the integrator engine and share them with users in your organization. (displayed as Shopify (custom or private apps)) – use this if the standard connection does not work
To connect your Shopify account to Boost.space Integrator, follow these steps:
Connecting Shopify using the standard connection type
Use the Shopify connection type by default. If creating the connection causes errorsService is unavailable due to a failure, a service responds with unexpected data or the validation of input data fails. More, use the custom or private app connection type.
-
Insert a Shopify moduleThe module is an application or tool within the Boost.space system. The entire system is built on this concept of modularity. (module - Contacts) More into a scenarioA specific connection between applications in which data can be transferred. Two types of scenarios: active/inactive. More. Under Connection, click Add.
-
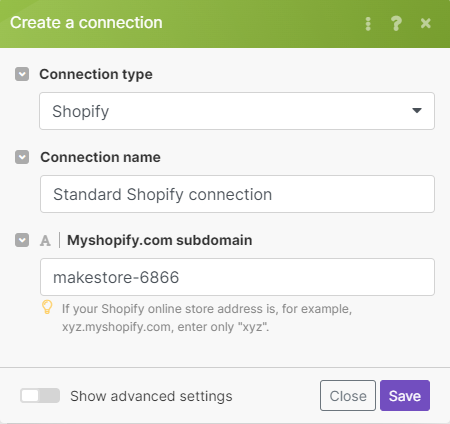
The Create a Connection dialog appears.
-
-
In the Connection type, select Shopify.
-
Type a Connection name.
-
Enter the Myshopify.com subdomain of your store.
-
For example, if the URL of your store is
https://mystore.myshopify.com, the subdomain to enter in the connection dialog ismystore.
-
-
Click Save.
-
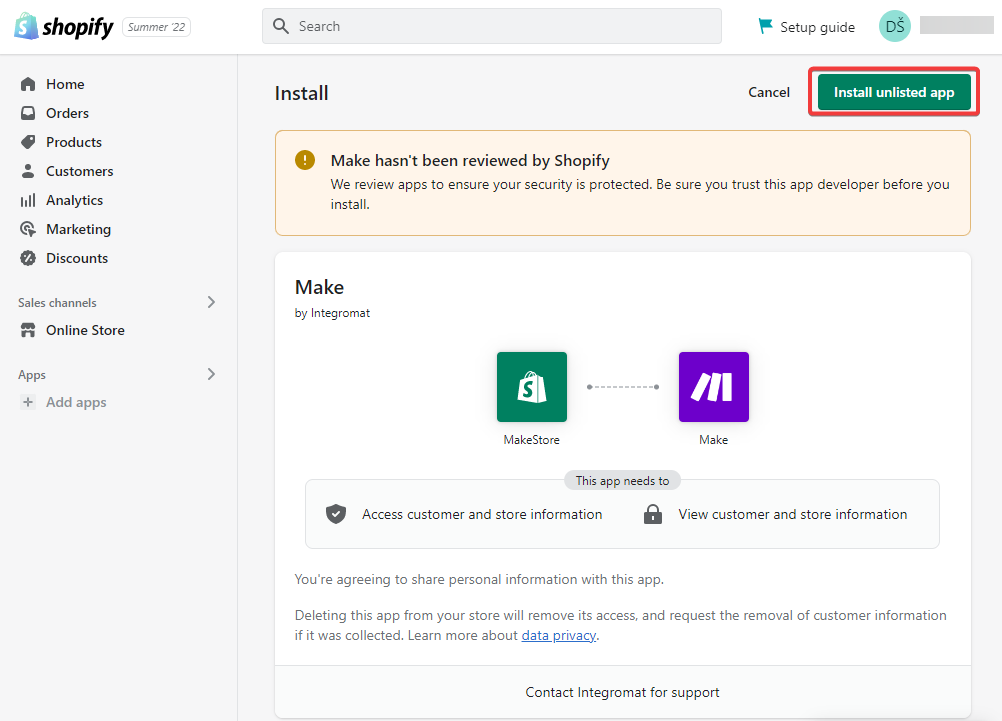
The system opens Shopify in a new window. Shopify asks you to log in and install the Boost.space Integrator app and approve its access to your store data.
-
-
In the Shopify Install dialog, review the privacy and permissions details, and then click Install unlisted app.
Connecting Shopify using a Shopify private or custom app
Use the Shopify (custom or private app) connection type if the standard Shopify connection type does not work for you.
This connection type requires creating a custom app in your Shopify store.
-
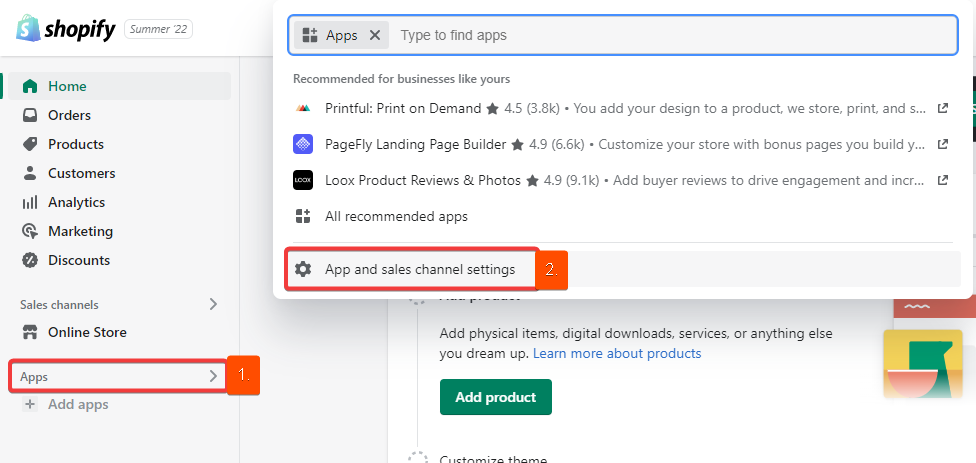
Log in to your Shopify store, click Apps, then click App and sales channel settings.
-
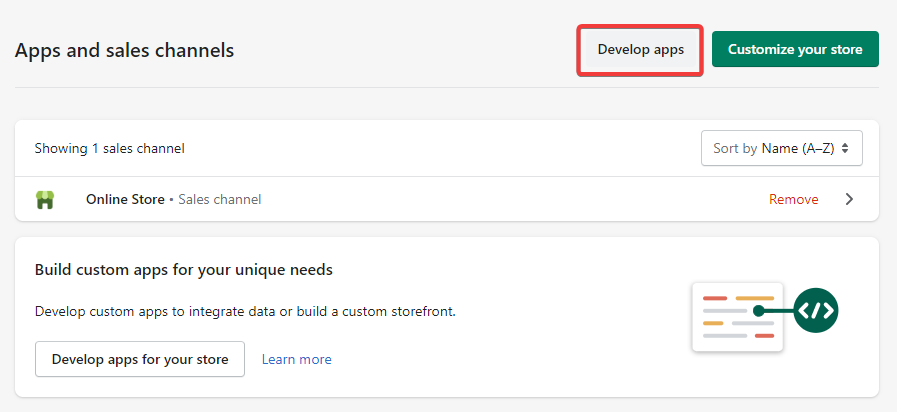
On the Apps and channels screen, click Develop apps.
-
Click Allow custom app development, then confirm this action again by clicking Allow custom app development on the next screen.
-
Click Create an app.
-
Type an App name, select an App developer, and click Create app.
-
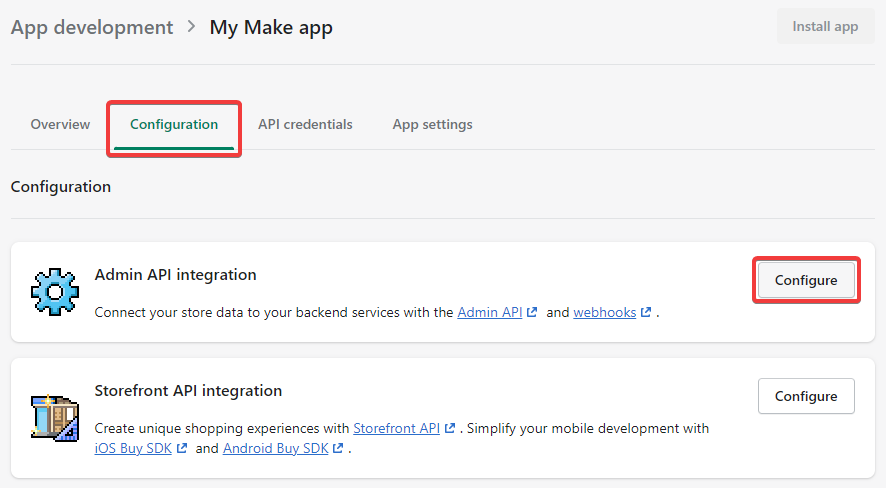
Click Configuration, then click Configurenext to AdminAdmins in Boost.space have exclusive access to system settings. They manage the overall system setup, including appearance, language, currency, user settings, and the availability of individual modules to users and teams. More API integration.
-
On the Admin API integration screen, select scopes (permissions) that represent the actions you will need Boost.space Integrator to perform. Then click Save.
-
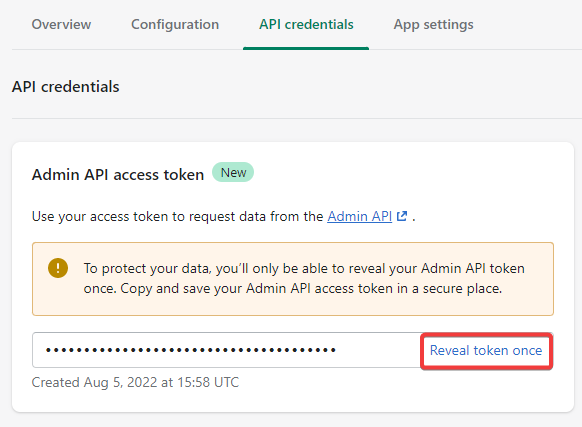
Switch to the API credentials tab and under Access tokens, click Install app. In the dialog that appears, confirm the action by clicking Install app.
-
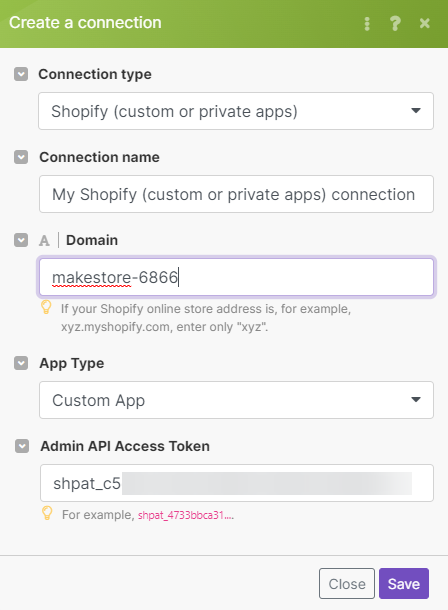
In Boost.space Integrator, add a Shopify module to a scenario. Under Connection, click Add, then fill in the required details shown in the following image.
-
Click Save.
To create a fulfillment, you’ll need to identify line itemsItems are rows in records (order/request/invoice/purchase...) in an order and retrieve the line item’s variant and inventory level.
Add the following modules to your scenario to create the fulfillment:
1. Get an Order or Watch Orders – to retrieve all line items of the order that you want to create fulfillment for.
2. Get Product Variant – to find the specific variants that are associated with the inventory itemItems are rows in records (order/request/invoice/purchase...) that you want to fulfill. You can find the Inventory item IDin the module’s output.
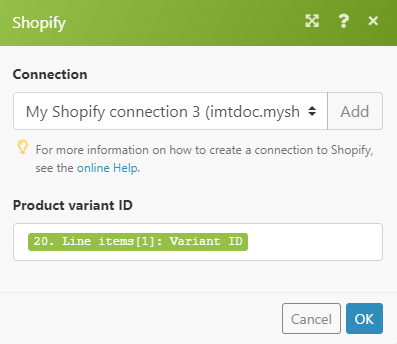
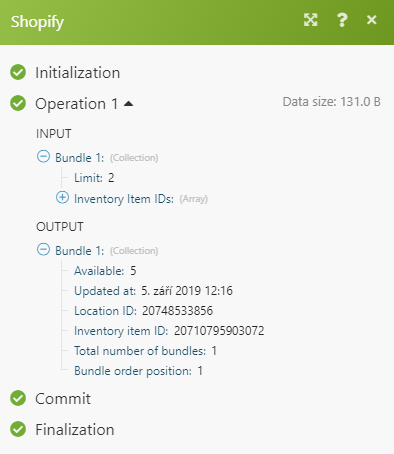
3. Search for Inventory Levels – to retrieve the inventory level for that item and the location where it’s stocked.
You can see in the module’s output that the variant is stocked at one location. The next step shows how to create a fulfillment from the 20748533856 location.
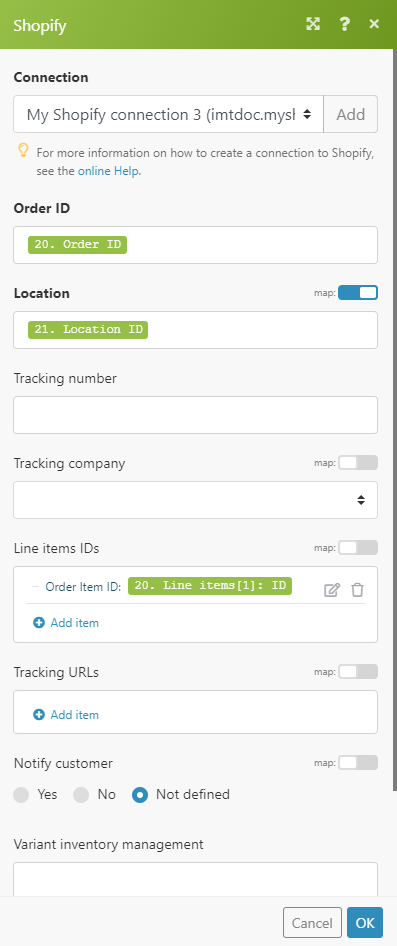
4. Create a Fulfillment – to create the fulfillment.
Use this to connect your Public App created in your Partner Dashboard.
To create an app:
-
From your Partner Dashboard, click Apps> Create app.
-
Provide an app name, URL, and Redirect URLs.
-
Click Create app. You are directed to your app’s overview page, where you can view the API key and API secret that you will need for the module’s connection configuration.
|
Connection Type |
|
|
Connection name |
Enter the name of the connection. |
|
Domain |
Enter the name of your Shopify domain. If your Shopify store address is https://mystore.myshopify.com, enter “mystore“. |
|
Client ID |
Enter the API key for the app, as defined in the Partner Dashboard. |
|
Client Secret |
Enter the API secret key for the app, as defined in the Partner Dashboard. |
|
Scope |
Specify needed scopes. If you requested both the read and write access scopes for a resource, then enter only for the write access scope. The read access scope is omitted because it’s implied by the write access scope. For example, if your request included See the list of admin scopes. |
To establish a private app connection, you need to create a private app to obtain the API Key and Password.
1. Log in to your Shopify administration (https://{yourShopifyDomain}.myshopify.com/admin).
2. Navigate to Apps > Manage private apps.
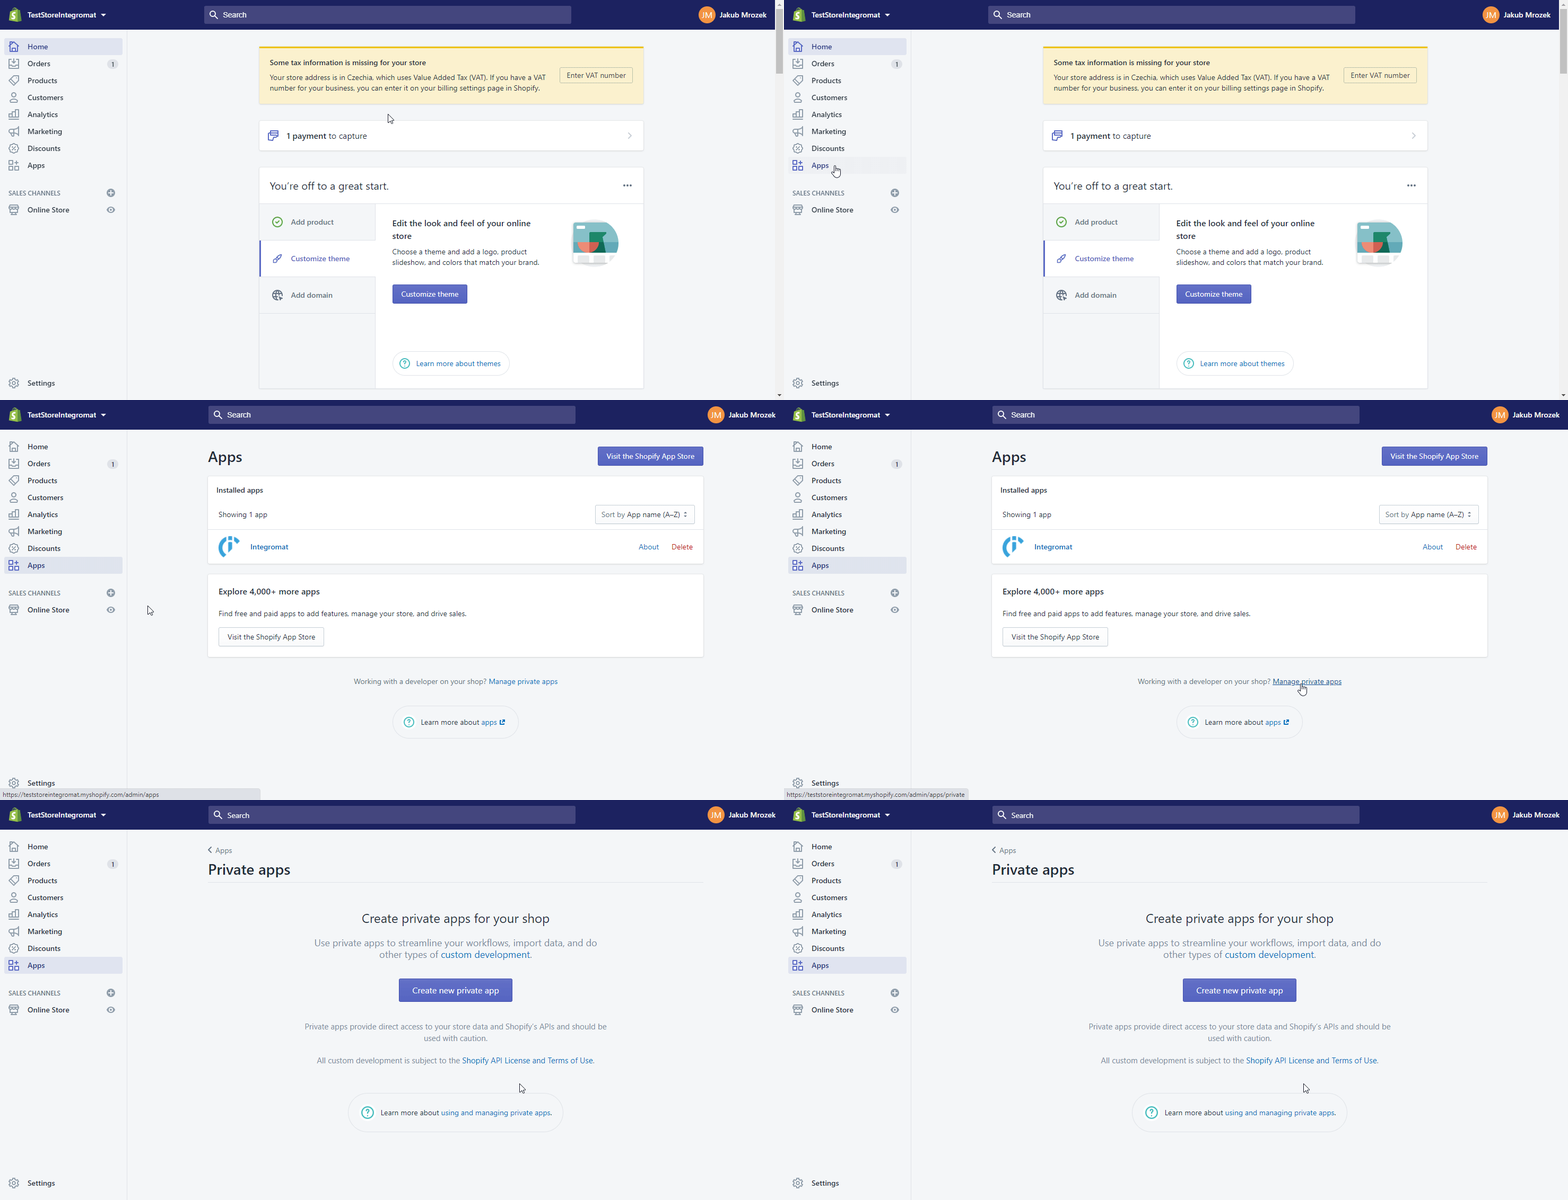
3. Click the Create new private app button ( ).
).
4. Fill in the required fields, click Save, and Create App.
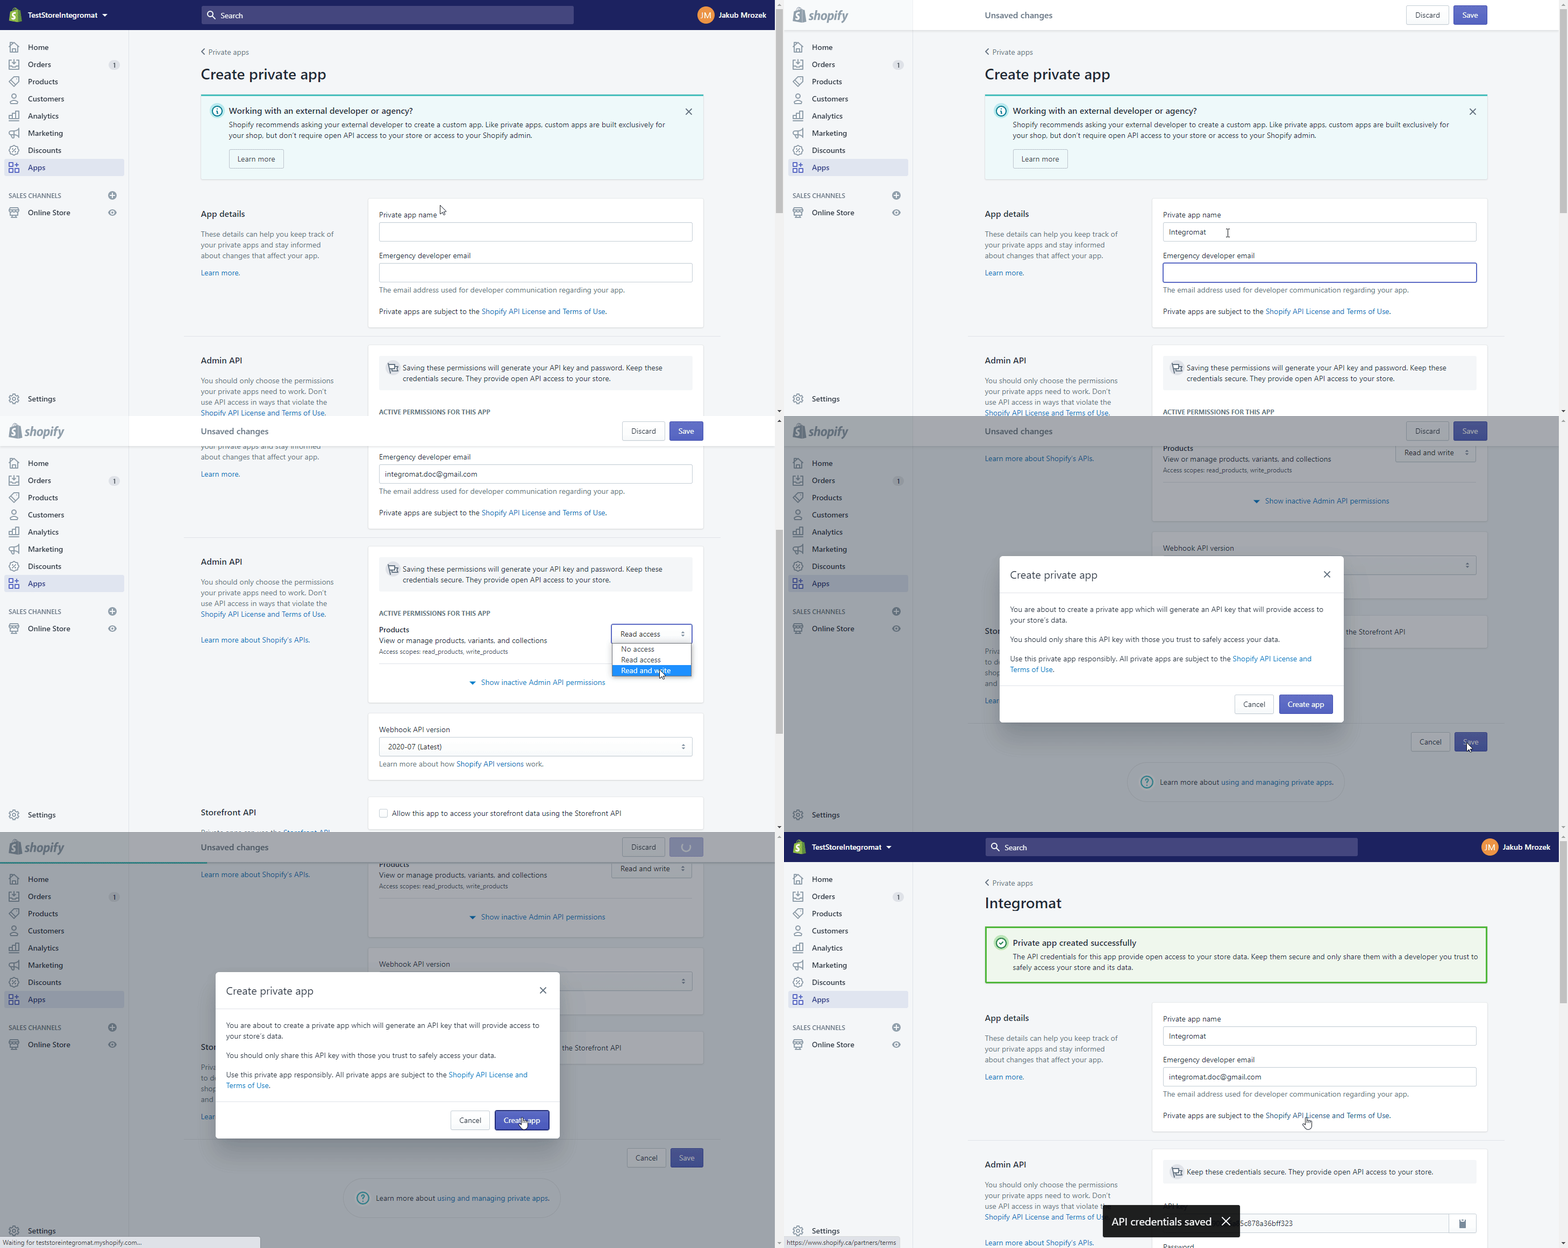
5. Find the generated API Key and Passwordin the Admin API section.
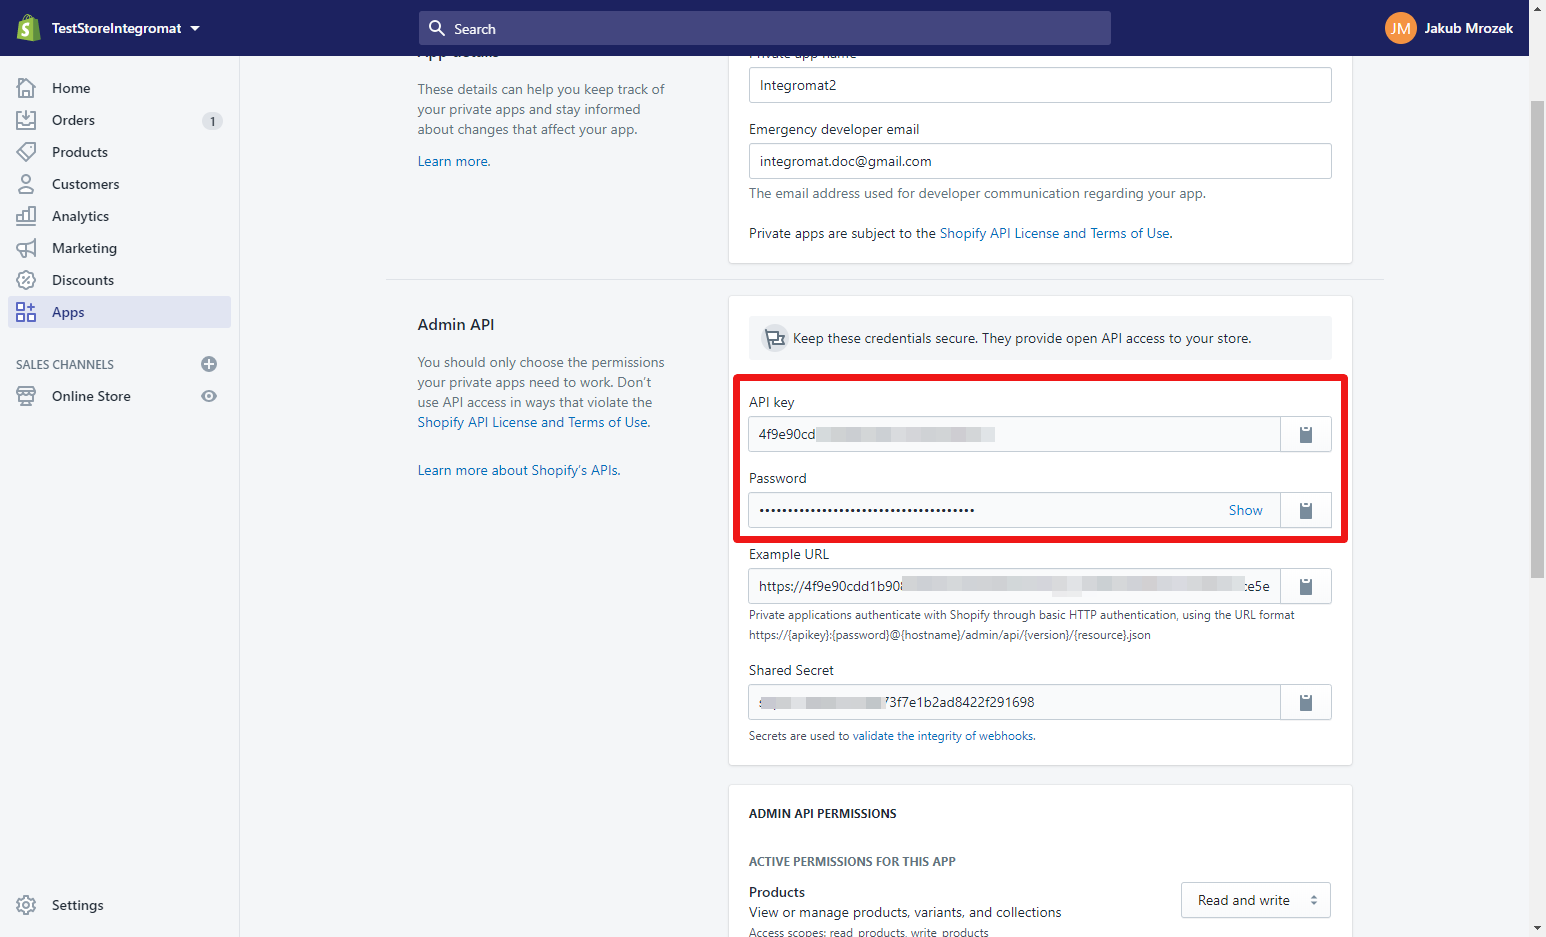
6. Go to Boost.space Integrator, and open the Make an API Callmodule’s Create a Connection dialog for the Shopify private app.
7. Enter the Domain (if your Shopify online store address is, for example, xyz.myshopify.com, enter only “xyz“.) and API Key and Password provided in step 5 to the respective fields, and click the Continue button to establish the connection.
The connection has been established. You can set up the private app’s Make an API Call module.
After connecting the app, you can perform the following actions:
Orders
-
Create an Order
-
Create a Draft Order
![[Note]](https://docs.boost.space/wp-content/themes/bsdocs/docs-parser/HTML/css/image/note.png)
Note In the output, the Shipping Line field is sometimes empty because the userCan use the system on a limited basis based on the rights assigned by the admin. More must have at least one item in the item list that requires shipping.
If not specified, the item will be treated as not requiring shipping, and Shopify will ignore Shipping Lines. This is the expected behavior.
-
Import a B2B Order
Only available for stores on the Shopify Plus planCombination of a license (enabled features) and tier (numeric limits) and a subscription period (monthly / yearly)..
-
Update an Order
-
Delete an Order
-
Close an Order
-
Reopen an Order
-
Cancel an Order
-
Get an Order
-
Count Orders
-
Search for Orders
-
Watch Orders
-
Search for Risks
Products
-
Create a Product
-
Update a Product
-
Delete a Product
-
Get a Product
-
Search for Products
-
Watch Products
Product Variants
-
Create a Product Variant
-
Update a Product Variant
-
Delete a Product Variant
-
List Product Variant
-
Get a Product Variant
Product Images
-
Upload a Product Image
-
Delete a Product Image
-
List Product Images
Collects
-
Create a Collect
-
Delete a Collect
-
Search for Collects
-
Get a Collect
Custom Collections
-
Search for Custom Collections
-
Create a Custom Collection
-
Get a Custom Collection
-
Update a Custom Collection
-
Delete a Custom Collection
Customers
-
Create a Customer
-
Update a Customer
-
Delete a Customer
-
Get a Customer
-
Search for Customers
-
Watch Customers
-
List Customer Addresses
![[Caution]](https://docs.boost.space/wp-content/themes/bsdocs/docs-parser/HTML/css/image/caution.png)
Caution Sometimes it is necessary to extend existing permissions in order to work with other objects (orders, customers, products, etc.)
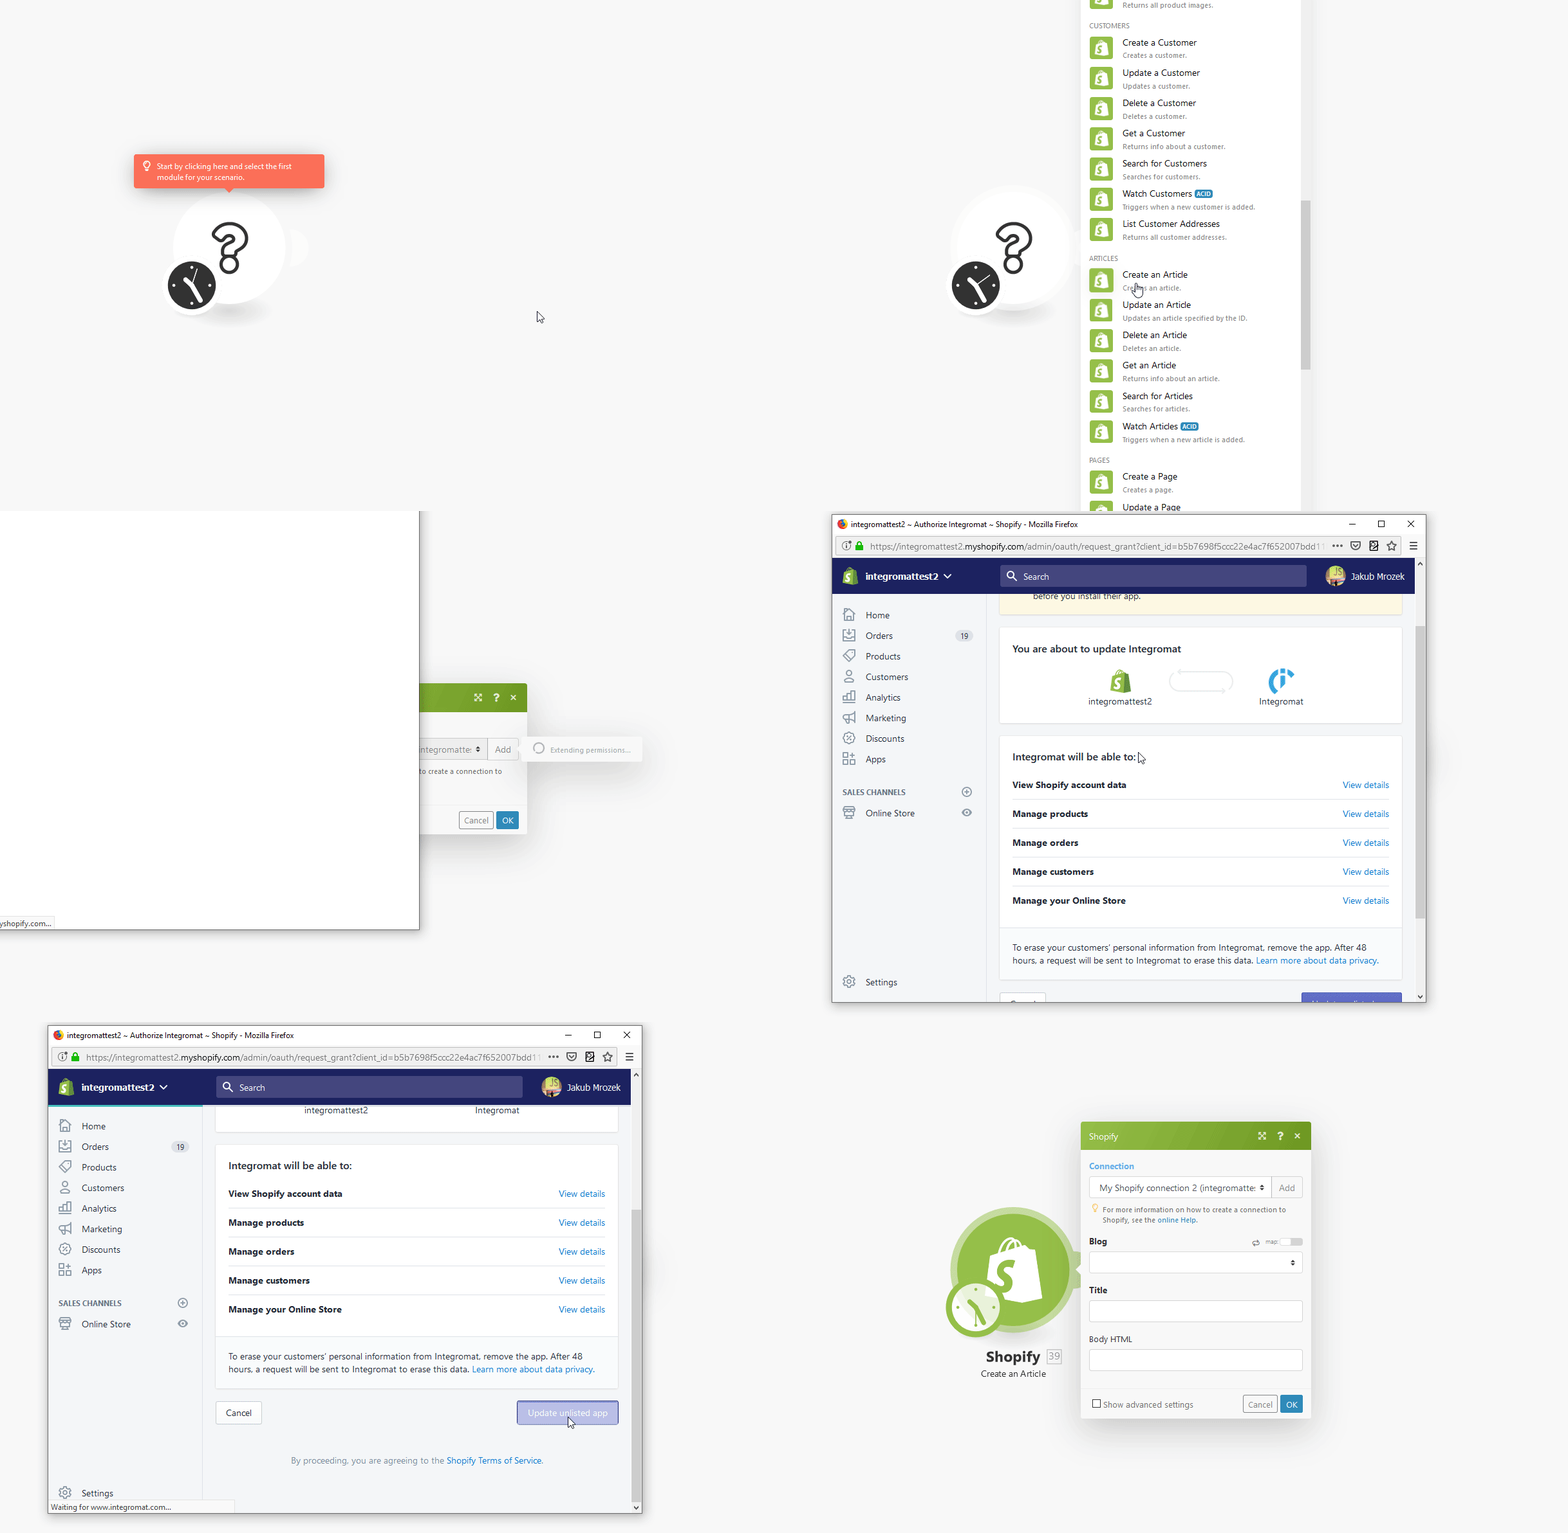
-
Send an Invitation
Articles
-
Create an Article
-
Update an Article
-
Delete an Article
-
Get an Article
-
Search for Articles
-
Watch Articles
Pages
-
Create a Page
-
Update a Page
-
Delete a Page
-
Get a Page
-
Search for Pages
-
Watch Pages
Refunds
-
Get a Refund
-
Search for Refunds
Fulfillments
-
List Fulfillments for a Fulfillment Order
-
Create a Fulfillment for Fulfillment Orders
Before you create a fulfillment, it’s helpful to understand some of the different fulfillment-related resources:
-
Order: Contains information about an order, including an arrayWithin a bundle, data items of the same type are sometimes in an array. You can find an array by looking at the details of a bundle. Depending on the details of your scenario, you can map other modules to a specific item in an array or use iterators and aggregators to manipulate your data into other formats. When mapping,... More of the purchased line items. Line items contain important fulfillment information, such as the associated variant, the quantity purchased, and the fulfillment statusCreate statuses for each module separately to create an ideal environment for efficient and consistent work. More.
-
Location: Represents a geographical location where a line item can be fulfilled from. A fulfillment service always has its own location, and variants managed by the fulfillment service should always be fulfilled from that location.
-
Fulfillment: Represents a shipment of one or more items in an order. It includes the line item that the fulfillment applies to, its tracking information, and the location of the fulfillment.
-
FulfillmentService: Represents a third-party warehousing service that prepares and ships orders on behalf of the store ownerCan manage members, managers and owners of a specific space. Can view and manage items. Can edit settings of a given space. More. Each fulfillment service is associated with its own location. When you create a fulfillment service, a new location is automatically created and associated with it.
-
-
Update a Fulfillment Tracking
-
Search for Fulfillments
-
Get a Fulfillment
-
Create a Fulfillment Event
Fulfillment Order
-
Search Assigned Fulfillment Orders
-
List Fulfillment Orders
-
Get a Fulfillment Order
-
Cancel a Fulfillment Order
-
Hold a Fulfillment Order
-
Release a Fulfillment Order Hold
-
Relocate a Fulfillment Order
-
Send a Fulfillment Request
-
Send a Cancellation Request
Fulfillment Service
-
Create a Fulfillment Service
-
Update a Fulfillment Service
-
Delete a Fulfillment Service
-
Accept a Fulfillment Request
-
Reject a Fulfillment Request
-
Accept a Cancellation Request
-
Reject a Cancellation Request
-
Close a Fulfillment Order
Inventory
-
Search for Inventory Levels
-
Adjust an Inventory Level
-
Update an Inventory Level
-
Connect an Inventory Item
-
Delete an Inventory Level
-
Search for Inventory Items
-
Update an Inventory Item
Abandoned Checkouts
-
Search for Abandoned Checkouts
-
Watch Abandoned Checkouts
Transactions
-
Create a Transaction
-
Search for Transactions
Discounts
-
Search for Discount Codes
-
Create a Discount Code
-
Update a Discount Code
-
Delete a Discount Code
-
Create a Price Rule
Metafields
-
Search for Metafields
-
Get a Metafield
-
Create a Metafield
-
Update a Metafield
-
Delete a Metafield
Payments
-
Search for Disputes
-
Search for Payouts
Themes
-
List Assets
-
Create or Update an Asset
-
Get an Asset
-
Delete an Asset
Other
-
Make an API Call
-
Make a GraphQL API Call
-
New Event
You need to create a new connection with a required scope.
Unfortunately, when you create a new connection, all previously used scopes are removed from your account, and only scopes added in the latest connection are used for all your connections (including the previously created connections).
Include all needed scopes in the new connection.

