| Active with remarks |
|---|
| This application needs additional settings. Please follow the documentation below to create your own connectionUnique, active service acces point to a network. There are different types of connections (API key, Oauth…). More. |
The Celoxis modulesThe module is an application or tool within the Boost.space system. The entire system is built on this concept of modularity. (module - Contacts) More allow you to watch, create, update, list, retrieve, and delete tasks, usersCan use the system on a limited basis based on the rights assigned by the admin. More, projects, time entries, and apps in your Celoxis account.
Prerequisites
-
A Celoxis account
In order to use Celoxis with Boost.spaceCentralization and synchronization platform, where you can organize and manage your data. More IntegratorPart of the Boost.space system, where you can create your connections and automate your processes. More, it is necessary to have a Celoxis account. If you do not have one, you can create a Celoxis account at celoxis.com/trial.
To connect your Celoxis account to Boost.space Integrator you need to obtain the Celoxis WebhookA webhook is a way for an app to send real-time information to a specific URL in response to certain events or triggers. URL and API Key from your Celoxis account and insert it in the Create a connection dialog in the Boost.space Integrator moduleThe module is an application or tool within the Boost.space system. The entire system is built on this concept of modularity. (module - Contacts) More.
1. Log in to your Celoxis account.
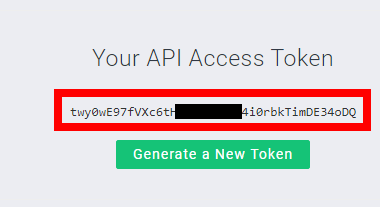
2. Click your Profile Icon >API> Click here> Generate API TokenThe API token is a multi-digit code that allows a user to authenticate with cloud applications. More.
3. Click OK and copy the API TokenThe API token is a multi-digit code that allows a user to authenticate with cloud applications. More to your clipboard.

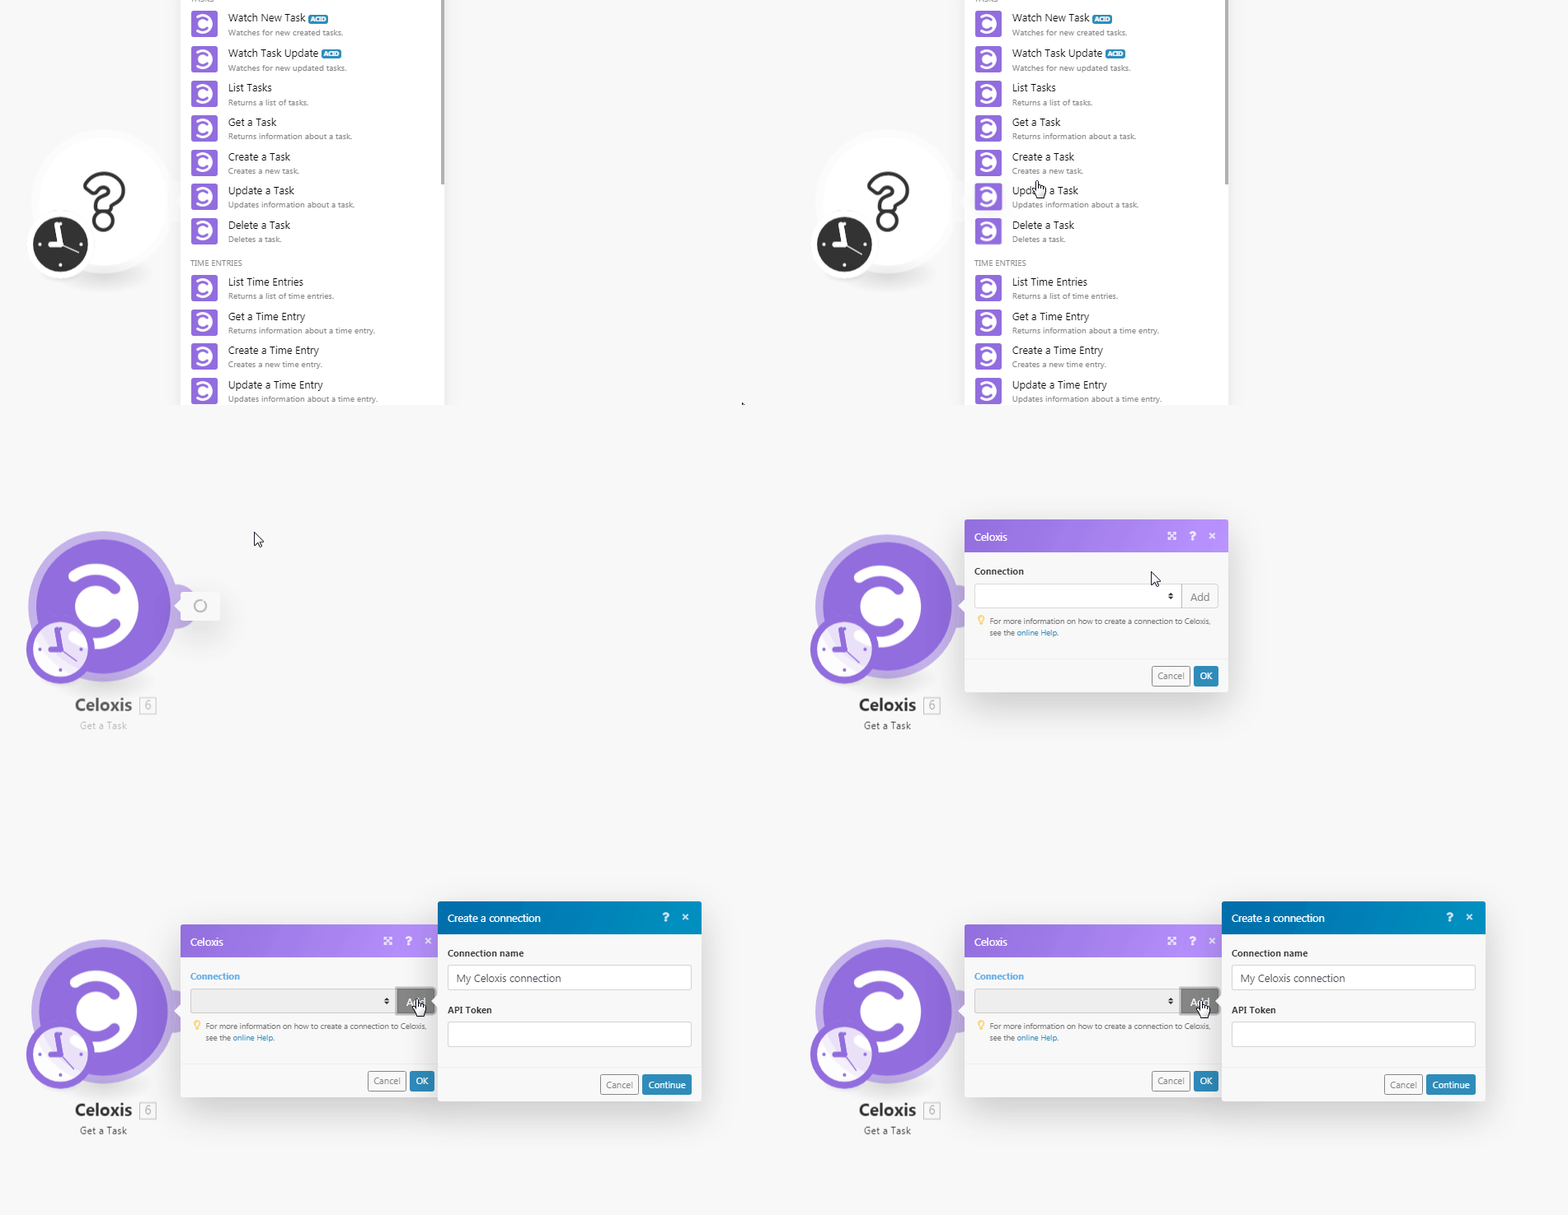
4. Go toBoost.space Integrator and open the Celoxis module’s Create a connection dialog.

5. In the Connection name field, enter a name for the connection.
6. In the API Token field, enter the API token copied in step 4 and click Continue.
The connection has been established.
Watches for newly created tasks.
|
Connection |
|
|
Limit |
Set the maximum number of new tasks Boost.space Integrator should return during one scenarioA specific connection between applications in which data can be transferred. Two types of scenarios: active/inactive. More execution cycleA cycle is the operation and commit/rollback phases of scenario execution. A scenario may have one or more cycles (one is the default).. |
Watches for newly updated tasks.
|
Connection |
|
|
Limit |
Set the maximum number of updated tasks Boost.space Integrator should return during one scenario execution cycle. |
Returns a list of tasks.
|
Connection |
|
|
Order |
Select the order in which you want to list the tasks:
|
|
Sort By |
Select the option to sort the tasks. |
|
Keywords |
Enter the keywords or phrases to search the tasks based on the specified criteria. |
|
Name |
Enter the name of the task to list the details. |
|
Hierarchy |
Enter the hierarchy details to list only those tasks related to it. |
|
Summary Tasks |
Select whether to list the summary tasks:
|
|
Assigned |
Select whether to list the assigned tasks:
|
|
Task Level |
Select the task level of the task you want to list. |
|
Display Tasks |
Select the option to display the tasks:
|
|
Limit |
Set the maximum number of tasks Boost.space Integrator should return during one scenario execution cycle. |
Returns information about a task.
|
Connection |
|
|
Task ID |
Select the Task ID whose details you want to retrieve. |
Creates a new task.
|
Connection |
|
|
Name |
Enter the name of the task. |
|
Project ID |
Select the Project ID related to the task. |
|
Actual Finish |
Enter the date when the task is completed. |
|
Actual Start |
Enter the date when the task has begun. |
|
Allow Time Logging |
Select whether you want to log the time for the task:
|
|
Billing Type |
Select the billing type of the task:
|
|
Budget |
Enter the budget amount allocated for the task. |
|
Constraint Date |
Enter the priority date by which the task to be completed. |
|
Description |
Enter the details of the task. |
|
Duration |
Enter the total duration in minutes or hours took to complete the task. |
|
Kanban State |
Select the Kanban state of the task:
|
|
Manually Scheduled |
Select whether the task is scheduled manually:
|
|
Planned Effort |
Enter the details of the planned effort on the task. |
|
Planned Finish |
Enter the date by when the task is planned to complete. |
|
Planned Fixed Cost |
Enter the fixed cost planned for the task. |
|
Planned Non Labor Cost |
Enter the non-labor cost planned for the task. For example, |
|
Planned Start |
Enter the date when the task is planned to start. |
|
Priority |
Select the priority of the task:
|
|
Resource ID |
Select the resources to whom the task is assigned: |
|
Schedule Type |
Select the schedule type of the task:
|
Updates information about a task.
|
Connection |
|
|
Task ID |
Select the Task ID whose details you want to update. |
|
Name |
Enter the name of the task. |
|
% Complete |
Enter the percentage of progress made on the task. |
|
Project ID |
Select the Project ID related to the task. |
|
Actual Finish |
Enter the date when the task is completed. |
|
Actual Start |
Enter the date when the task has begun. |
|
Allow Time Logging |
Select whether you want to log the time for the task:
|
|
Billing Type |
Select the billing type of the task:
|
|
Budget |
Enter the budget amount allocated for the task. |
|
Constraint Date |
Enter the priority date by which the task to be completed. |
|
Description |
Enter the details of the task. |
|
Duration |
Enter the total duration in minutes or hours took to complete the task. |
|
Kanban State |
Select the Kanban state of the task:
|
|
Manually Scheduled |
Select whether the task is scheduled manually:
|
|
Planned Effort |
Enter the details of the planned effort on the task. |
|
Planned Finish |
Enter the date by when the task is planned to complete. |
|
Planned Fixed Cost |
Enter the fixed cost planned for the task. |
|
Planned Non Labor Cost |
Enter the non-labor cost planned for the task. For example, |
|
Planned Start |
Enter the date when the task is planned to start. |
|
Priority |
Select the priority of the task:
|
|
Resource ID |
Select the resources to whom the task is assigned:
|
|
Schedule Type |
Select the schedule type of the task:
|
Deletes a task.
|
Connection |
|
|
Task ID |
Select the Task ID you want to delete. |
Returns a list of time entries.
|
Connection |
|
|
Order |
Select the order to list the time entries:
|
|
Sort by |
Select the option to sort the time entries. |
|
Approver |
Select the approver of the time entries you want to list. |
|
Non Project Time |
Select whether to list the non-project time entries:
|
|
Limit |
Set the maximum number of time entries Boost.space Integrator should return during one scenario execution cycle. |
Returns information about a time entry.
|
Connection |
|
|
Time Entry ID |
Select the Time Entry ID whose details you want to retrieve. |
Creates a new time entry.
|
Connection |
|
|
Date |
Enter the date on which you want to create the time entry. |
|
Hours |
Enter the hours in the HH:MM 24 hour format. For example, |
|
Time Code |
Select the time code for the time entry:
|
|
App ID |
Select the App ID related to the time entry. |
|
Task ID |
Select the Task ID related to the time entry. |
|
Bill Rate |
Enter the billing rate for the time entry. |
|
Cost Rate |
Enter the cost rate for the time entry. |
|
Billable |
Select whether the time entry is billable:
|
|
Costable |
Select whether the time entry is costable:
|
|
Comments |
Enter any additional comments about the time entry. |
|
Invoiced On |
Enter the date when the time entry is invoiced. |
|
UserCan use the system on a limited basis based on the rights assigned by the admin. More ID |
Select the User ID for whom you are creating the time entry. |
|
State |
Select the statusCreate statuses for each module separately to create an ideal environment for efficient and consistent work. More of the time entry:
|
|
Approver ID |
Select the Approver ID who is the approver for the time entry. |
|
Invoicer ID |
Select the Invoicer ID of the time entry:
|
Updates information about a time entry.
|
Connection |
|
|
Time Entry ID |
Select the Time Entry ID whose details you want to update. |
|
Date |
Enter the date on which you want to create the time entry. |
|
Hours |
Enter the hours in the HH:MM 24 hour format. For example, |
|
Time Code |
Select the time code for the time entry:
|
|
App ID |
Select the App ID related to the time entry. |
|
Task ID |
Select the Task ID related to the time entry. |
|
Bill Rate |
Enter the billing rate for the time entry. |
|
Cost Rate |
Enter the cost rate for the time entry. |
|
Billable |
Select whether the time entry is billable:
|
|
Costable |
Select whether the time entry is costable:
|
|
Comments |
Enter any additional comments about the time entry. |
|
Invoiced On |
Enter the date when the time entry is invoiced. |
|
User ID |
Select the User ID for whom you are creating the time entry. |
|
State |
Select the status of the time entry:
|
|
Approver ID |
Select the Approver ID who is the approver for the time entry. |
|
Invoicer ID |
Select the Invoicer ID of the time entry:
|
Deletes a specified time log.
|
Connection |
|
|
Time Entry ID |
Select the Time Entry ID you want to delete. |
Returns a list of users.
|
Connection |
|
|
Order |
Select the order to list the users:
|
|
Sort By |
Select the option to sort the users. |
|
Search |
Enter a keyword or phrase to search the users based on the specified criteria. |
|
Job Role |
Select whether to list the job role of the users:
|
|
Active |
Select whether to list active users:
|
|
Limit |
Set the maximum number of users Boost.space Integrator should return during one scenario execution cycle. |
Returns information about a user.
|
Connection |
|
|
User ID |
Select the User ID whose details you want to retrieve. |
Creates a new user.
|
Connection |
|
|
Name |
Enter the name of the user. |
|
Non Virtual |
Select the checkbox if the user is non-virtual. |
|
AdminAdmins in Boost.space have exclusive access to system settings. They manage the overall system setup, including appearance, language, currency, user settings, and the availability of individual modules to users and teams. More |
Select whether the user is an admin:
|
|
Phone |
Enter the phone number of the user. |
|
Role |
Select the role of the user:
|
|
Dashboard |
Select the appropriate dashboard for the user. |
|
Reporting ManagerCan manage members and space managers, view and manage items. Can modify space settings. More ID |
Select the Reporting Manager ID to whom the user must report to. |
|
Locale |
Enter the applicable language for the user. For example, |
|
Bill Rate |
Enter the billing rate of the user. |
|
Cost Rate |
Enter the cost rate of the user. |
Updates information about a user.
|
Connection |
|
|
User ID |
Select the User ID whose details you want to update. |
|
Name |
Enter the name of the user. |
|
Non Virtual |
Select whether the user is non-virtual:
|
|
Admin |
Select whether the user is an admin:
|
|
Phone |
Enter the phone number of the user. |
|
Role |
Select the role of the user:
|
|
Dashboard |
Select the appropriate dashboard for the user. |
|
Reporting Manager ID |
Select the Reporting Manager ID to whom the user must report to. |
|
Locale |
Enter the applicable language for the user. For example, |
|
Bill Rate |
Enter the billing rate of the user. |
|
Cost Rate |
Enter the cost rate of the user. |
Returns a list of projects.
|
Connection |
|
|
Order |
Select the order in which you want to list the projects:
|
|
Sort By |
Select the option to sort the projects. |
|
Keywords |
Enter the keywords or phrases to search the projects based on the specified criteria. |
|
Name |
Enter the name of the project to list the details. |
|
Open Projects |
Enter the open project details to list only those projects. |
|
Team |
Enter the team details to list the project related to only those teams. |
|
Limit |
Set the maximum number of projects Boost.space Integrator should return during one scenario execution cycle. |
Returns information about a project.
|
Connection |
|
|
Project ID |
Select the Project ID whose details you want to list. |
Creates a new project.
|
Connection |
|
|
Manager ID |
Select the Manager ID who will manage the project. |
|
Name |
Enter a name for the project. |
|
Planned Start |
Enter the date when the project begins. |
|
State |
Select the state of the project:
|
|
Type |
Select the project type:
|
|
Alignment |
Enter a number 0 and 100 based on how closely the project’s requirements match with the organization’s business, goals, skill sets, and resources. A higher number means better alignment. |
|
Benefit |
Enter a number between 0 and 100 based on how closely the project reflects the potential for financial or operational gain upon successful completion. A higher number means more benefits. |
|
Client ID |
Select the Client ID associated with the project. |
|
Billing Type |
Select the billing type of the project:
|
|
Budget |
Enter the amount allocated for the project. |
|
Code |
Enter the |
|
Deadline |
Enter the date when the project must be completed. |
|
Description |
Enter the details of the project. |
|
Fixed Price |
Enter the price fixed for the project. |
|
Priority |
Select the priority of the project:
|
|
Risk |
Select the Risk type of the project:
|
Updates information about a project.
|
Connection |
|
|
Project ID |
Select the Project ID whose details you want to update. |
|
Manager ID |
Select the Manager ID who will manage the project. |
|
Name |
Enter a name for the project. |
|
Planned Start |
Enter the date when the project begins. |
|
State |
Select the state of the project:
|
|
Type |
Select the project type:
|
|
Alignment |
Enter a number 0 and 100 based on how closely the project’s requirements match with the organization’s business, goals, skill sets, and resources. A higher number means better alignment. |
|
Benefit |
Enter a number between 0 and 100 based on how closely the project reflects the potential for financial or operational gain upon successful completion. A higher number means more benefits. |
|
Client ID |
Select the Client ID associated with the project. |
|
Billing Type |
Select the billing type of the project:
|
|
Budget |
Enter the amount allocated for the project. |
|
Code |
Enter the |
|
Deadline |
Enter the date when the project must be completed. |
|
Description |
Enter the details of the project. |
|
Fixed Price |
Enter the price fixed for the project. |
|
Priority |
Select the priority of the project:
|
|
Risk |
Select the Risk type of the project:
|
Deletes a project.
|
Connection |
|
|
Project ID |
Select the Project ID you want to delete. |
Returns a list of apps.
|
Connection |
|
|
Order |
Select the order in which you want to list the apps:
|
|
Sort By |
Select the option to sort the apps. |
|
Keywords |
Enter the keywords or phrases to search the apps based on the specified criteria. |
|
State |
Enter the name of the task to list the details. |
|
Limit |
Set the maximum number of apps Boost.space Integrator should return during one scenario execution cycle. |
Returns information about an app.
|
Connection |
|
|
App ID |
Select the App ID whose details you want to retrieve. |
Creates a new app.
|
Connection |
|
|
Project ID |
Select the Project ID to which you are creating the app. |
|
App |
Select the app type:
|
|
Name |
Enter a name for the app. |
|
Date |
Enter the date when you are creating the app. |
|
Description |
Enter the details of the app. |
|
Due Date |
Enter the date when the app must be completed. |
|
Mitigation PlanCombination of a license (enabled features) and tier (numeric limits) and a subscription period (monthly / yearly). |
Enter the details of the mitigation plan for the app. |
|
Mitigation Cost |
Enter the mitigation cost details of the project. |
|
Potential Cost |
Enter the cost planned if the risk occurs. |
|
Bug Type |
If the app is a bug, select the bug type:
|
|
Component |
Select the app component. |
|
Fix Version |
Select the software product fix version of the app. |
|
Affects Version |
Select the version the app fix affects. |
|
Budget |
Select the color code for the app budget. For example, |
|
Issue |
Select the color code for the app issue. For example, |
|
Overall |
Select the overall status of the app. |
|
Quality |
Select the quality of the app. |
|
Schedule |
Select the schedule status of the app. |
|
Scope |
Select the scope of the app. |
|
Team |
Select the team to whom the app is assigned. |
|
Risk |
Select the risk status of the app. |
|
Risk Impact |
Select the risk impact of the app. |
|
Risk Probability |
Select the risk probability of the app:
|
|
Priority |
Select the priority of the app:
|
|
Severity |
Select the severity of the app:
|
|
Resolution |
Select the resolution for the app:
|
Updates information about an app.
|
Connection |
|
|
App ID |
Select the App ID whose details you want to update. |
|
Project ID |
Select the Project ID to which you are creating the app. |
|
App |
Select the app type:
|
|
Name |
Enter a name for the app. |
|
Date |
Enter the date when you are creating the app. |
|
Description |
Enter the details of the app. |
|
Due Date |
Enter the date when the app must be completed. |
|
Mitigation Plan |
Enter the details of the mitigation plan for the app. |
|
Mitigation Cost |
Enter the mitigation cost details of the project. |
|
Potential Cost |
Enter the cost planned if the risk occurs. |
|
Bug Type |
If the app is a bug, select the bug type:
|
|
Component |
Select the app component. |
|
Fix Version |
Select the software product fix version of the app. |
|
Affects Version |
Select the version the app fix affects. |
|
Budget |
Select the color code for the app budget. For example, |
|
Issue |
Select the color code for the app issue. For example, |
|
Overall |
Select the overall status of the app. |
|
Quality |
Select the quality of the app. |
|
Schedule |
Select the schedule status of the app. |
|
Scope |
Select the scope of the app. |
|
Team |
Select the team to whom the app is assigned. |
|
Risk |
Select the risk status of the app. |
|
Risk Impact |
Select the risk impact of the app. |
|
Risk Probability |
Select the risk probability of the app:
|
|
Priority |
Select the priority of the app:
|
|
Severity |
Select the severity of the app:
|
|
Resolution |
Select the resolution of the app:
|
Deletes specified app.
|
Connection |
|
|
App ID |
Select the App ID you want to delete. |
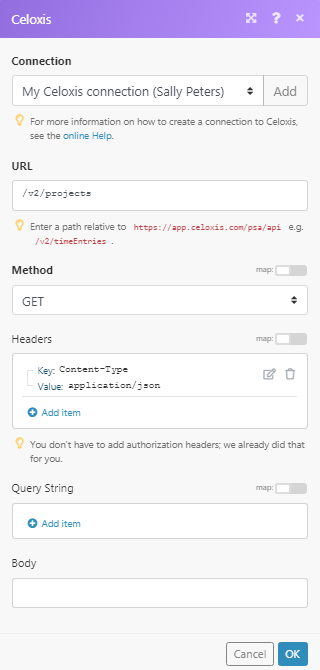
Performs an arbitrary authorized API call.
|
Connection |
|
|
URL |
Enter a path relative to For the list of available endpoints, refer to the Celoxis API Documentation. |
|
Method |
Select the HTTP method you want to use: GET to retrieve information for an entry. POST to create a new entry. PUT to update/replace an existing entry. PATCH to make a partial entry update. DELETE to delete an entry. |
|
Headers |
Enter the desired request headers. You don’t have to add authorization headers; we already did that for you. |
|
Query String |
Enter the request query string. |
|
Body |
Enter the body content for your API call. |
The following API call returns all the projects from your Celoxis account:
URL:
/v2/projects
Method:
GET
You can get the task ID, Project ID, user ID, Time Entry ID, App ID details from their respective list modules.

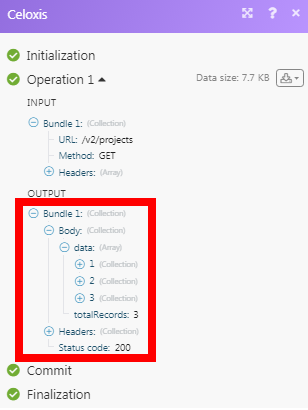
Matches of the search can be found in the module’s Output under BundleA bundle is a chunk of data and the basic unit for use with modules. A bundle consists of items, similar to how a bag may contain separate, individual items. More > Body > data.
In our example, 3 projects were returned:

