Version Legacy
![[Note]](https://bs-docs2.boost.space/wp-content/themes/bsdocs/docs-parser/HTML/css/image/note.png) |
Note |
|---|---|
|
This is the documentation for the legacy WordPress app. Here is the documentation for the new WordPress app. |
The WordPress modulesThe module is an application or tool within the Boost.space system. The entire system is built on this concept of modularity. (module - Contacts) More allow you to monitor, publish, update, delete, or search posts, pages, comments, media, usersCan use the system on a limited basis based on the rights assigned by the admin. More, and tags on your WordPress site.
Prerequisites
-
WordPress installed on your server
-
A Basic Authentication for JSON plugin installed in your WordPress
-
Modified
.htaccessorweb.configfile (optional) -
Custom FieldsA feature in Boost.space that allows you to define and manage data within each module according to your specific needs. More for REST API plugin (optional, for working with custom fields)
In order to use Wordpress with Boost.spaceCentralization and synchronization platform, where you can organize and manage your data. More IntegratorPart of the Boost.space system, where you can create your connections and automate your processes. More, it is necessary to have the WordPress content management system installed on your server or webhosting. You can download WordPress at wordpress.org/download/ and install by following the instructions on wordpress.org/support/article/how-to-install-wordpress.
![[Note]](https://bs-docs2.boost.space/wp-content/themes/bsdocs/docs-parser/HTML/css/image/note.png) |
Note |
|---|---|
|
The moduleThe module is an application or tool within the Boost.space system. The entire system is built on this concept of modularity. (module - Contacts) More dialog fields that are displayed in bold (in the Boost.space Integrator scenarioA specific connection between applications in which data can be transferred. Two types of scenarios: active/inactive. More, not in this documentation article) are mandatory! |
To connect your WordPress account to Boost.space Integrator, the JSON Basic Auth plugin has to be installed in your WordPress installation.
-
Visit github.com/WP-API/Basic-Auth and download the JSON Basic Authentication plugin (direct link).
-
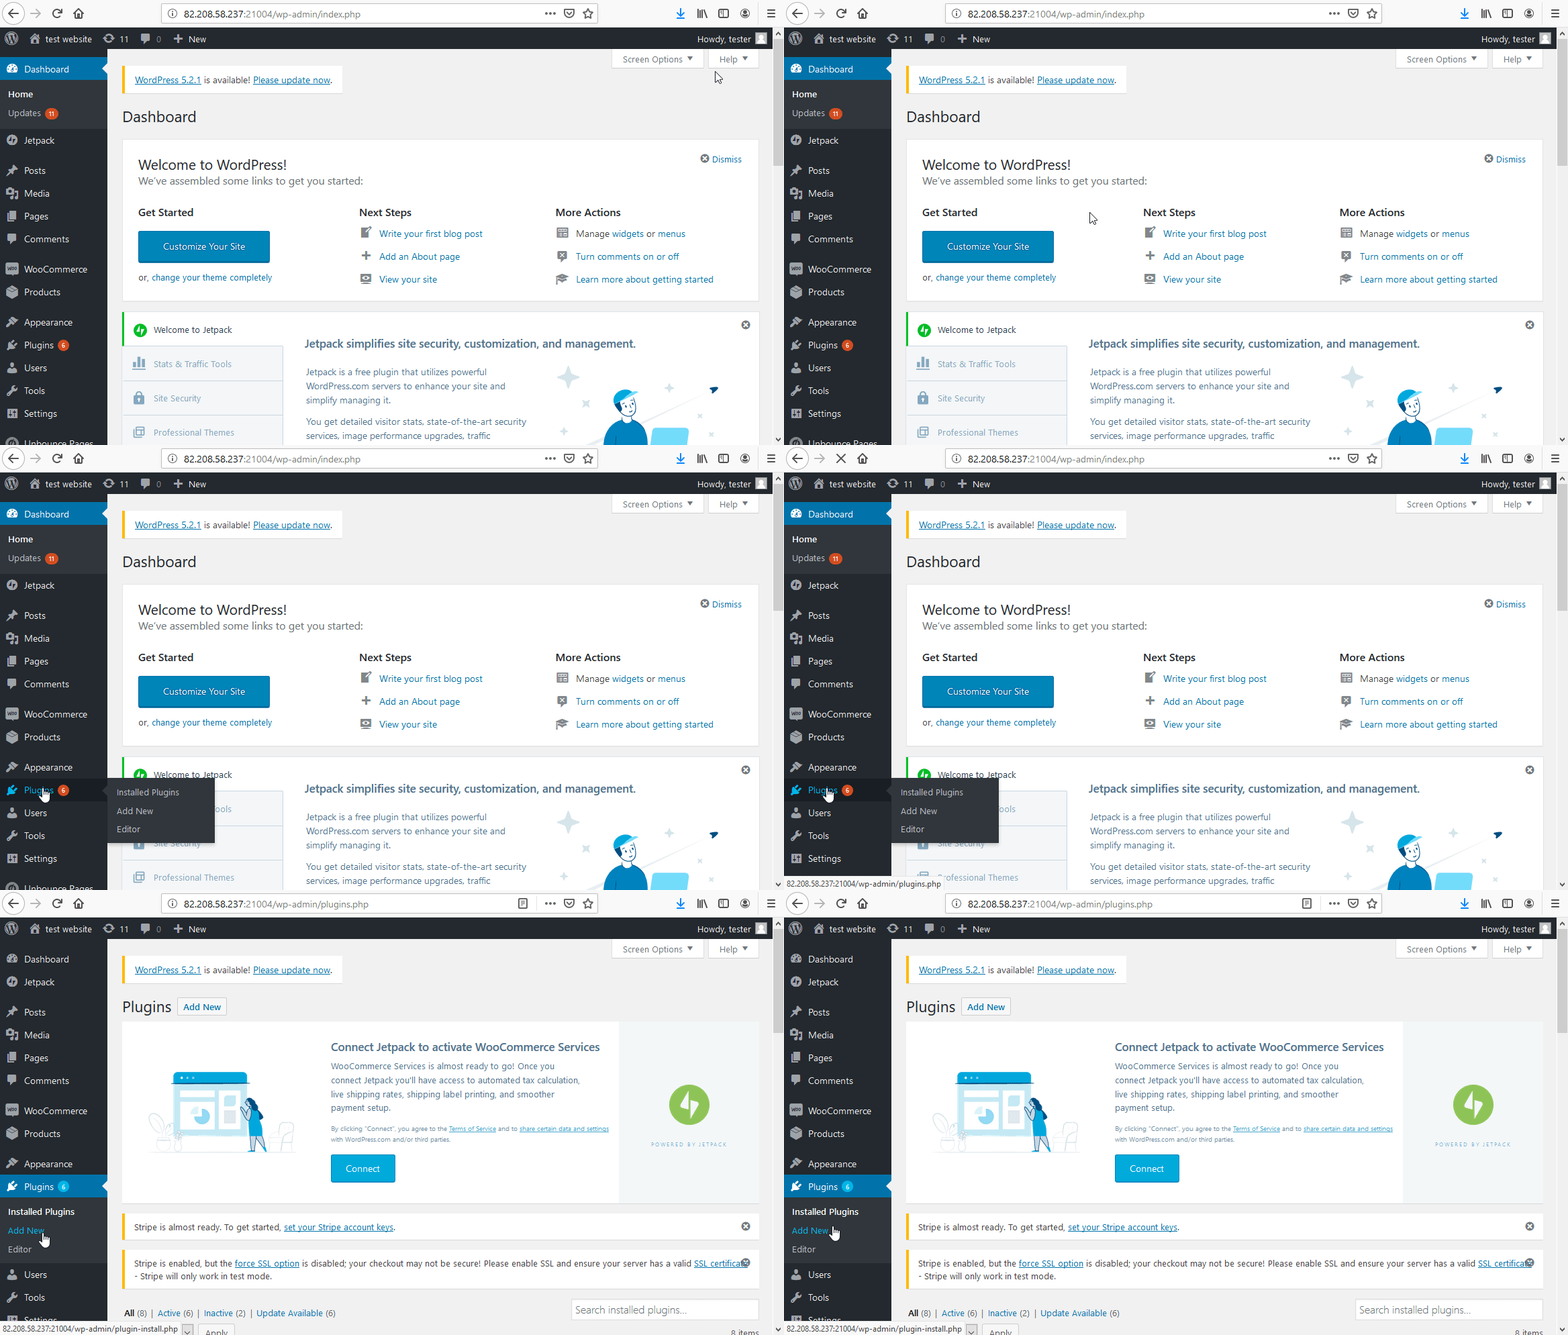
Log in to your WordPress administration and open Plugins.
-
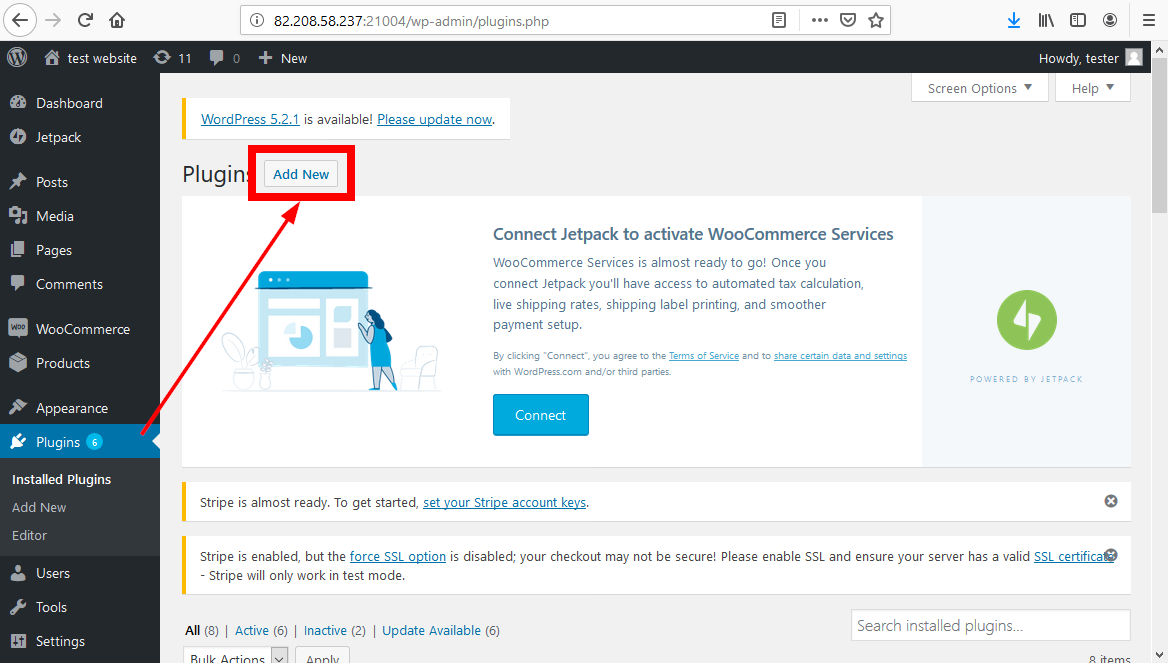
Click the Add New button.
-
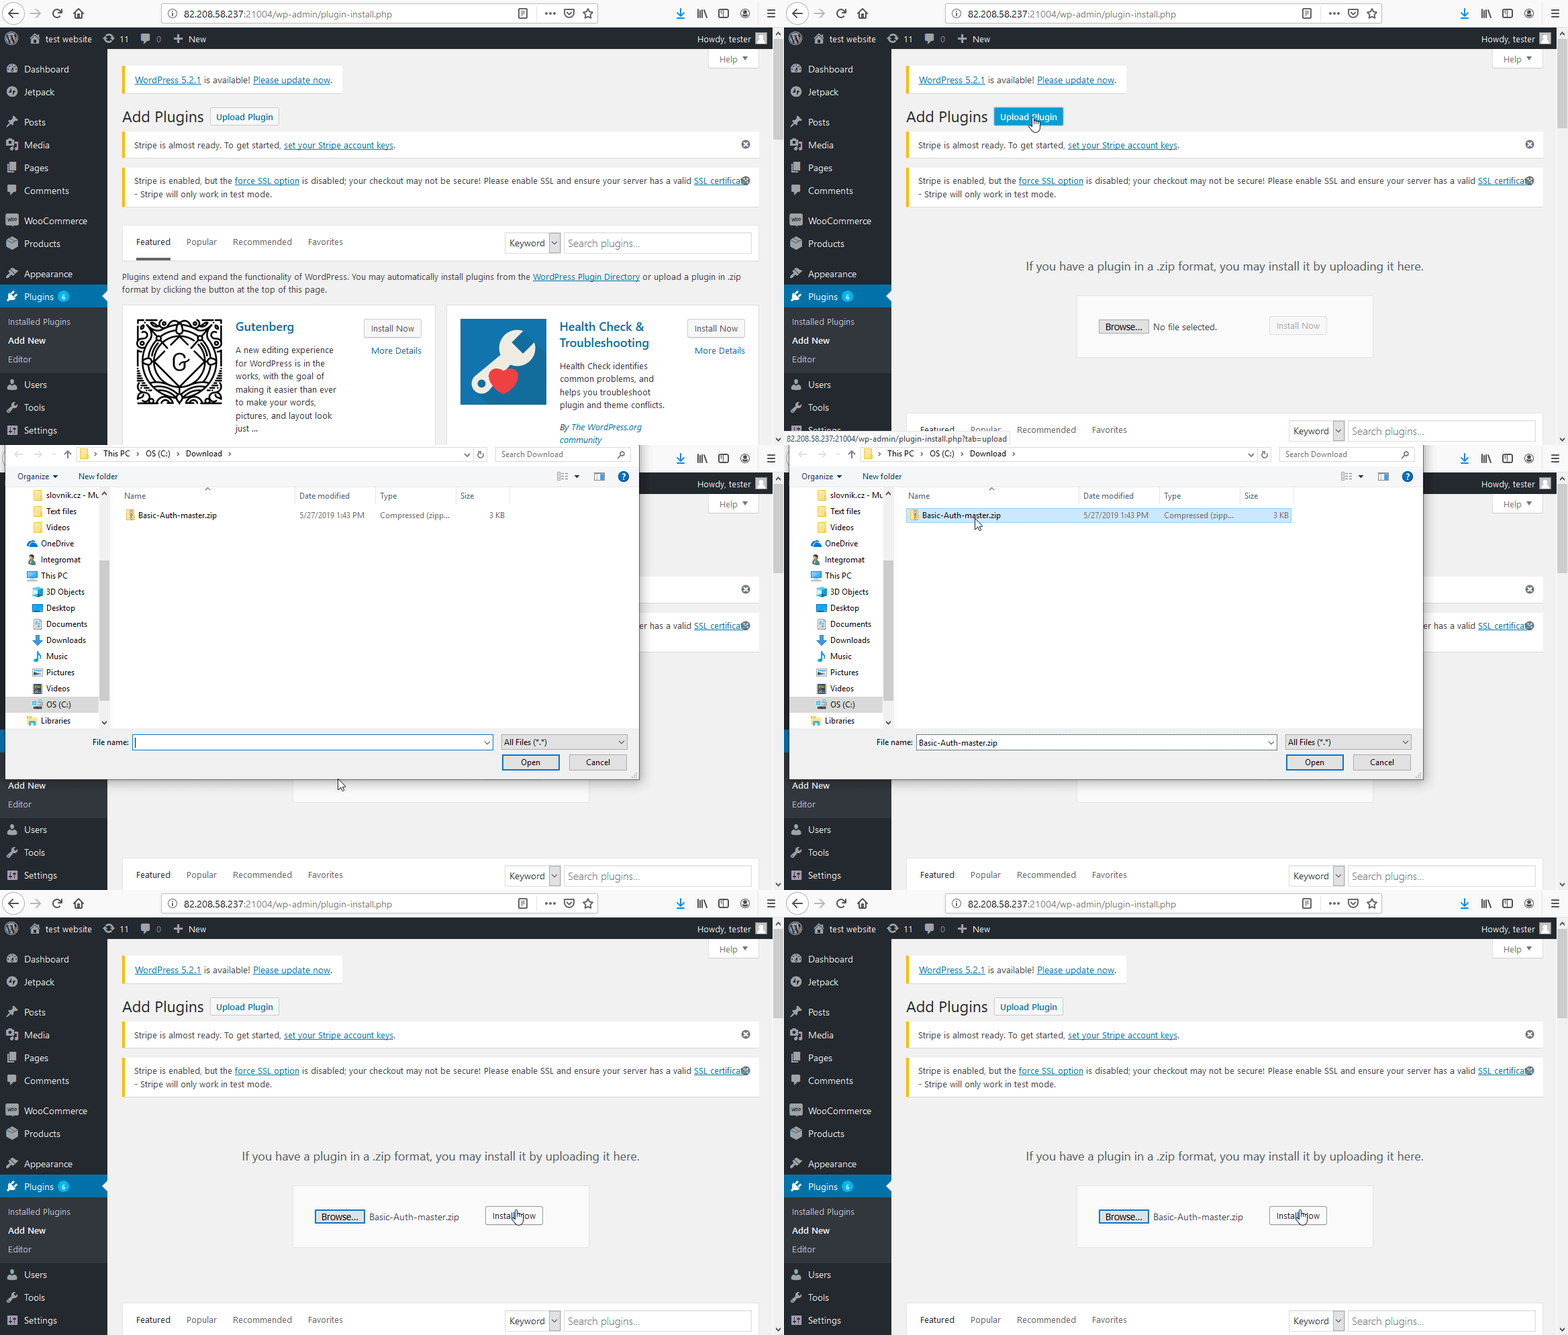
Click on the Upload plugin button, browse and select the plugin ZIP file.
-
Click on the Install now button to install the plugin.
-
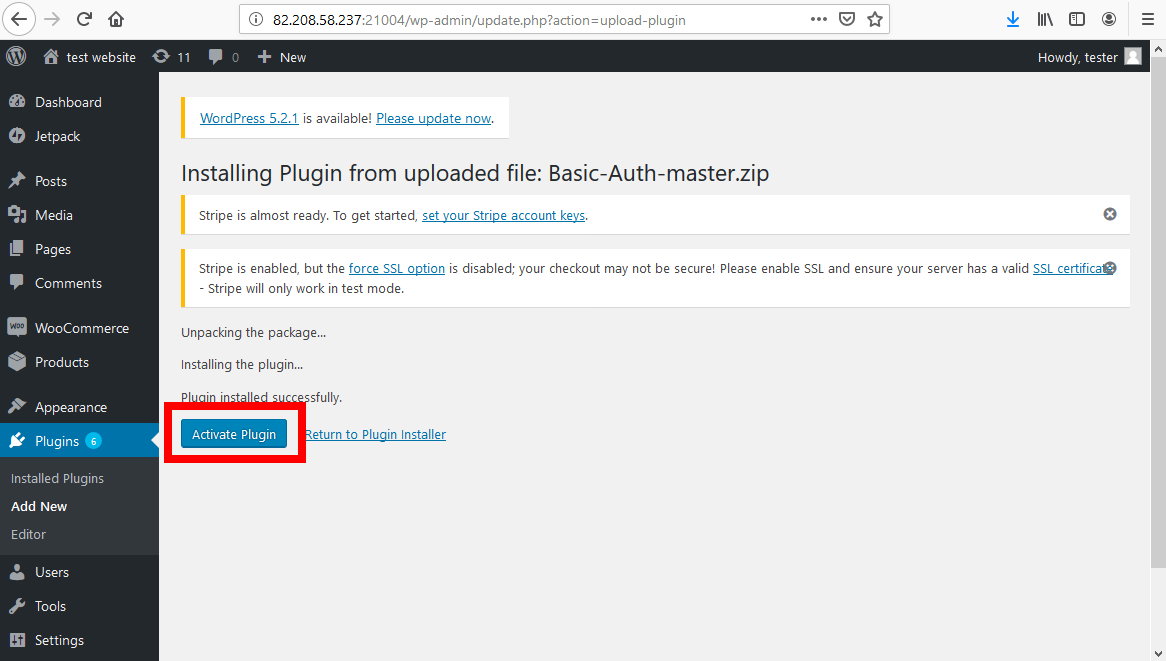
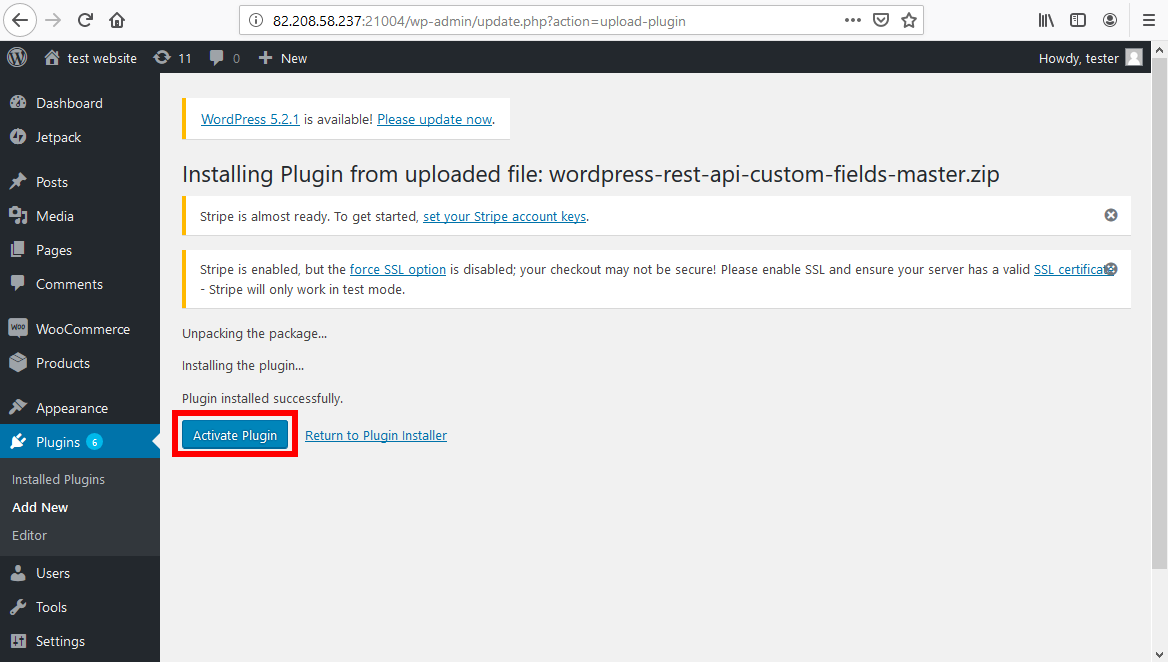
After the installation is finished, click on the Activate Plugin button.
-
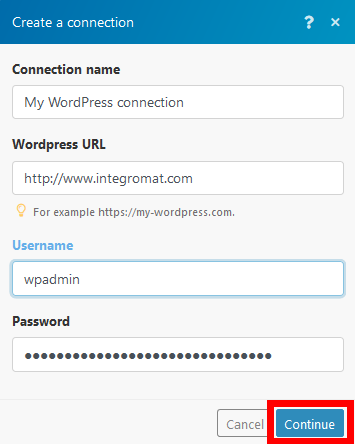
Go to Boost.space Integrator and open the Create a connectionUnique, active service acces point to a network. There are different types of connections (API key, Oauth…). More dialog of the desired WordPress module. Enter the URL of your WordPress site and your WordPress credentials to the respective fields.
-
Establish a connection by clicking the Continue button.
![[Warning]](https://bs-docs2.boost.space/wp-content/themes/bsdocs/docs-parser/HTML/css/image/warning.png) |
Warning |
|---|---|
|
If the connection is not established and an errorService is unavailable due to a failure, a service responds with unexpected data or the validation of input data fails. More is returned, you need to add the following code to your
If your WordPress is on the Windows server (IIS), please contact your administrator in order to allow the HTTP authorization header. |
|
Self-signed certificate |
Click the Extract button to open the upload dialog. Upload the certificate to use the TLS with your self-signed certificate. Boost.space Integrator does not retain or store any data (files, passwords) you provide. File and password are only used to extract the certificate. For more details about certificates and keys please refer to the Certificates and Keys article. |
-
Visit https://wordpress.org/plugins/rest-api-custom-fields/ and download the Custom Fields for REST API plugin (direct link).
-
Log in to your WordPress administration and open Plugins.
-
Click the Add New button.
-
Click on the Upload plugin button, browse and select the plugin ZIP file.
-
Click on the Install now button to install the plugin.
-
After the installation is finished, click on the Activate Plugin button.
-
Follow these instructions in order to add a custom fieldA feature in Boost.space that allows you to define and manage data within each module according to your specific needs. More to your post, page, media, or another object.
-
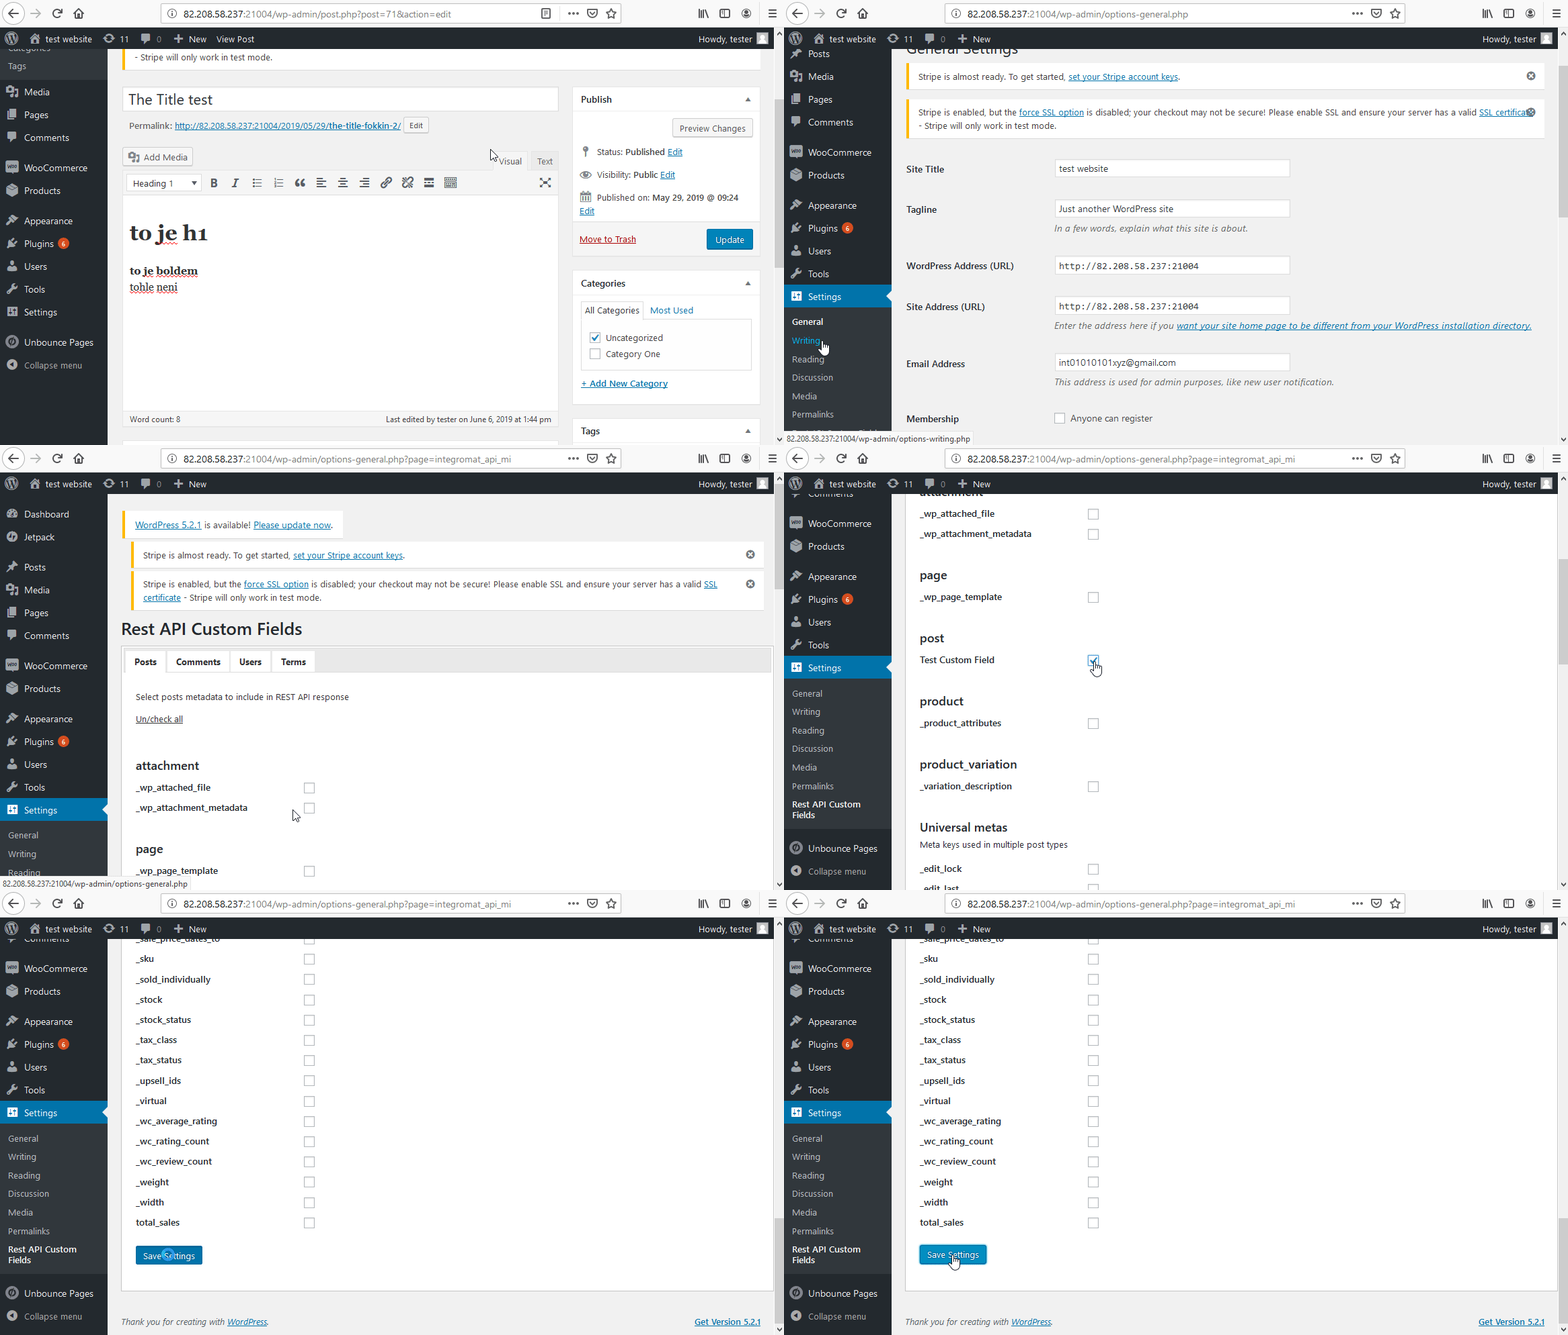
Go toSettings and open the Rest API Custom Fields dialog.
-
Select the desired object’s custom fields you want to include in the REST API response.
-
Click on the Save Settings button.
-
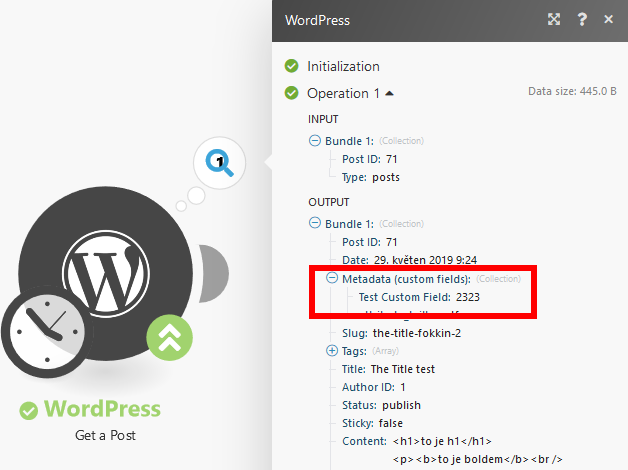
The selected custom fields are now available in the module response.
TriggersEvery scenario has a trigger, an event that starts your scenario. A scenario must have a trigger. There can only be one trigger for each scenario. When you create a new scenario, the first module you choose is your trigger for that scenario. Create a trigger by clicking on the empty module of a newly created scenario or moving the... when a new object (post, page, or media) is added.
|
Connection |
|
|
Type |
Select whether you want to retrieve newly added posts, pages, or media. |
|
Limit |
Set the maximum number of objects Boost.space Integrator will return during one cycleA cycle is the operation and commit/rollback phases of scenario execution. A scenario may have one or more cycles (one is the default).. |
Creates an object.
|
Connection |
|
|
Type |
Select whether you want to retrieve newly added posts, pages, media, or another object. |
|
Title |
Set the post’s title. |
|
Content |
Enter the content of the new post. HTML is allowed. |
|
Excerpt |
Enter the excerpt content for the post. |
|
Date |
Enter the date of the new post. List of supported date formats. |
|
Slug |
Enter the post’s slug (in order to have more SEO-friendly URL). |
|
StatusCreate statuses for each module separately to create an ideal environment for efficient and consistent work. More |
Set the status of the new post. If no status is selected the post’s status will be set to draft. |
|
Format |
Select one of the formats for the post. For more information about post formats refer to wordpress.org/support/article/post-formats. |
|
Password |
Set the password if you want the post password protected. |
|
Sticky |
Set whether or not the object should be treated as sticky. |
|
Categories |
Select categories that a new post should belong to. |
|
Tags |
Select tags for the new post. |
|
Author |
Set the author of the post. |
|
Featured media ID |
Enter the ID of the media. Retrieve the media by following these steps: 1. Open Media settings. 2. Change the mode to List view. 3.Hover the mouse over the image. 4. See the media ID in the status bar. 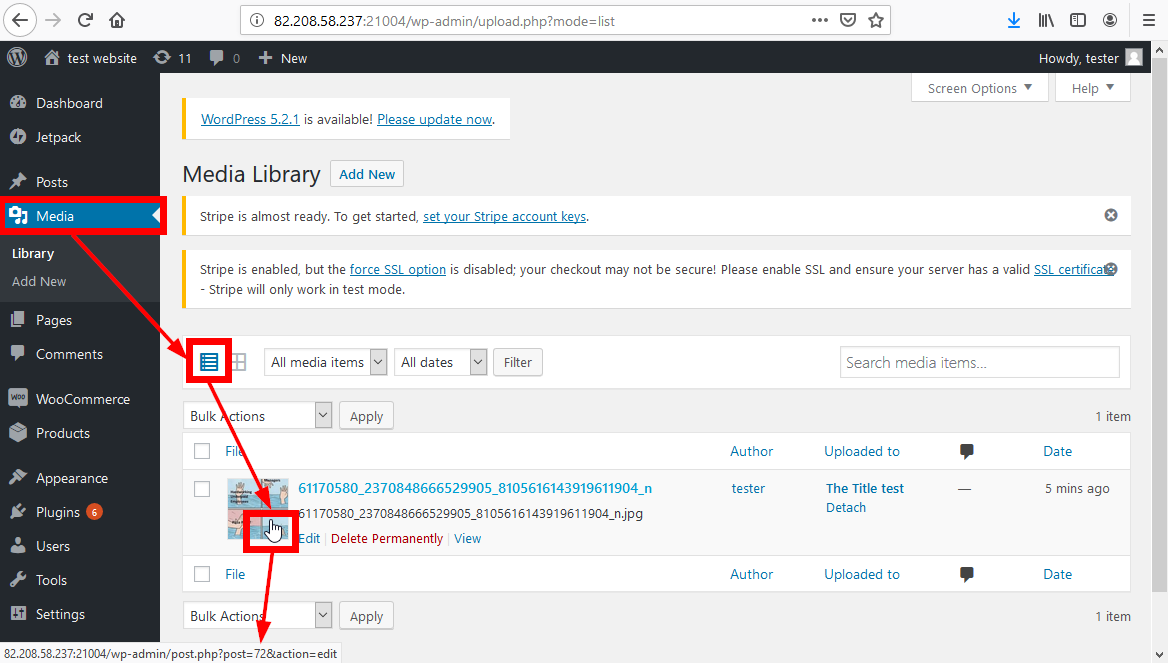 |
|
Comment status |
Set whether or not comments are open on the post. |
|
Ping status |
Set whether the post can be pinged. |
Allows you to modify the existing post.
|
Connection |
|
|
Post ID |
Enter (map) the ID of the post you want to update. |
Please find the descriptions of the fields in the section Create a Post above.
Deletes a specified WordPress object (post, page, media, product, …)
|
Connection |
|
|
Post ID |
Enter (map) the ID of the object you want to delete. |
Retrieves details of a post.
|
Connection |
|
|
Type |
Select the type of post you want to retrieve details about. |
|
Post ID |
Enter (map) the ID of the post you want to retrieve details about. |
Searches for a post and returns its details.
|
Connection |
|
|
Type |
Select the type of post you want to search. |
|
Search term |
Enter the search term. |
|
Limit |
Set the maximum number of results Boost.space Integrator will return during one cycle. |
Triggers when a new page is published.
|
Connection |
|
|
Limit |
Set the maximum number of pages Boost.space Integrator will return during one cycle. |
Creates a page.
|
Connection |
|
|
Title |
Set the page’s title. List of supported date formats. |
|
Content |
Enter the content of the new post. HTML is allowed. |
|
Date |
Enter the date of the new page. |
|
Slug |
Enter the page’s slug (in order to have a more SEO-friendly URL). |
|
Status |
Set the status of the new page. If no status is selected the page’s status will be set to draft. |
|
Password |
Set the password if you want the page password protected. |
|
Parent object ID |
Enter the ID of the parent object, if needed. |
|
Author |
Set the author of the new page. |
|
Featured media ID |
Enter the ID of the media. Retrieve the media by following these steps: 1. Open Media settings. 2. Change mode to List view. 3.Hover the mouse over the image. 4. See the media ID in the status bar.  |
|
Comment status |
Set whether or not comments are open on the page. |
|
Ping status |
Set whether the page can be pinged. |
Allows you to modify the existing page.
|
Connection |
|
|
Page ID |
Enter (map) the ID of the page you want to update. |
Please find the descriptions of the fields in the section, Create a Page above.
Deletes a specified page.
|
Connection |
|
|
Page ID |
Enter (map) the ID of the page you want to delete. |
Retrieves the details of a page.
|
Connection |
|
|
Page ID |
Enter (map) the ID of the page you want to retrieve details about. |
Searches for a page and returns its details.
|
Connection |
|
|
Search term |
Enter the search term. |
|
Limit |
Set the maximum number of pages Boost.space Integrator will return during one cycle. |
Triggers when a new page is created.
|
Connection |
|
|
Limit |
Set the maximum number of categories Boost.space Integrator will return during one cycle. |
Adds a new category.
|
Connection |
||||
|
Name |
Enter the name of the category and how it appears on your site. |
|||
|
Description |
Enter the text for the description.
|
|||
|
Slug |
Enter the slug of the category you want to create.
|
|||
|
Parent category ID |
Enter the ID of the parent category in the case where you want to create a child category. |
Modifies an existing category.
|
Connection |
|
|
Category ID |
Enter (map) the ID of the category you want to update. |
Please find the descriptions of the fields in the section Create a Category above.
Deletes a specified category.
|
Connection |
|
|
Category ID |
Enter (map) the ID of the category you want to delete. |
Retrieves the category details.
|
Connection |
|
|
Category ID |
Enter (map) the ID of the category you want to retrieve information about. |
|
Connection |
|
|
Search term |
Enter the search term. |
|
Limit |
Set the maximum number of categories Boost.space Integrator will return during one cycle. |
Triggers when a new comment is posted.
|
Connection |
|
|
Limit |
Set the maximum number of comments Boost.space Integrator will return during one cycle. |
Creates a comment for a post.
|
Connection |
|
|
Post ID |
Enter (map) the ID of the post you want to create a comment for. |
|
Content |
Enter the text content of the comment. |
|
Status |
Set the status of the new comment. |
|
Author name |
Enter a display name for the comment author. |
|
Author ID |
Enter the ID of the userCan use the system on a limited basis based on the rights assigned by the admin. More if the author of the comment is the user. |
|
Author email |
Enter the email address for the comment author. |
|
Author IP |
Set the comment author’s IP address. |
|
Author URL |
Enter the URL for the author of the comment. |
|
Author User-Agent |
Enter the author User-Agent. E.g. Mozilla/5.0 (Windows NT 10.0; Win64; x64; rv:67.0) Gecko/20100101 Firefox/67.0 |
|
Parent object ID |
Enter the ID of the parent object. |
Allows you to modify an existing comment.
|
Connection |
|
|
Comment ID |
Enter (map) the ID of the comment you want to update. |
Please find the descriptions of the fields in the section Create a Comment above.
Deletes a specified comment.
|
Connection |
|
|
Comment ID |
Enter (map) the ID of the comment you want to delete. |
Retrieves details of a specified comment.
|
Connection |
|
|
Comment ID |
Enter (map) the ID of the comment you want to retrieve information about. |
Searches for the comment and returns its details.
|
Connection |
|
|
Search term |
Enter the search term. |
|
Post ID |
Enter the ID of the post to limit the result set to comments assigned to specific post IDs. |
|
Password |
Enter the password for the post if it is password protected. |
|
Status |
Select status to limit results to comments assigned to a specific status. |
|
Limit |
Set the maximum number of comments Boost.space Integrator will return during one cycle. |
Triggers when new media is added to the library.
|
Connection |
|
|
Limit |
Set the maximum number of media itemsItems are rows in records (order/request/invoice/purchase...) Boost.space Integrator will return during one cycle. |
Adds new media to the media library.
|
Connection |
|
|
Source file |
Map the file from the previous module (e.g.Dropbox > Get a File), or enter the file name and file data to the respective fields. |
|
Title |
Enter the media title. |
|
Slug |
Set the slug for the new media itemItems are rows in records (order/request/invoice/purchase...). |
|
Description |
Enter the description of the media. |
|
Post ID |
Enter the ID of the associated post of the media attachment. |
|
Author |
Select the author of the media item. |
|
Date |
Enter the date when the media item is published. List of supported date formats. |
|
Alternative text |
Enter alt text to display when media is not displayed. |
|
Caption |
Enter the attachment caption. |
|
Status |
Select the status of the media item. |
|
Ping status |
Select whether the media item can be pinged. |
|
Comment status |
Set whether or not comments are open for the media item. |
Allows you to modify an existing media item.
|
Connection |
|
|
Comment ID |
Enter (map) the ID of the media item you want to update. |
Please find the descriptions of the fields in the section Create a Media Item above.
Deletes specified media.
|
Connection |
|
|
Comment ID |
Enter (map) the ID of the media item you want to delete. |
Retrieves the details for a specified media item.
|
Connection |
|
|
Comment ID |
Enter (map) the ID of the media item you want to retrieve information about. |
|
Connection |
|
|
Search term |
Enter the search term. |
|
Limit |
Set the maximum number of media items Boost.space Integrator will return during one cycle. |
Triggers when a new user is added.
|
Connection |
|
|
Limit |
Set the maximum number of users Boost.space Integrator will return during one cycle. |
Adds a new user.
|
Connection |
|
|
Email address |
Enter the email address of the new user. |
|
Username |
Enter the login user name for the user you want to add. |
|
Password |
Enter the password for the user. |
|
Display name |
Enter the display name for the user. |
|
First name |
Enter the user’s first name. |
|
Last name |
Enter the user’s last name. |
|
Description |
Enter the description for the user. |
|
Locale |
Set the user’s locale. E.g. |
|
Nickname |
Enter the user’s nickname. |
|
URL |
Enter the user’s website. |
|
Slug |
Enter the alphanumeric identifier for the user. |
|
Roles |
Select the roles you want to assign the user to. |
Allows you to modify existing user information.
|
Connection |
|
|
User ID |
Enter (map) the ID of the user you want to update. |
Please find the descriptions of the fields in the section, Create a User above.
Deletes a specified user.
|
Connection |
|
|
User ID |
Enter (map) the ID of the user you want to delete. |
|
Reassign posts and links to user ID |
Enter the user ID of another user to reassign the deleted user’s posts and link it to this user ID. |
Retrieves specified user details.
|
Connection |
Establish a connection to your WordPress. |
|
User ID |
Enter (map) the ID of the user you want to retrieve information about. |
Searches for the user by the search term.
|
Connection |
|
|
Search term |
Enter the search term. |
|
Limit |
Set the maximum number of users Boost.space Integrator will return during one cycle. |
Triggers when a new tag is added.
|
Connection |
|
|
Limit |
Set the maximum number of tags Boost.space Integrator will return during one cycle. |
Adds a new tag.
|
Connection |
|
|
Name |
Enter the name of the tag how it appears on your site. |
|
Description |
Enter the tag description. The description is not prominent by default; however, some themes may show it. |
|
Slug |
Enter the slug for the tag. The slug is the URL-friendly version of the name. It is usually all lowercase and contains only letters, numbers, and hyphens. |
Allows you to modify an existing tag.
|
Connection |
|
|
Tag ID |
Enter (map) the ID of the tag you want to update. |
Please find the descriptions of the fields in the section, Create a Tag above.
Deletes a specified tag.
|
Connection |
|
|
Tag ID |
Enter (map) the ID of the tag you want to delete. |
Retrieves specified tag details.
|
Connection |
|
|
Tag ID |
Enter (map) the ID of the tag you want to retrieve information about. |
|
Connection |
|
|
Search term |
Enter the search term. |
|
Limit |
Set the maximum number of tags Boost.space Integrator will return during one cycle. |
Returns the details of the authorized user.
|
Connection |
Allows you to perform a custom API call.
|
Connection |
||||
|
URL |
Enter a path relative to
|
|||
|
Method |
Select the HTTP method you want to use: GET to retrieve information for an entry. POST to create a new entry. PUT to update/replace an existing entry. PATCH to make a partial entry update. DELETE to delete an entry. |
|||
|
Headers |
Enter the desired request headers. You don’t have to add authorization headers; we already did that for you. |
|||
|
Query String |
Enter the request query string. |
|||
|
Body |
Enter the body content for your API call. |
The following API call returns all pages:
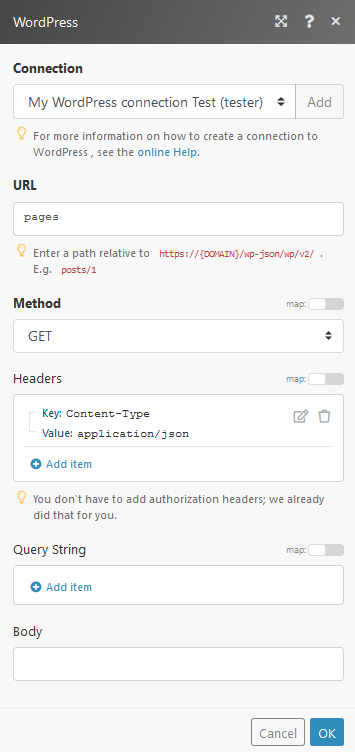
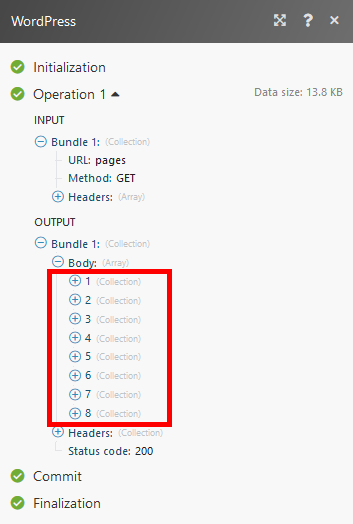
Matches of the search can be found in the module Output under BundleA bundle is a chunk of data and the basic unit for use with modules. A bundle consists of items, similar to how a bag may contain separate, individual items. More > Body.
In our example, 8 pages were returned:

